- Overview
- Lazada Integration for Magento 2 Extension Installation
- Lazada Configuration Settings
- Manage Apps
- View Lazada Category Details
- View Lazada Category Attributes Details
- Manage Lazada Profiles
- Lazada Product Listing
- Lazada Feeds
- Manage Lazada Orders
- View Failed Lazada Orders
- Lazada Cron Details
- Knowledge base
- Help and Support

3.Lazada Configuration Settings ↑ Back to Top
Once the extension is successfully installed in the Magento 2 store, the LAZADA INTEGRATION menu appears on the left navigation bar of the Magento 2 Admin panel.

Once the seller account is created and is approved by Lazada, then the Magento 2 store owners can use the Lazada API credentials provided by Lazada while setting up the Lazada Configuration settings in the Magento 2 Admin panel.
To set up the configuration settings in the Magento 2 Admin panel
- Go to the Magento 2 Admin panel.
- On the left navigation bar, click the LAZADA INTEGRATION menu.
The menu appears as shown in the following figure:

- Click Configuration.
The Configuration page appears as shown in the following figure:

- In the right panel, click the Lazada Developer Settings tab.
The Lazada Seller/Developer Settings tab is expanded and the relevant fields appear as shown in the following figure:

- Under Lazada Developer Settings, do the following steps:
- In the Debug, select Yes for enabling the debugging. This setting is for the developer end if you want the debug logs to be created for the developer.
- Click the Save Config button to save the entered values.
- Scroll down to the Lazada Product Settings tab, and then click the tab.
The Lazada Product Settings tab is expanded and the expanded section appears as shown in the following figure:

- Under Lazada Product Settings, do the following steps:
- Click the Lazada Price Settings tab.
The Lazada Price Settings tab is expanded and the section appears as shown in the following figure:

- Under Lazada Price Settings, do the following step:
- In the Product Price list, select one of the following options:
- Increase by Fixed Price: If selected, then the Modify by Fix Price field appears.
- Increase by Fixed Percentage: If selected, then the Modify by Percentage Price field appears.
Enter the numeric value to increase the price of the Lazada, product price by the entered value % of Magento 2 price.
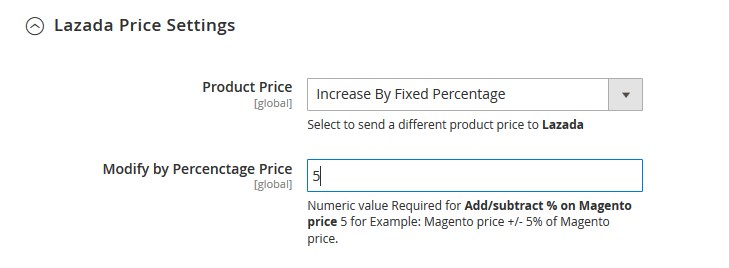
For Example,
Magento 2 price + 5% of Magento 2 price.
Magento 2 Price = 100
Select Increase By Fixed Percentageoption
Modify by Percentage Price = 5
100 + 5% of 100 = 100 + 5 = 105
Thus, Lazada Product Price = 105 - Decrease by Fixed Price: If selected, then the Modify by Fix Price field appears.
- Decrease by Fixed Percentage: If selected, then the Modify by Percentage Price field appears.
Enter the numeric value to decrease the price of the Lazada product price by the entered value % of Magento 2 price
For Example,
Magento 2 price – 5% of Magento 2 price.
Magento 2 Price = 100
Select Decrease By Fixed Percentage option
Modify by Fix Price = 5
100 – 5% of 100 = 100 – 5 = 95
Thus, Lazada Product Price = 95
- In Include Taxes, select Yes if you want to add the tax to the product price send to Lazada. But if you want the tax to be excluded from the product price the select option No.
- In the Product Price list, select one of the following options:
- Click the Lazada Inventory Settings tab.
The Lazada Inventory Settings tab is expanded and the section appears as shown in the following figure:

- Under the Lazada Inventory Settings tab, do the following steps:
- In the Set Inventory on Basis of Threshold list, select the Enable option if required to set the inventory based on a threshold.

The section appears as shown in the following figure:
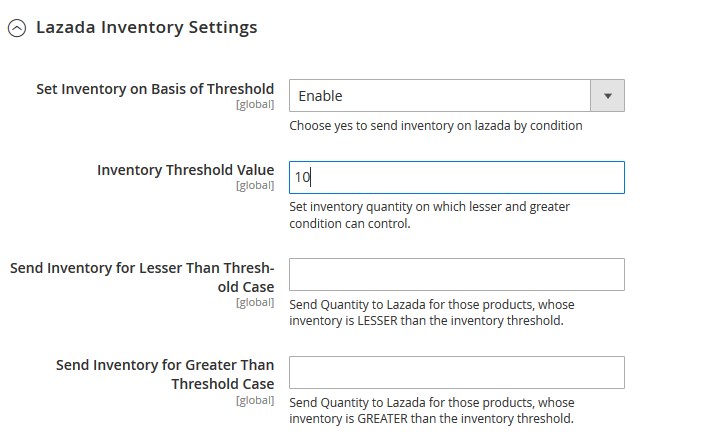
- In the Inventory Threshold Value box, enter the value that you want to set as the threshold. Based on this value the inventory greater and lesser conditions will be conducted.
- In the Send Inventory for Lesser Than Threshold Case box, enter the value to send quantity to Lazada for those products, whose inventory is lesser than the inventory threshold value you have set.
- In the Send Inventory for Greater Than Threshold Case box, enter the value to send quantity to Lazada for those products, whose inventory is greater than the inventory threshold value you have set.
- In the Set Inventory on Basis of Threshold list, select the Enable option if required to set the inventory based on a threshold.
- Click the Lazada Price Settings tab.
- Click the Save Config button to save the entered values.
- Scroll down to the Lazada Order Settings tab, and then click the tab.
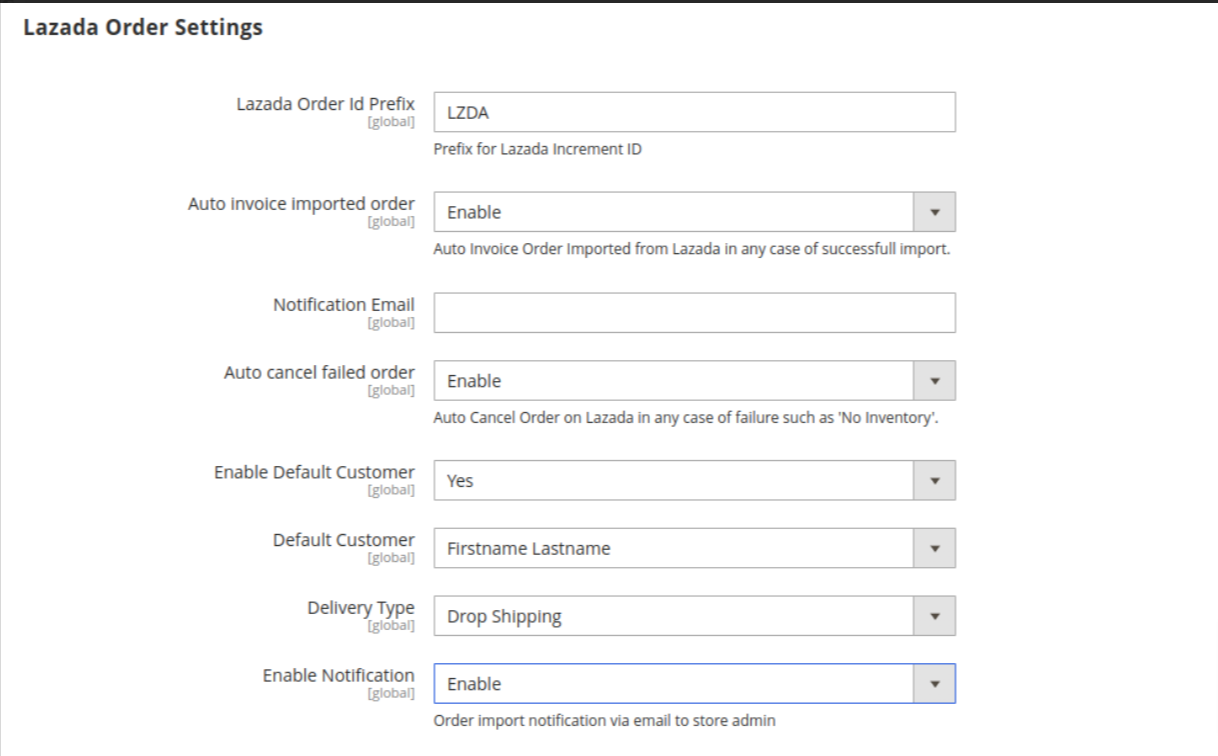
The tab is expanded and the section appears as shown in the following figure:
- Under Lazada Order Settings, do the following steps:
- In the Lazada Order Id Prefix box, enter an Id prefix according to you which will be used with the order number.
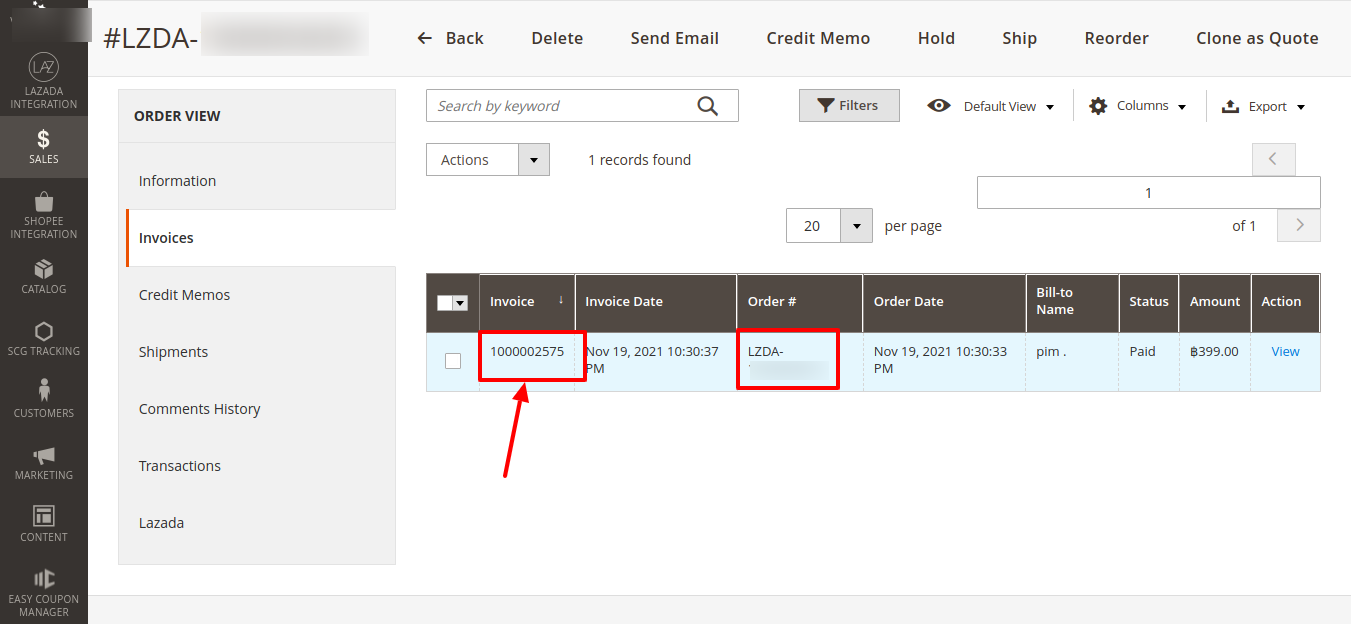
For Example, you can use the Order Id prefix as: LZDA-1000003659. Here, LZDA is the Prefix entered by you and 1000003659 is the order number. You can also refer to the image below: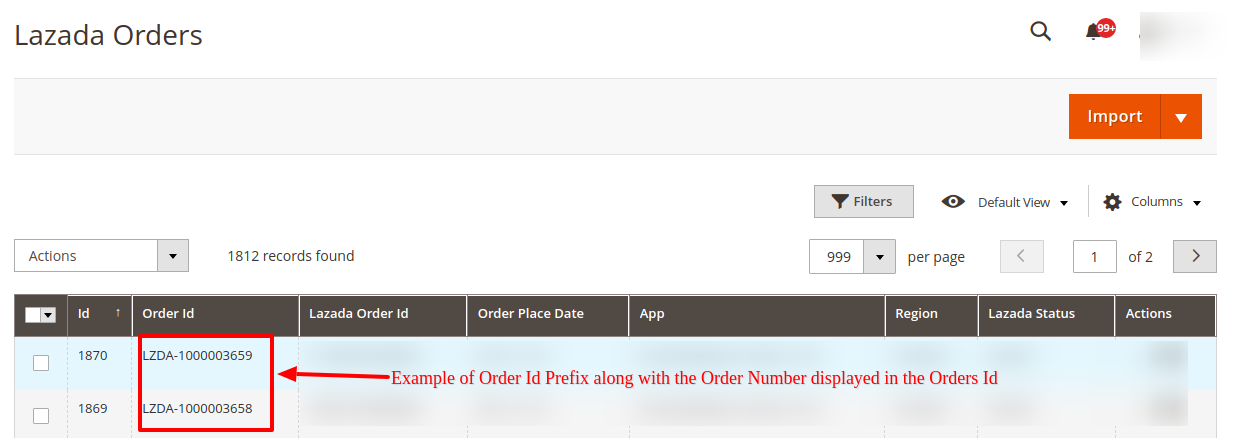
- In Auto Invoice Imported Order, select Enable if want the automatic invoice for orders imported from Lazada. If the option is selected as Disable then the invoice won’t be generated for the orders.
In the below image you can see the invoice of an order-
- In Auto Cancel Failed Order, select Enable if the order is failed in Magento and not getting imported due to any error then if you wish to cancel the same order on Lazada automatically.
- In the Enable Default Customer list, select the Yes option to enable the default customer. After enabling this all the orders will be created for this default customer only. If No is selected then whatever data is fetched through the orders then based on that data the customer will be created for which the order will be placed.
The field appears as shown in the following figure:

- In the Default Customer list, select the customer name that you want to set as default for placing the orders.
- In Delivery Type, select the type of delivery of the product. When the order is shipped then at that time in shipment you need to enter the delivery type based on the type of order. You can also get this notion of delivery type in the Order data.
- In the Enable Notification box, you can select Enable option if you wish to receive the notifications on the email of the imported orders.
- In Notification Email, enter the email id on which the imported orders notification will be sent.
- In the Lazada Order Id Prefix box, enter an Id prefix according to you which will be used with the order number.
- Click the Save Config button to save the entered values.
- Scroll down to the Lazada Cron Settings tab, and then click the tab.
The tab is expanded and the section appears as shown in the following figure:

- Under Lazada Cron Settings, do the following steps:
- In the Order Cron, select Enable if you want to fetch the orders. Order Crons are used to fetch waiting for shipment orders at approx 10 minutes. based on the combination of three order settings- Order Status, Fetch Shipped Order, and Fetch Orders No. Of. Days the orders are automatically fetched if this cron is enabled.
- In Order Status Sync Cron, select Enable to synchronize the Lazada order and its status automatically at regular intervals of time. This cron runs every 2 hours to sync.
- In the Inventory |Price Cron list, select Enable to enable the Inventory & Price Synchronisation automatically at regular intervals of time. This cron runs every 1 hour to sync.

- Click the Save Config button to save the entered values.
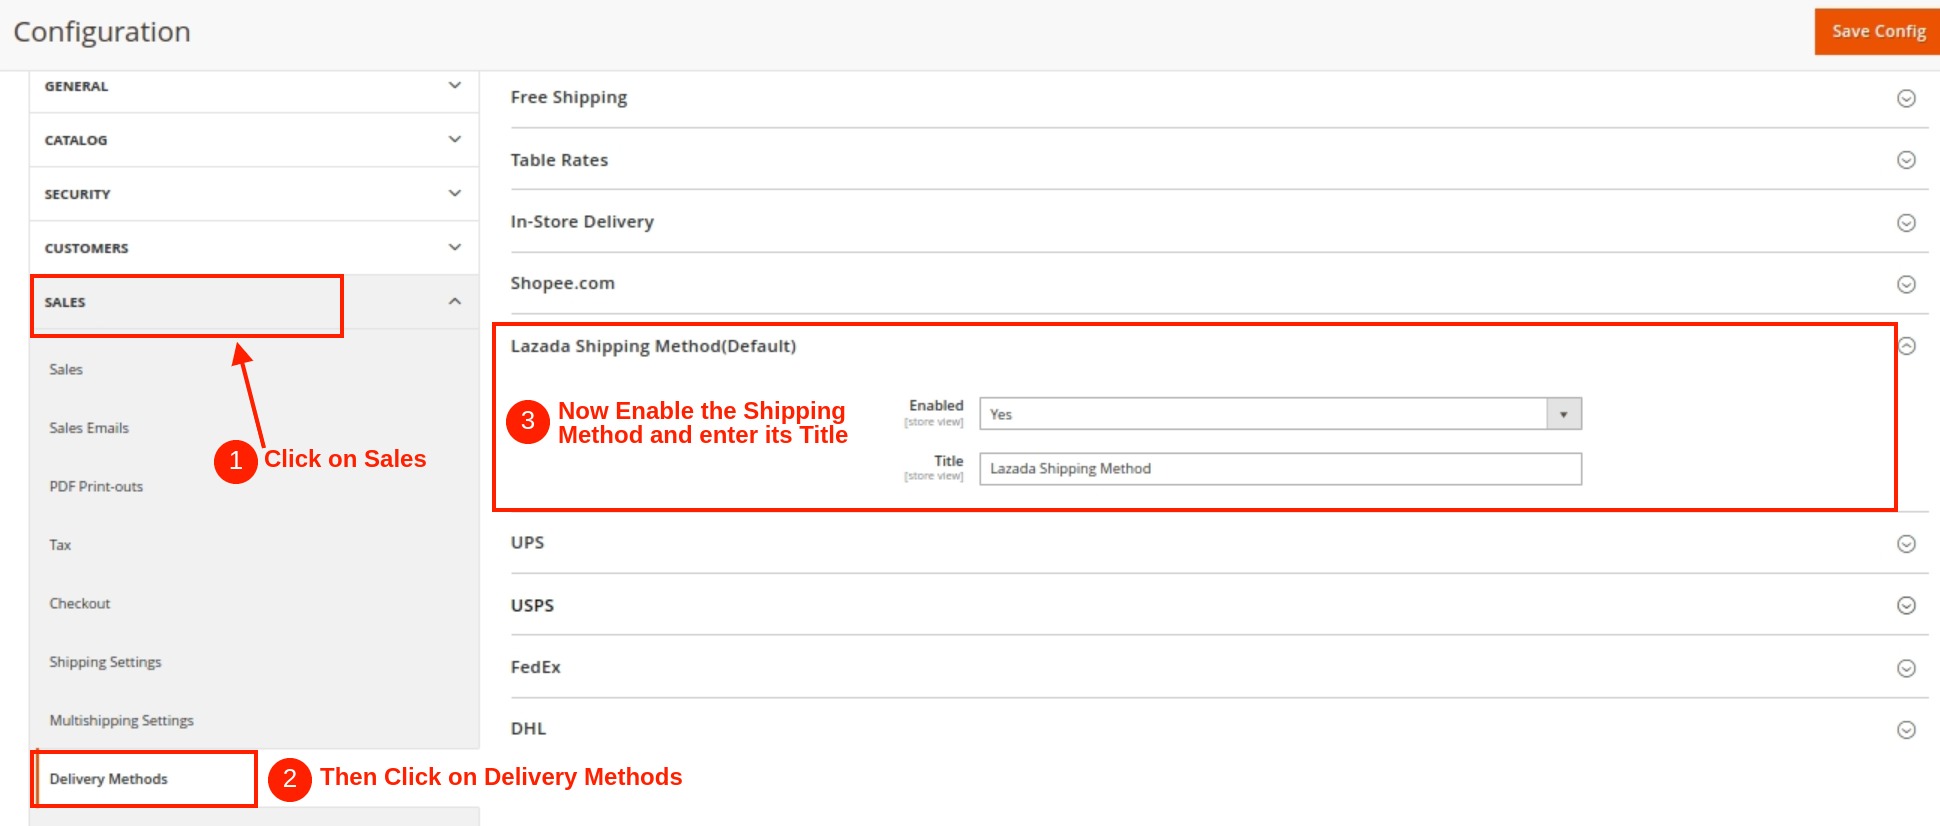
- Apart from this you also need to configure two more settings(Shipping and Delivery Method) for your Lazada store. Follow the steps below:
- Go to the Sales tab in the Magento panel. Then click on Delivery Methods.
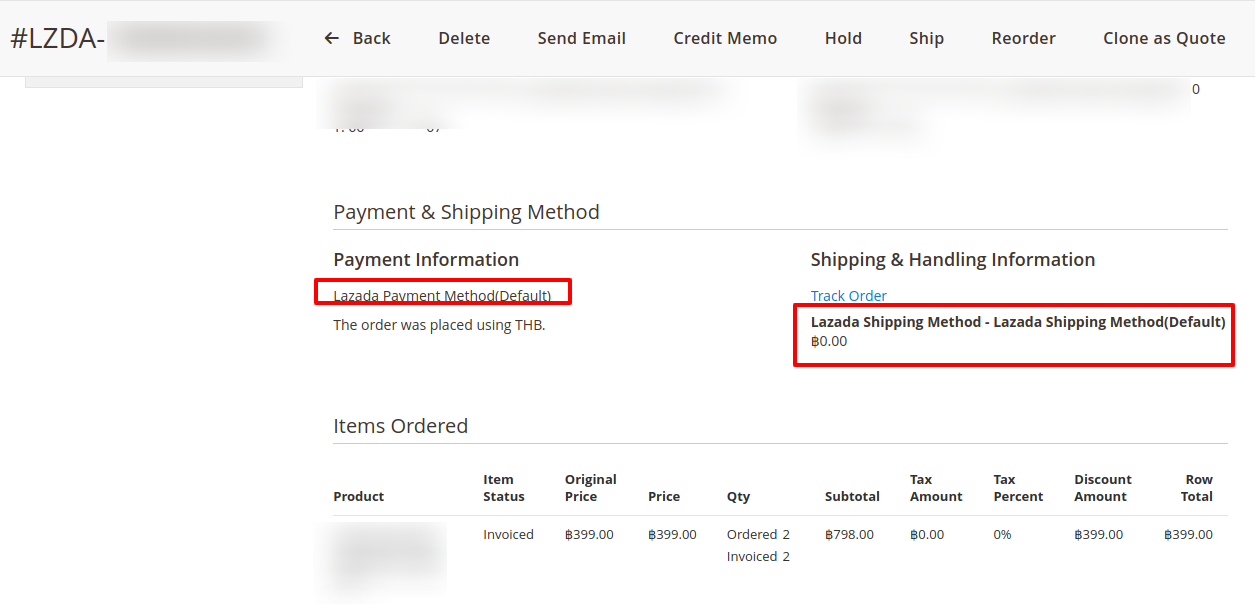
- The settings you change here will be displayed in the Shipment settings as shown below:
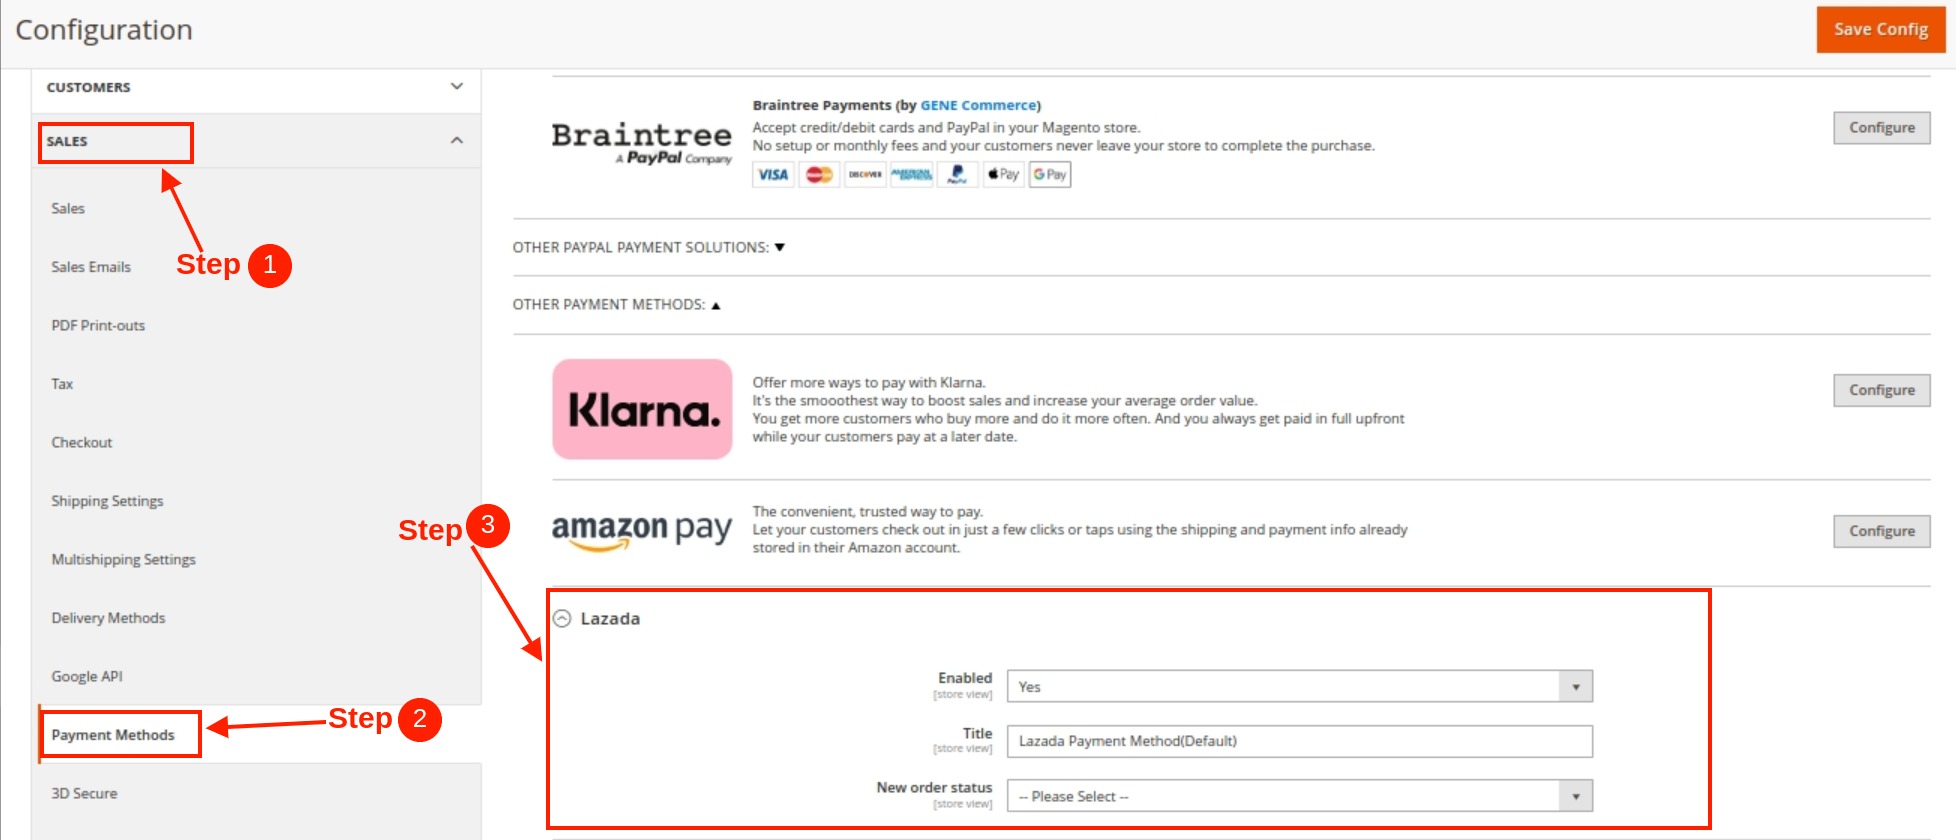
- To Enable and set the Payment method, go to Sales->Payment Method->Click on the Lazada tab. Under the Lazada tab enable the payment method for Lazada and set its title to be displayed as shown in the figure below:
- Go to the Sales tab in the Magento panel. Then click on Delivery Methods.
×


