
1.Overview
- Product Sync: Sync the products along with their details such as Name, Image, Price, SKU and Description to HubSpot from your eCommerce store.
- Customer Sync: Sync all the customer details from your eCommerce store to HubSpot. The customer details that you can sync are – Email, First Name, Last Name, Company Name, SKU, Telephone Number, Street, City, Region, Country, Post Code, and Contact Stage.
- Deal Sync: Get all the orders from your eCommerce store synced with HubSpot. The order details that can be synced using this Magento HubSpot Integration are – Deal Stage, Deal Name, Amount, Pipeline, Abandoned Cart URL, Discount Amount, Increment ID, Shipment IDs, Tax Amount, and Contact IDs.
- Line Item Sync: Sync the Line Items to HubSpot and know in detail about your high-demand products. The Magento HubSpot Integration lets you sync the Product ID, Deal ID, Discount Amount, Quantity, Price, Name, and SKU.
- Email: With this Magento HubSpot Integration, you may create the email pattern with personalized content from the HubSpot panel itself and make your presence more prominent amongst your target clientèle.
- Marketing Automation: Forget the hassles of email marketing. Operate and experience the automated email marketing from the HubSpot panel with the Magento 2 HubSpot Integration, and rely on self-operating email marketing.
- Analytics: Understand your customers’ behavior and purchasing patterns by understanding the analytics from the HubSpot panel. Get the comprehensive details with HubSpot Magento Integration, have deeper insights about your marketplace analytics, and turn it into your forte.
- Abandoned Cart Recovery: Magento HubSpot Integration enables you to send emails to the customers from your HubSpot panel in the case of an Abandoned Shopping Cart, to procure the recovery. After a specific time period, communicate with the shoppers through an email to persuade them to take the desired action.
- Welcome Email: On your customers’ first purchase, send the welcome email to them within a specific time period. From your HubSpot panel, initiate the email communication with shoppers once they have completed the buying process, within a definite time period.
- Customer Re-engagement: With the HubSpot Magento Integration, re-engage with your customers and draw their attention towards your brand once again. This Magento and HubSpot Integration authorizes you to send emails to communicate with your users who haven’t purchased with you lately.
2.Installation
For the installation process, visit the basic steps to upload or move plugins in app/code/Makewebbetter/Package by name as HubIntegration. Then you’ll have to run the Magento commands for the installation of the plugin on your Magento server.
Once done with the command, you will be able to see the installed plugin on your Magento dashboard.
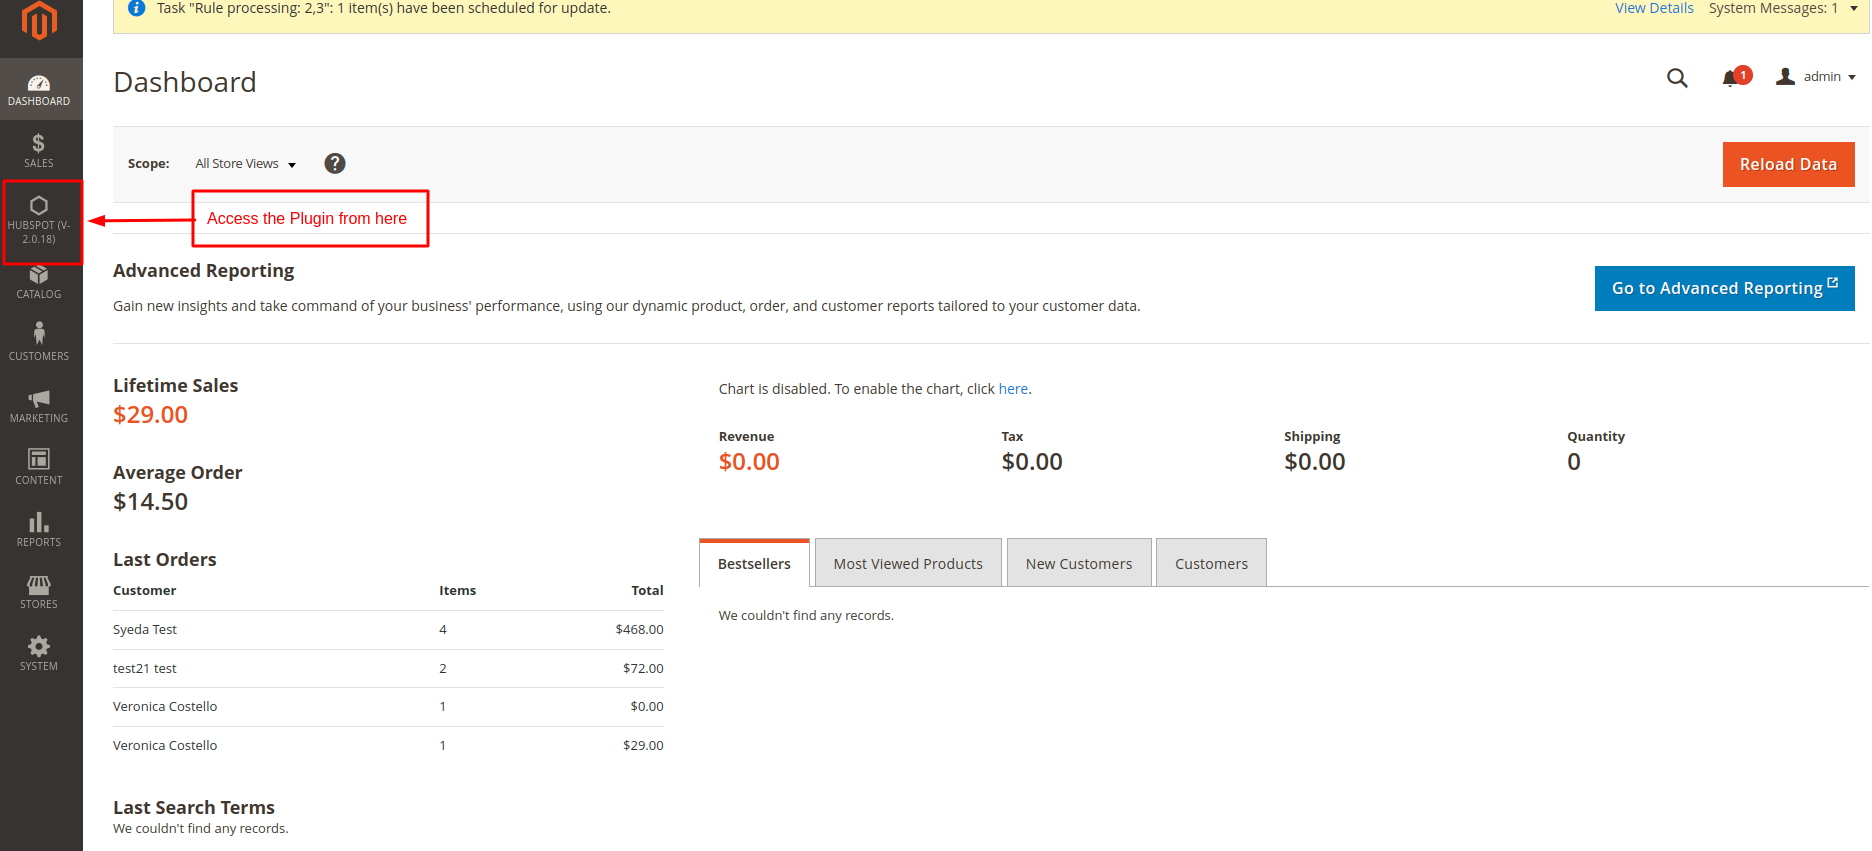
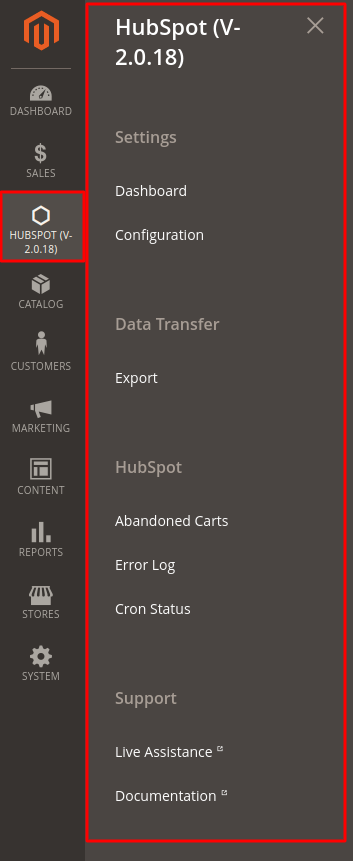
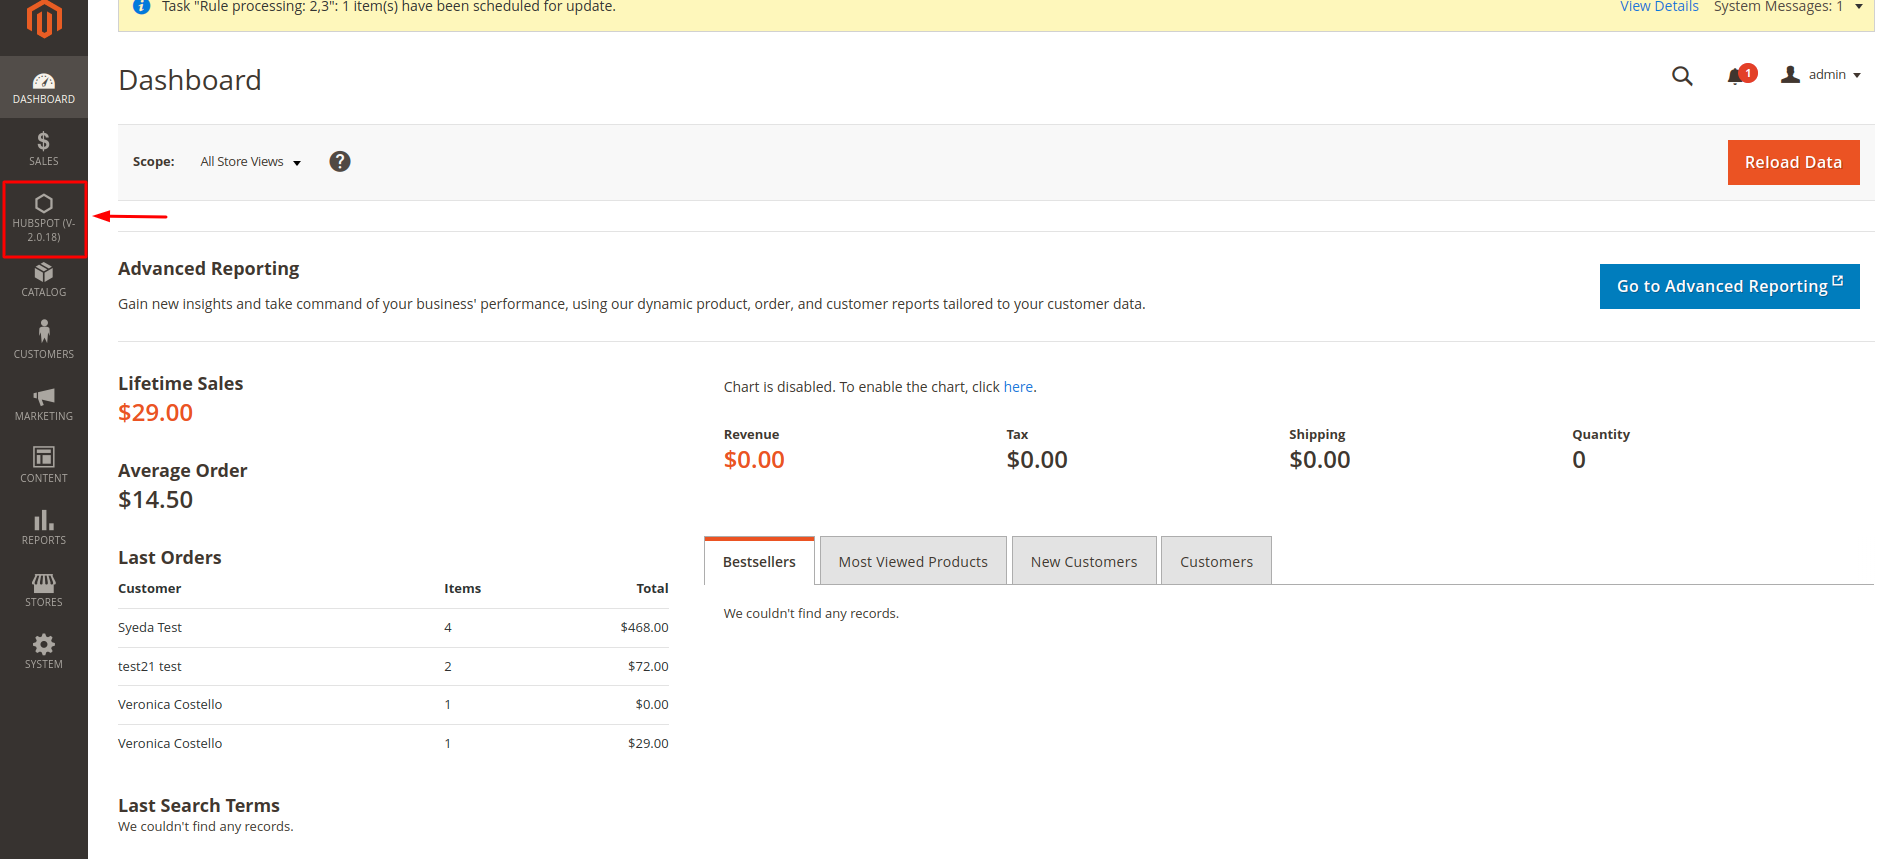
After installing the plugin successfully, you will be able to see the HubSpot menu on the left side, and the features of the plugin under the HubSpot menu bar as shown in the screenshot below:
3.Configuration & Settings
The first step in the process of integrating your Magento 2 store with HubSpot is the Configuration.
To do the Configuration:
- Go to your Magento 2 dashboard.
- You’ll see an icon named HubSpot in the left menu bar. Click on it.

- After clicking on the HubSpot icon, the following menu will appear.

- Click on Configuration at the bottom.

- After clicking on configuration, you’ll land on the configuration page.

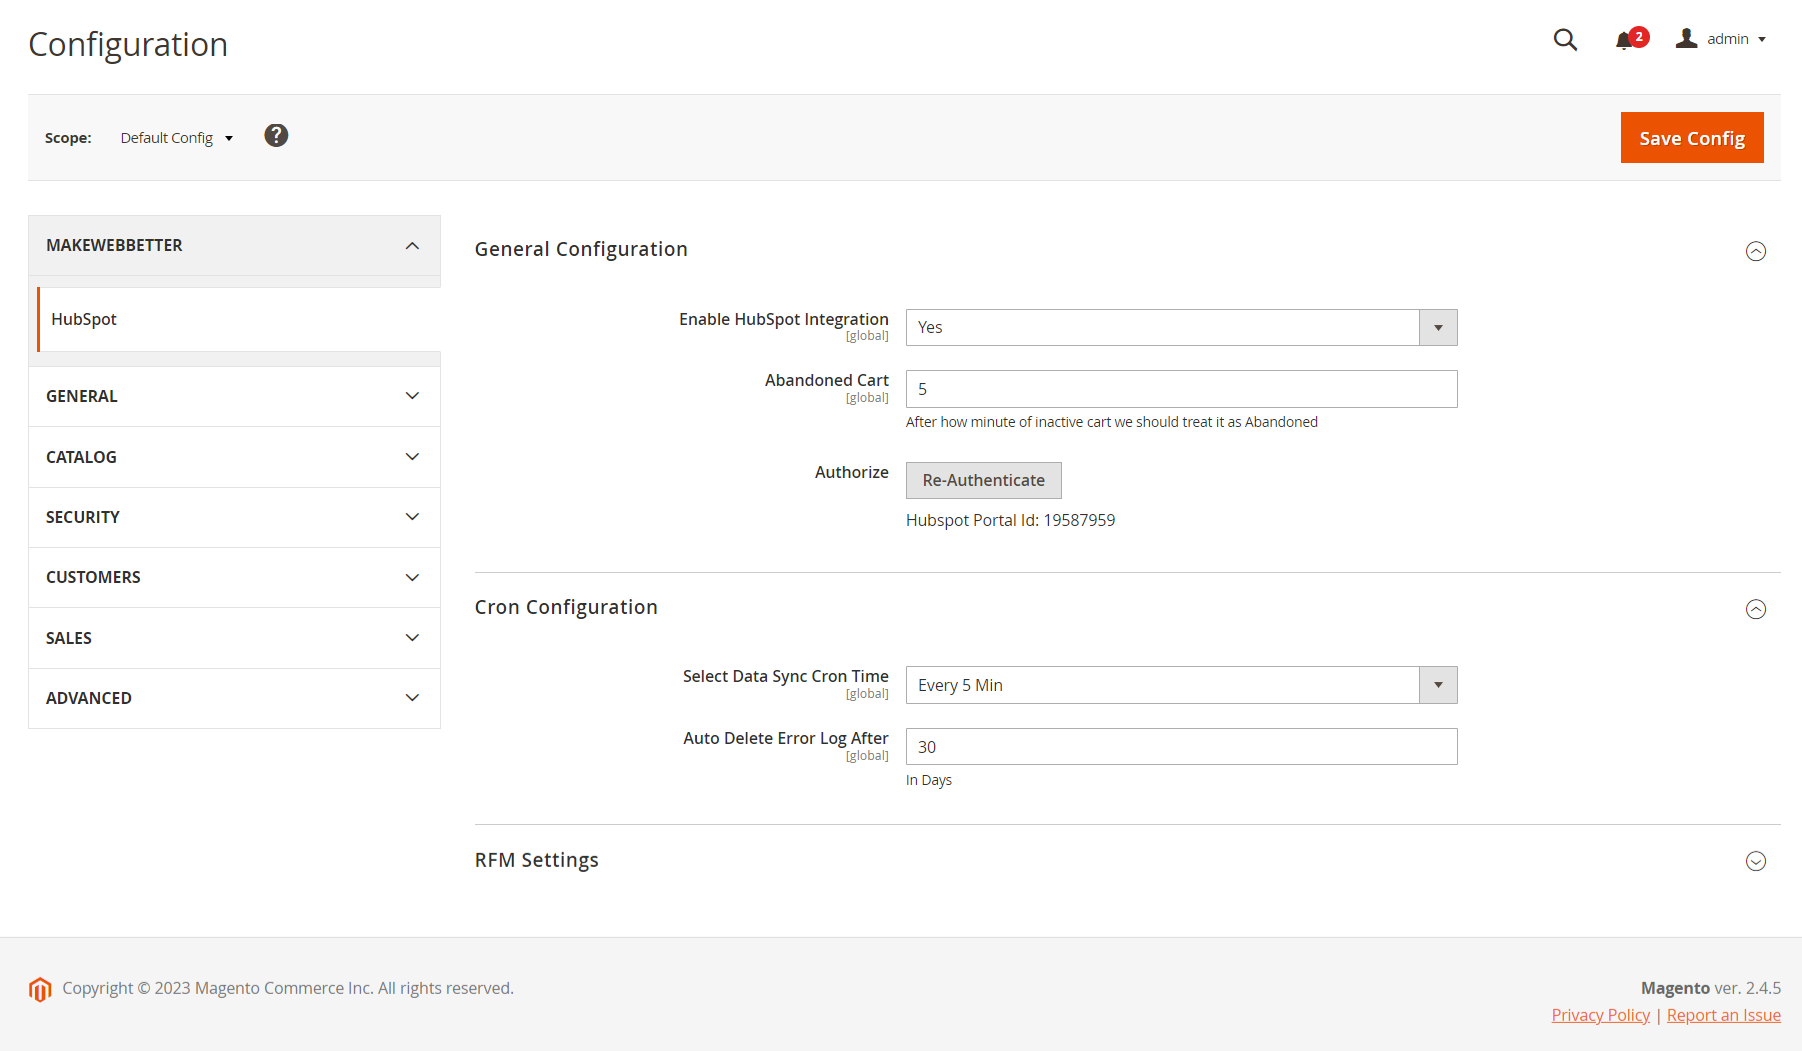
This page contains 3 different settings for the plugin.
3.1.General configuration
- Enable HubSpot Integration: Select Yes to enable the extension. (Yes is the default state which is already selected)

- Abandoned Cart: Enter the time (in minutes) after which you want the inactive shopping cart to be treated as abandoned.

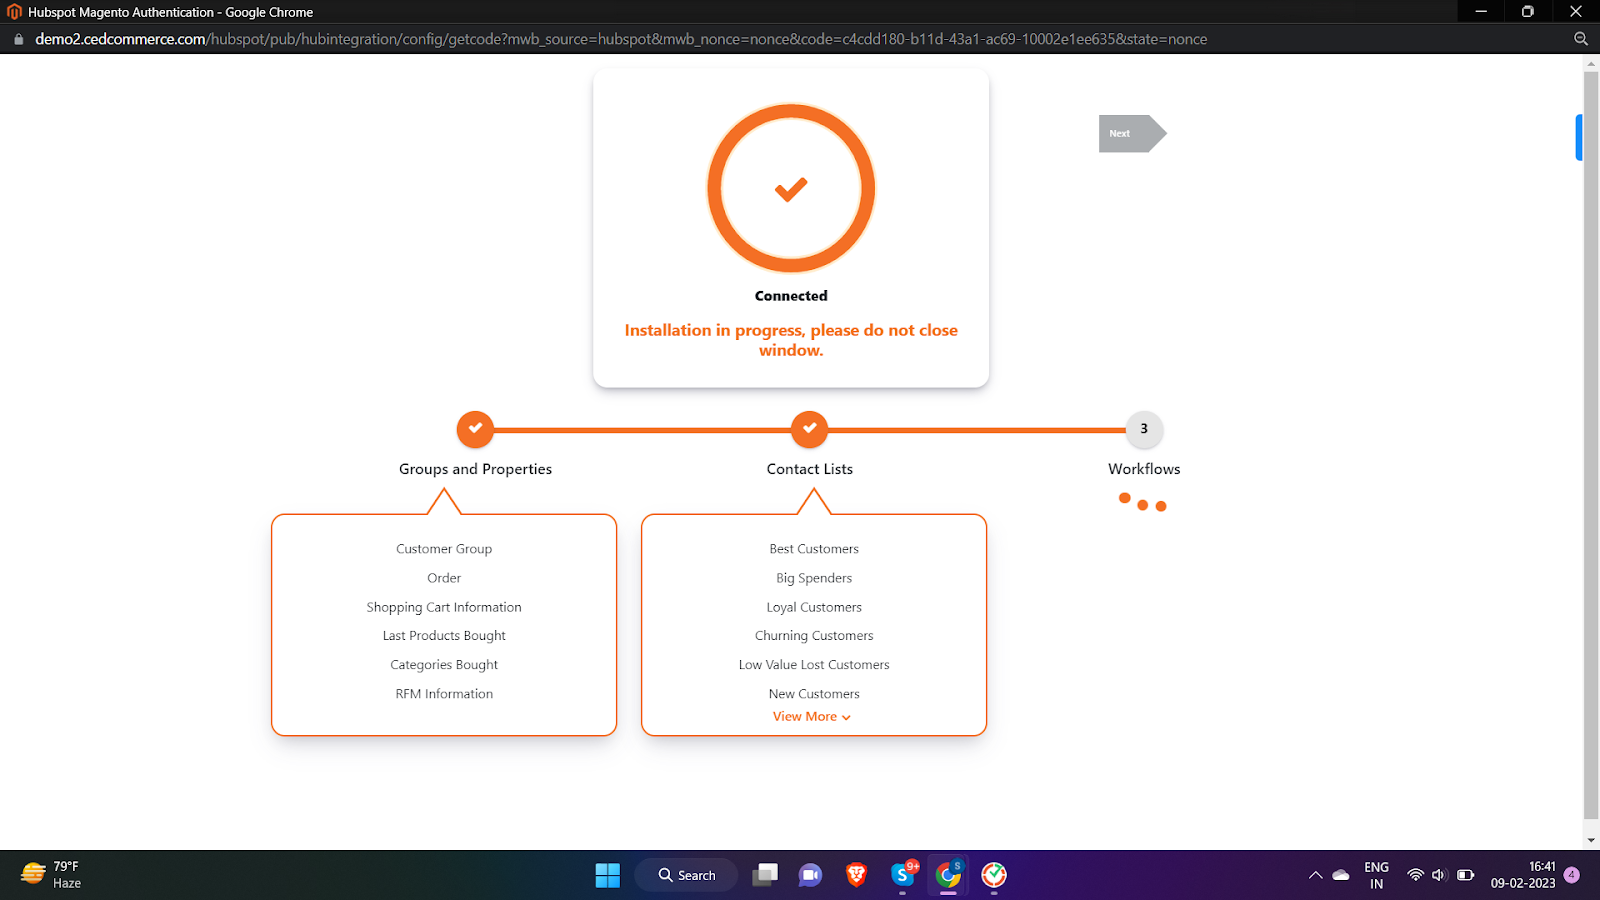
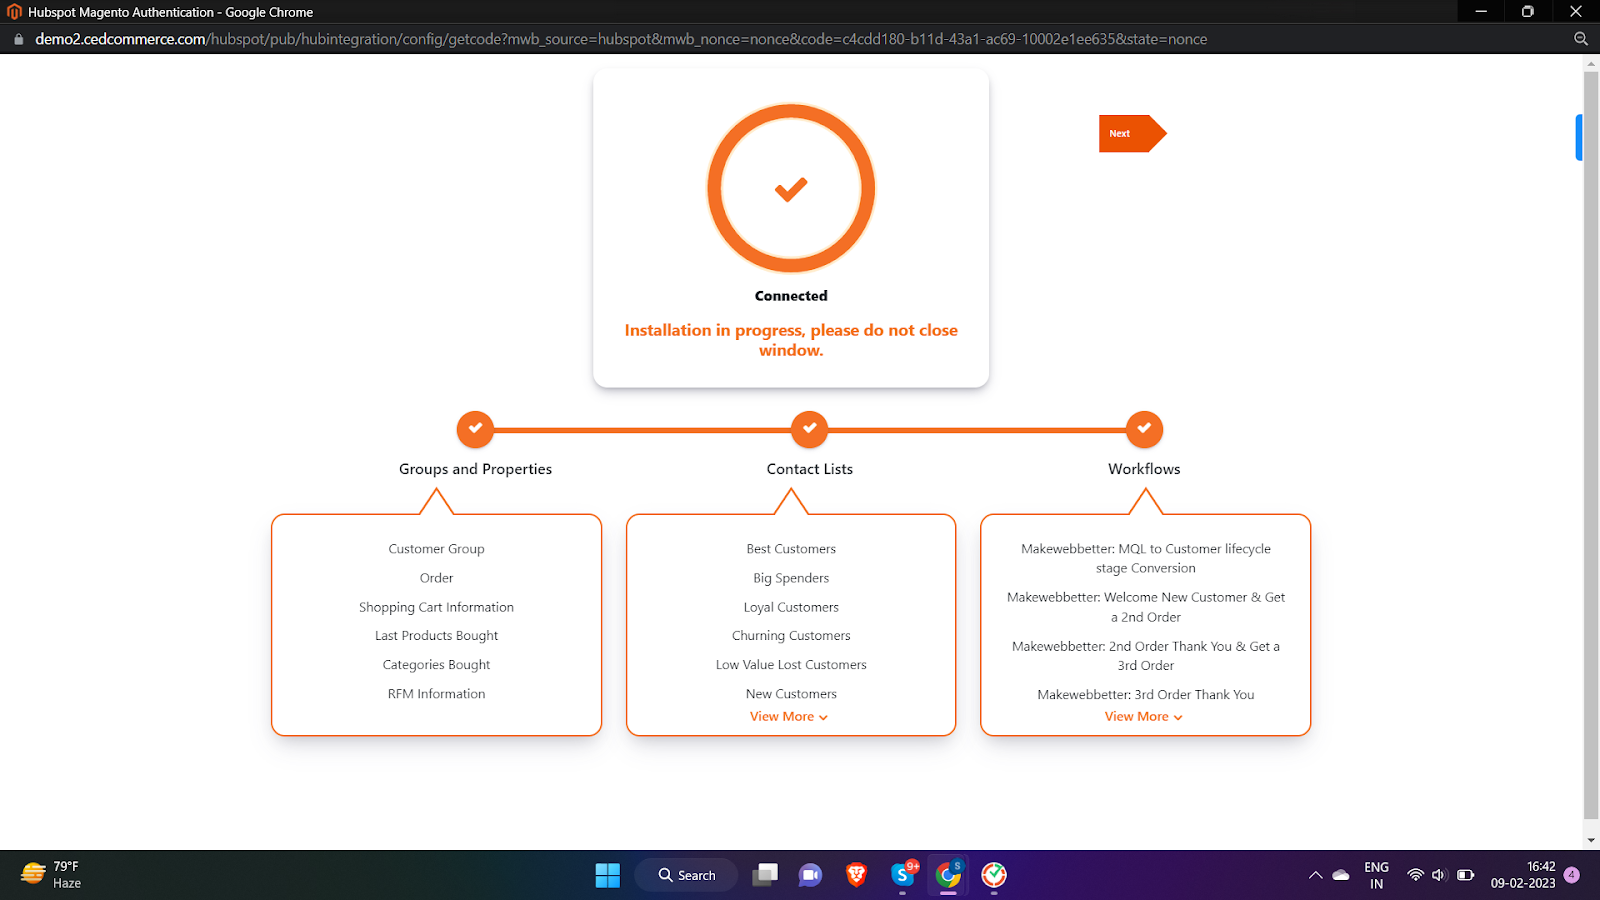
- Authorize: Once clicked on this option, it authorizes the above options selected by the admin. A new window of the HubSpot page will open up, which will ask to enter details of the signup form then it will provide authorization to access the admin panel with HubSpot.

This is only a demo, thus it is showing Re-authenticate. In your account, “Authenticate” will be displayed.
Click on the Authenticate button, and you’ll be asked to choose the HubSpot account you want to connect with the plugin.

After selecting the account, the plugin will start creating Groups & Properties, Contact Lists, and Workflows.

Once done, click on Next to proceed further to map your Magento order status with HubSpot deal stages.

Click on Save and the authentication will be done successfully.
Additionally, you can change the pipeline after the one-time authentication directly from Hubspot Dashboard.


3.2.Cron Configuration
- Select Data Sync Cron Time: You can decide on what frequency Magento data gets synced to HubSpot. You can set this frequency to Once in a day, Twice in a day, Four times a day, or Every hour or Every 5 mins.

- Auto Delete Error Log After: This allows automatic removal of error logs. If you select 30 here, the logs will be deleted after 30 days.


3.3.RFM Settings
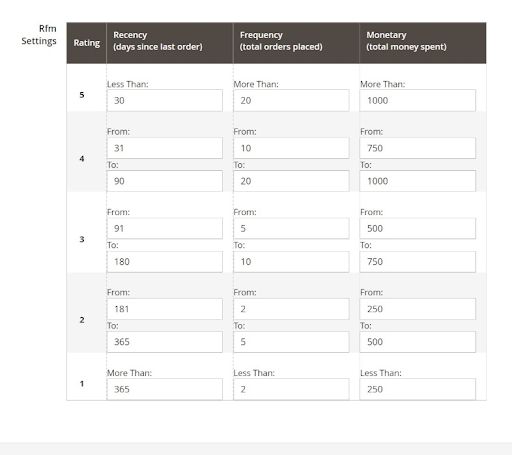
The RFM settings allow you to rate your customers based on their buying behavior. There are 3 habits on which you can give ratings to your customers.
- In the Recency column, you need to enter the numbers as a parameter for days and decide on its basis which type of customers are visiting your store most frequently. You may rate them accordingly.
- In the Frequency column, you need to enter the numbers for the total orders placed by a customer, and based on that, you can decide about the customers who are placing the most orders and who are placing the least number of orders.
- In the Monetary column, enter the numbers as a parameter and decide on its basis who are the customers who are spending the most on your product and who are spending the least.
Once done with all configurations, click on the Save Config button on the top right of the page to save all the changes.
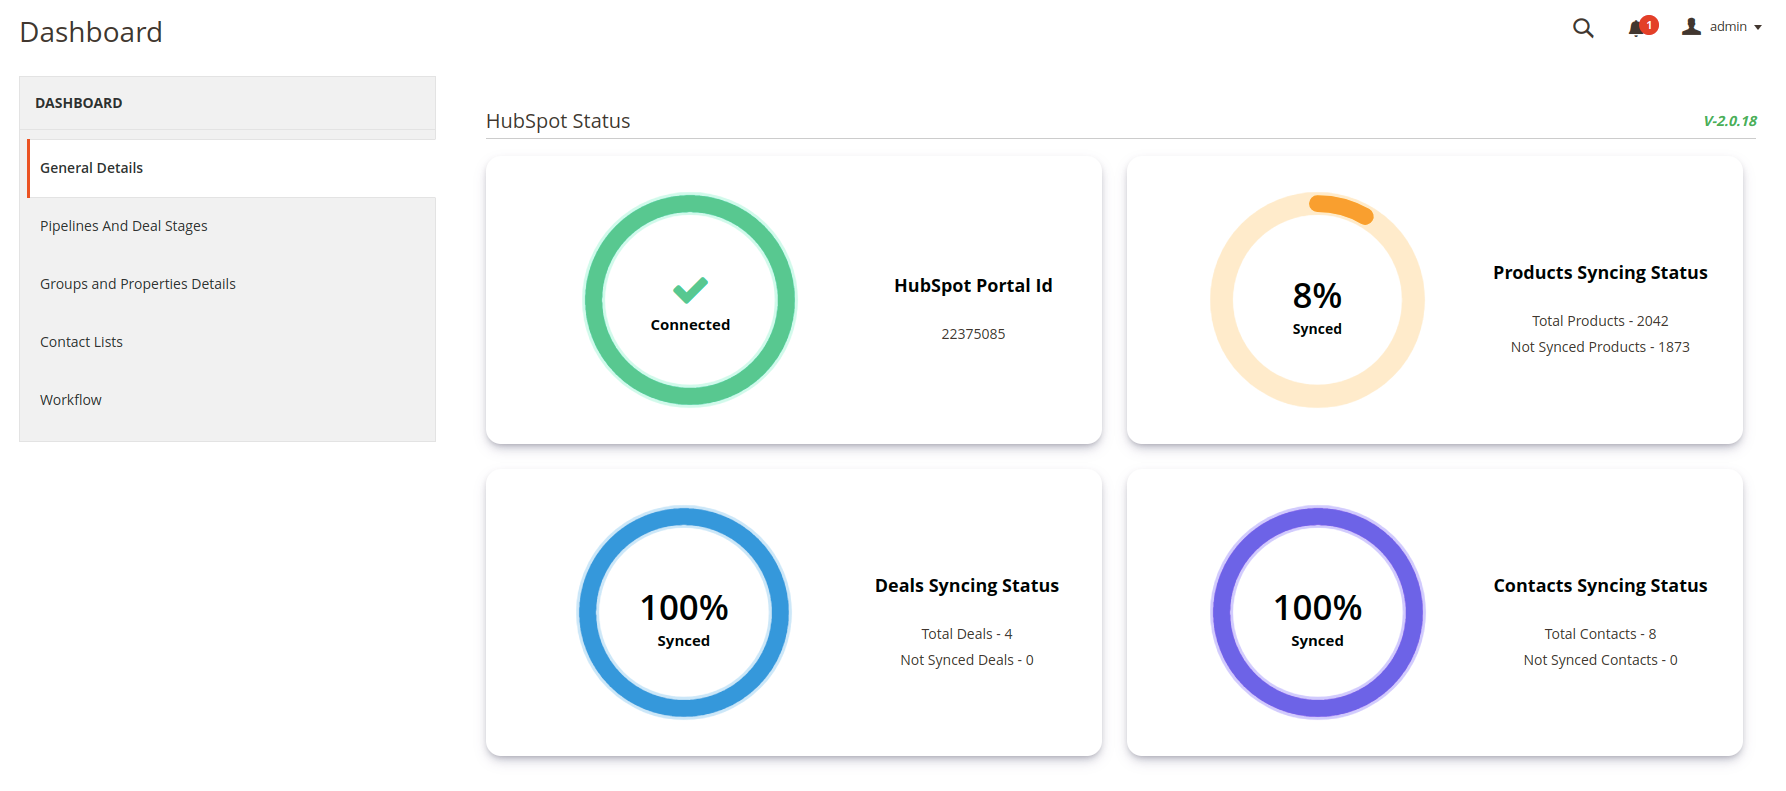
4.Dashboard
The dashboard will display information about your:
- HubSpot portal connection
- Products syncing status
- Deals syncing status
- Contacts syncing status

Also, you can see all the default groups & properties, contact lists, deal stages and pipelines, and workflows in your HubSpot CRM through this integration.
Here’s the complete list of these assets,
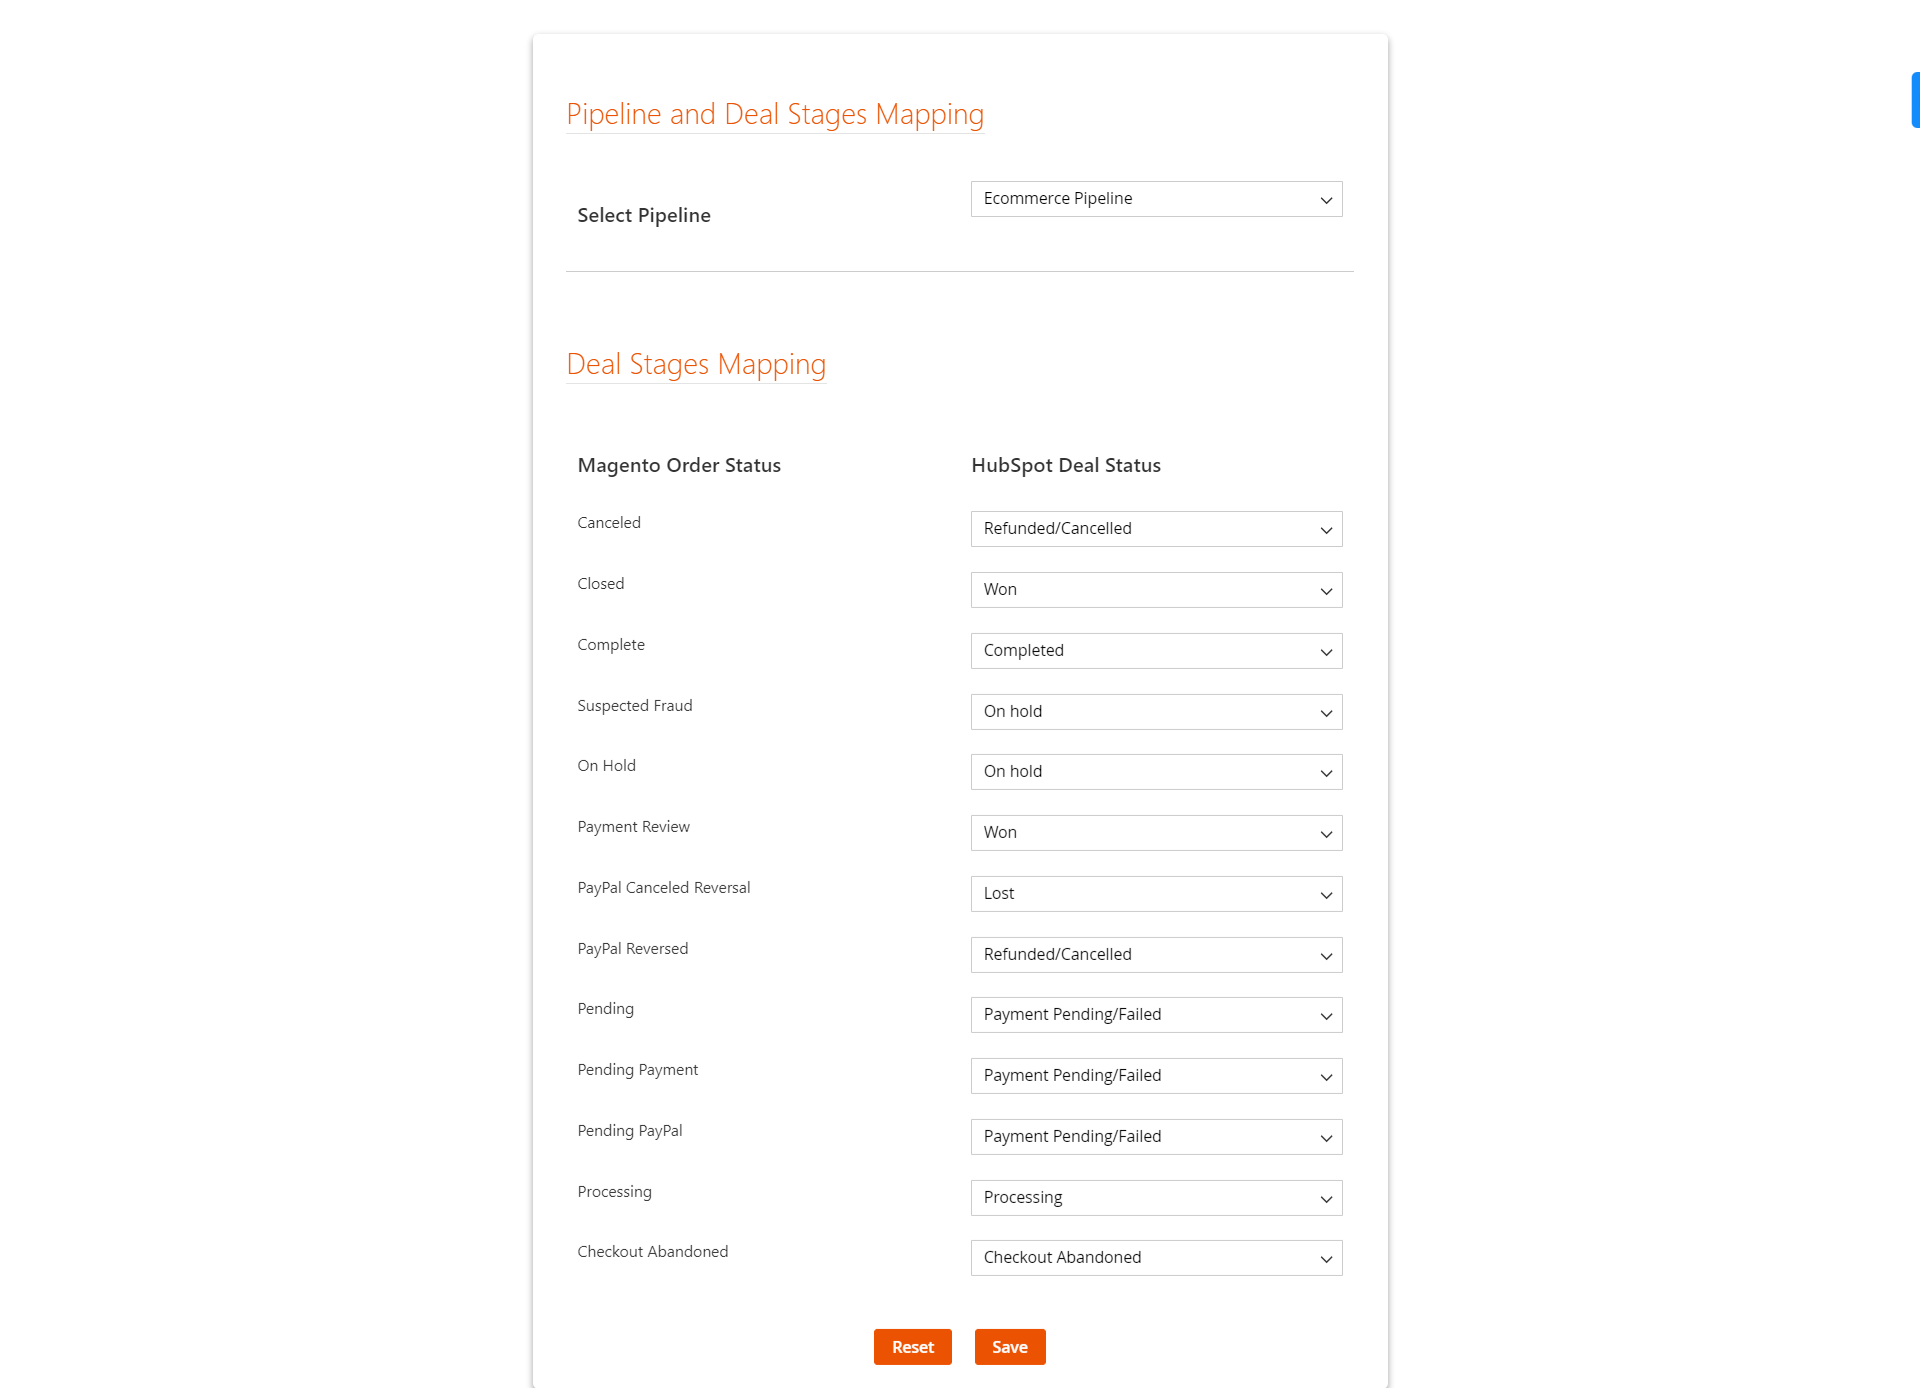
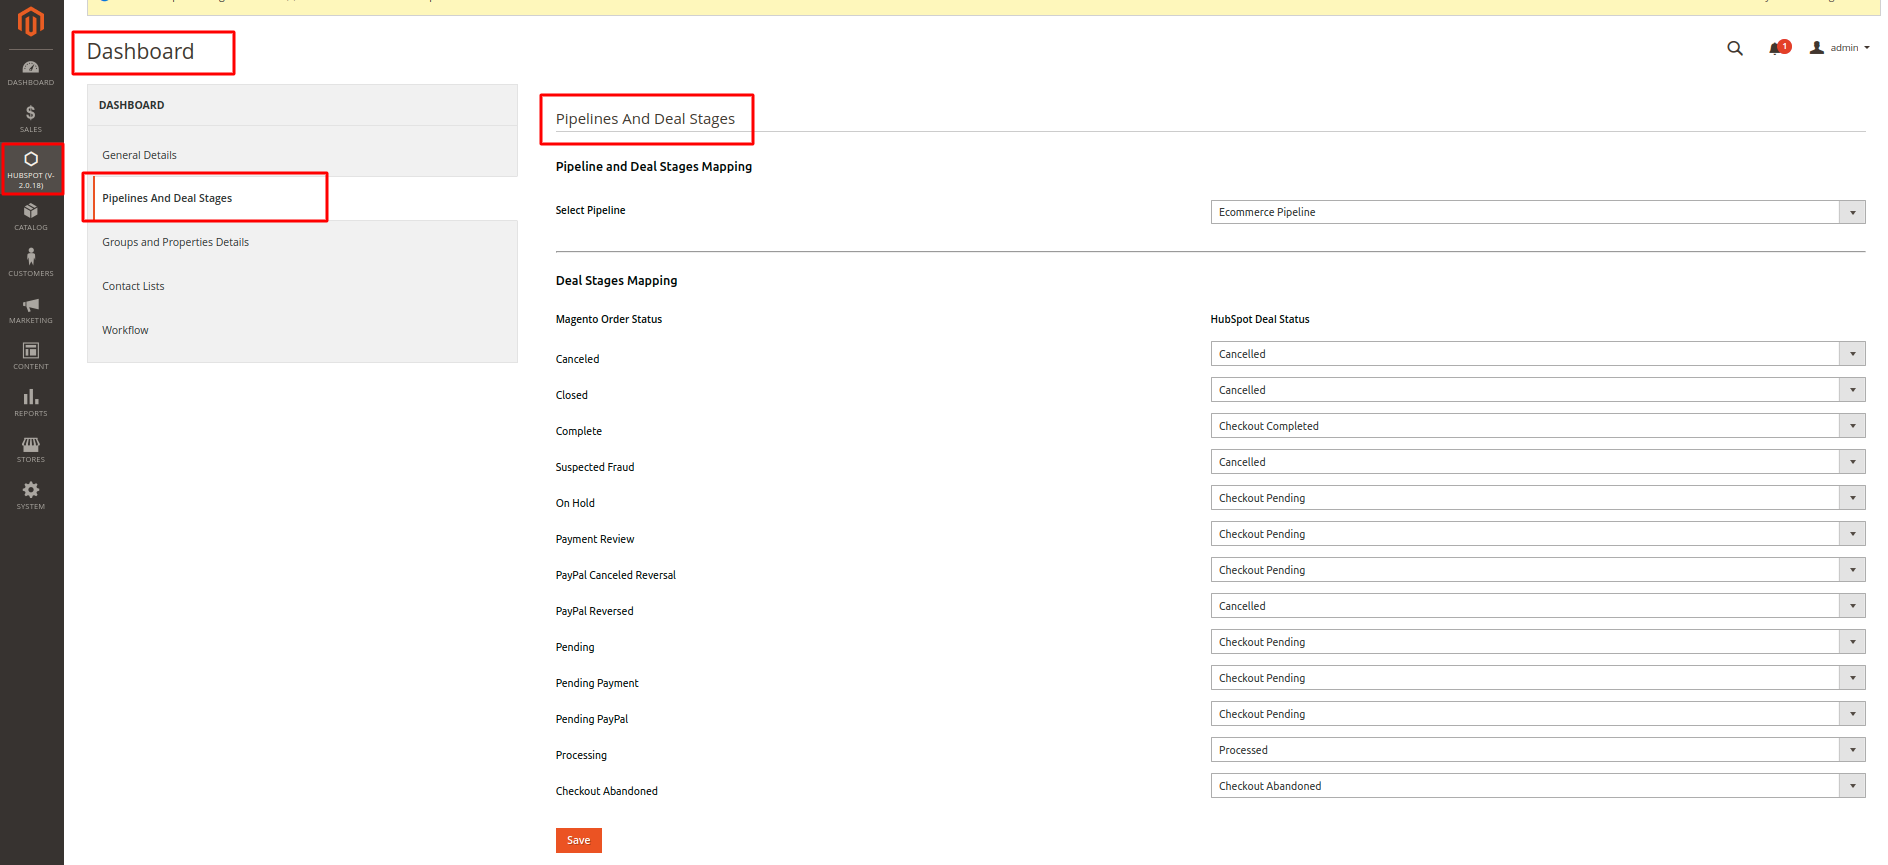
4.1.Pipeline and Deal Stages
This section helps you select your pipeline and map its deal stages with your Magento order status. Mapping the order statuses with deal stages will automatically change the deal stage of an order if it is changed on your Magento store.
4.2.HubSpot lists
- Best Customers
- Big Spenders
- Loyal Customers
- Churning Customers
- Low Value Lost Customers
- New Customers
- Customers needing attention
- About to Sleep
- Mid Spenders
- Low Spenders
- Newsletter Subscriber
- One-time purchase customers
- Two-time purchase customers
- Three-time purchase customers
- Bought four or more times
- Leads
- Marketing Qualified Leads
- Customers
- Engaged Customers
- DisEngaged Customers
- Repeat Buyers
4.3.Workflows
- MQL to Customer lifecycle stage Conversion
-
-
- MQL Capture, Nurture & Conversion Start Date
- Current ROI Campaign
- MQL Nurturing Email Series – 1
- MQL Nurturing Email Series – 2
- Current ROI Campaign
-
- Welcome New Customer & Get the 2nd Order
-
-
- Current ROI Campaign
- Second Purchase Workflow Start Date
- Customer Re-engagement Series – 1
- Customer Re-engagement Series – 2
- Customer Re-engagement Series – 3
- Current ROI Campaign
-
- 2nd Order Thank You & Get the 3rd Order
-
-
- Current ROI Campaign
- Third Purchase Workflow Start Date
- Third Purchase Email Series – 1
- Third Purchase Email Series – 2
- Third Purchase Email Series – 3
- Current ROI Campaign
-
- 3rd Order Thank You
-
-
- Current ROI Campaign
- Third Purchase ThankYou Mail
- Current ROI Campaign
-
- ROI Calculation
-
-
- ROI Calculation
-
- Order Workflow
-
-
- Lifecycle stage
- Lifecycle stage
- ROI Calculation
-
- Set Order Recency 1 Ratings
-
-
- Order Recency Rating
-
- Set Order Recency 2 Ratings
-
-
- Order Recency Rating
- Set Order Recency 1 Ratings
-
- Set Order Recency 3 Ratings
-
-
- Order Recency Rating
- Set Order Recency 2 Ratings
-
- Set Order Recency 4 Ratings
-
-
- Order Recency Rating
- Set Order Recency 3 Ratings
-
- Set Order Recency 5 Ratings
-
-
- Order Recency Rating
- Set Order Recency 4 Ratings
-
- Update Historical Order Recency Rating
-
-
- Update Historical Order Recency Rating
-
- Enroll Customers for Recency Settings
-
-
- Update Historical Order Recency Rating
-
- After order Workflow
-
- After order Workflow
4.4.Groups and Properties
- Customer Group
-
-
- Customer Group/ User role
- Accepts Marketing
- Shopping Cart Customer ID
-
- Shopping Cart Information
-
-
- Shipping Address Line 1
- Shipping Address Line 2
- Shipping City
- Shipping State
- Shipping Postal Code
- Shipping Country
- Billing Address Line 1
- Billing Address Line 2
- Billing City
- Billing State
- Billing Postal Code
- Billing Country
-
- Order
-
-
- Last Order Status
- Last Order Fulfillment Status
- Last Order Tracking Number
- Last Order Tracking URL
- Last Order Shipment Date
- Last Order Number
- Total Number of Current Orders
-
- Last Products Bought
-
-
- Last Product Bought
- Last Product Types Bought
- Last Products Bought
- Last Products Bought HTML
- Last Total Number Of Products Bought
- Product Types Bought
- Products Bought
- Total Number Of Products Bought
- Last Products Bought Product 1 Image URL
- Last Products Bought Product 1 Name
- Last Products Bought Product 1 Price
- Last Products Bought Product 1 URL
- Last Products Bought Product 2 Image URL
- Last Products Bought Product 2 Name
- Last Products Bought Product 2 Price
- Last Products Bought Product 2 URL
- Last Products Bought Product 3 Image URL
- Last Products Bought Product 3 Name
- Last Products Bought Product 3 Price
- Last Products Bought Product 3 URL
-
- Categories Bought
-
-
- Categories Bought
- Last Categories Bought
-
- RFM Information
-
-
- Total Value of Orders
- Average Order Value
- Total Number of Orders
- First Order Value
- First Order Date
- Last Order Value
- Last Order Date
- Average Days Between Orders
- Account Creation Date
- Monetary Rating
- Order Frequency Rating
- Order Recency Rating
-
- SKUs Bought
-
-
- Last SKUs Bought
- SKUs Bought
-
- ROI Tracking
-
-
- Customer New Order
- Abandoned Cart Recovery Workflow Conversion
- Abandoned Cart Recovery Workflow Conversion Amount
- Abandoned Cart Recovery Workflow Conversion Date
- Abandoned Cart Recovery Workflow Start Date
- Current ROI Campaign
- Customer Re-engagement Workflow Conversion
- Customer Re-engagement Workflow Conversion Amount
- Customer Re-engagement Workflow Conversion Date
- Customer Re-engagement Workflow Start Date
- Customer Rewards Workflow Conversion
- Customer Rewards Workflow Conversion Amount
- Customer Rewards Workflow Conversion Date
- Customer Rewards Workflow Start Date
- MQL Capture, Nurture & Conversion Conversion
- MQL Capture, Nurture & Conversion Conversion Amount
- MQL Capture, Nurture & Conversion Conversion Date
- MQL Capture, Nurture & Conversion Start date
- New Customer Workflow Conversion
- New Customer Workflow Conversion Amount
- New Customer Workflow Conversion Date
- New Customer Workflow Start Date
- Second Purchase Workflow Conversion
- Second Purchase Workflow Conversion Amount
- Second Purchase Workflow Conversion Date
- Second Purchase Workflow Start Date
- Third Purchase Workflow Conversion
- Third Purchase Workflow Conversion Amount
- Third Purchase Workflow Conversion Date
- Third Purchase Workflow Start Date
-
- Deal Information
-
- Order Creation Date
- Order Shipped Date
- Contact Is Guest
- Contact Email
Note: More than default syncing you can also connect with us if custom properties, lists or personalized workflows will be needed. We can cover all the customization as the way your business operates.
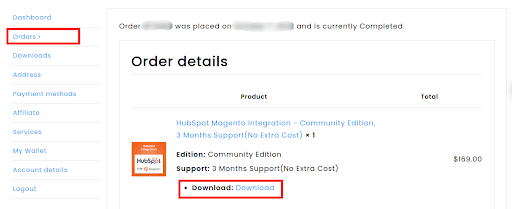
5.For Downloading an Upgrade
- To get an upgrade, Login to the MakeWebbetter site and go to My Account.
- After login, go to Downloads or visit the URL: https://makewebbetter.com/my-account/orders
- Here you will see all purchased orders from Makewebbetter Site.

- Go to the Order Details page and Download the updated extension.
6.For Export Setting
To export data from your Magento store to HubSpot click on the Export button, all the data will be transferred through the export setting.
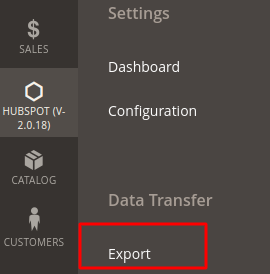
For the export setting, click on the left-side menu bar and then click on “Export”. After clicking on Export, a new page will appear.

In the Export section, you will see the “Status” of the export and the date and time when the last export was started. You can export 4 components of data like Products, Contacts, Deals, and Line Items.
The export will occur through “Cron”, and the current status can be seen after reloading the page.
For 2-way contact syncing or Bi-directional syncing, you can install the add-on (from HubSpot to Magento).
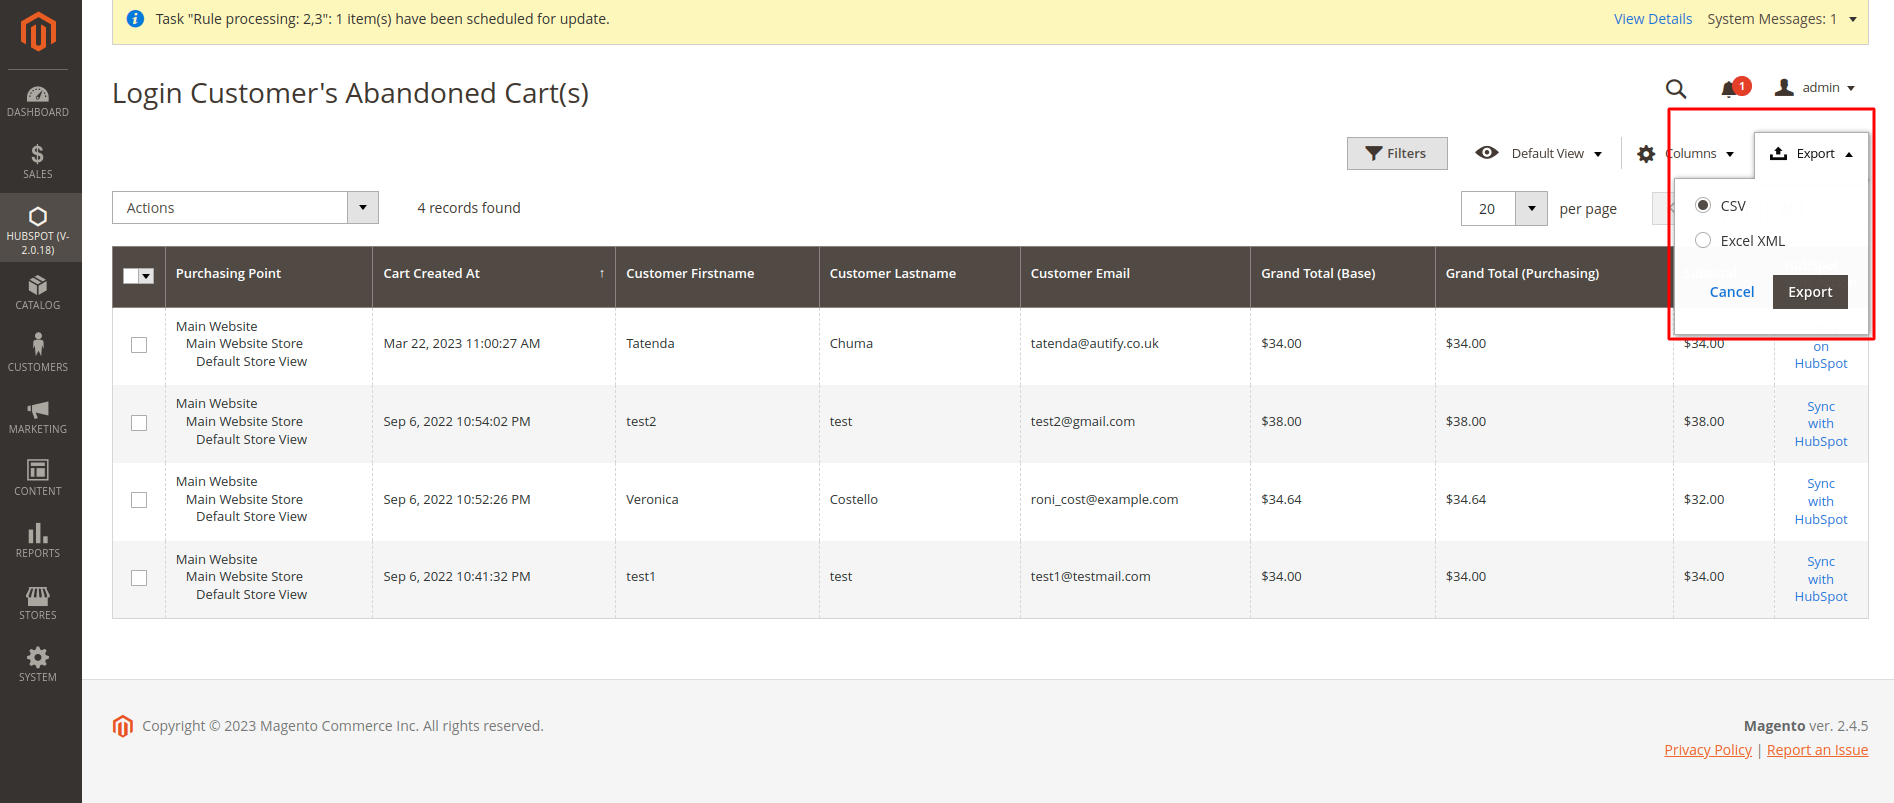
7.Abandoned Carts
With this setting, you can see the details of the customer’s abandoned cart.
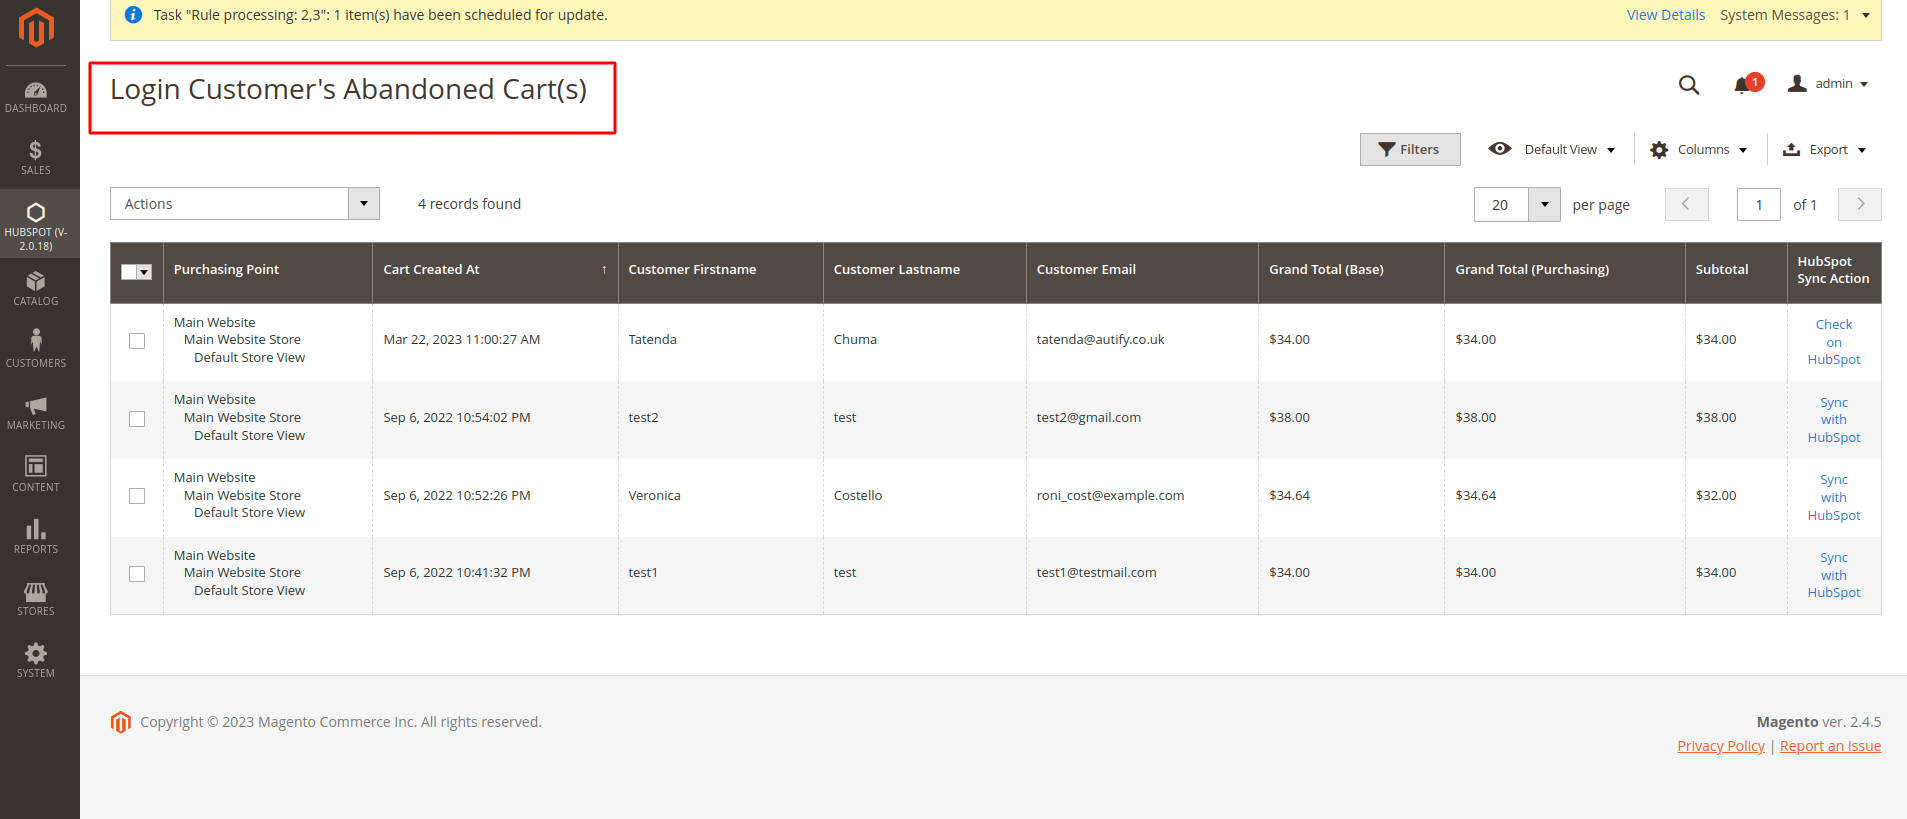
Upon selecting an abandoned cart a new page will open up showing the details of the customer’s cart like Purchasing point, email created, customer name, customer email address, and purchase price.
Admin can export information via CSV file/Excel XML by the option Export available at the right corner, refer to the below images for more clarity.
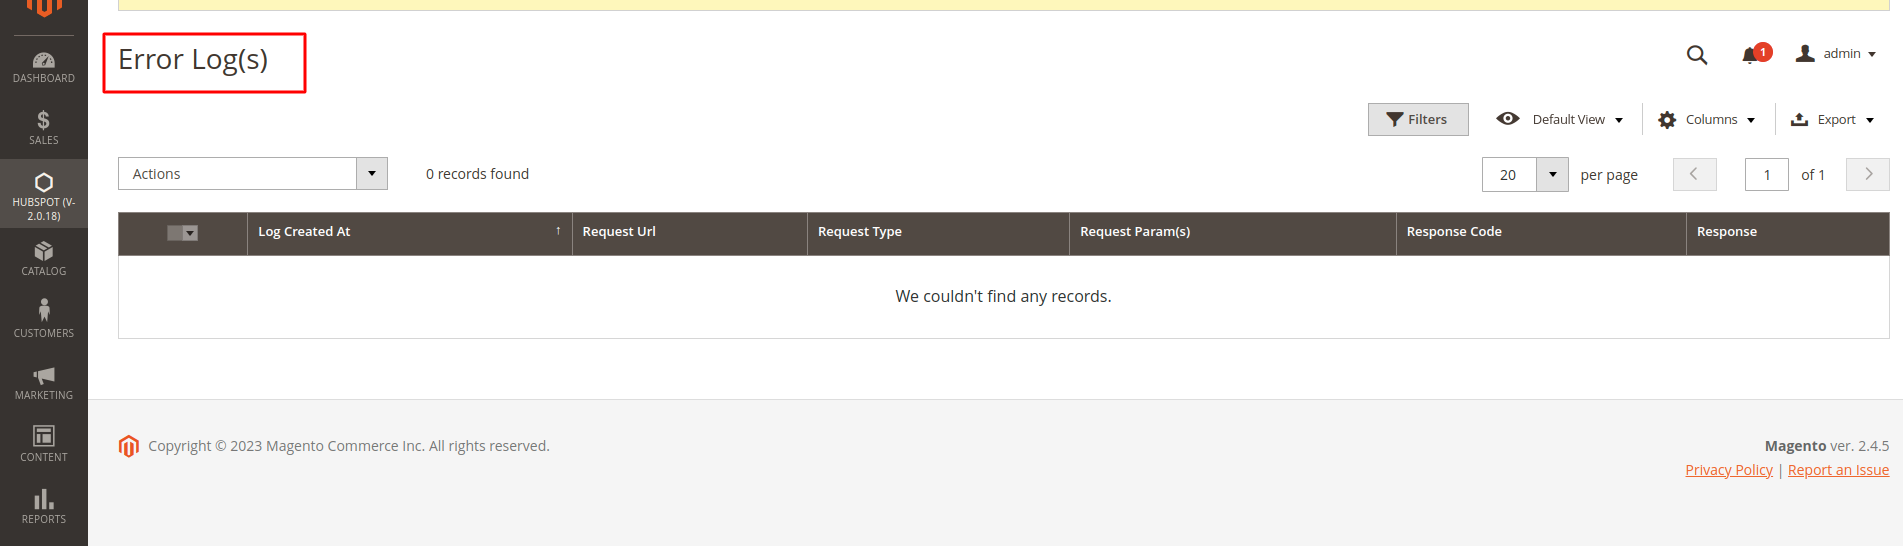
8.Error Logs
During the data sync process from Magento to HubSpot, if any error occurs, it will be logged in this Error Log section.
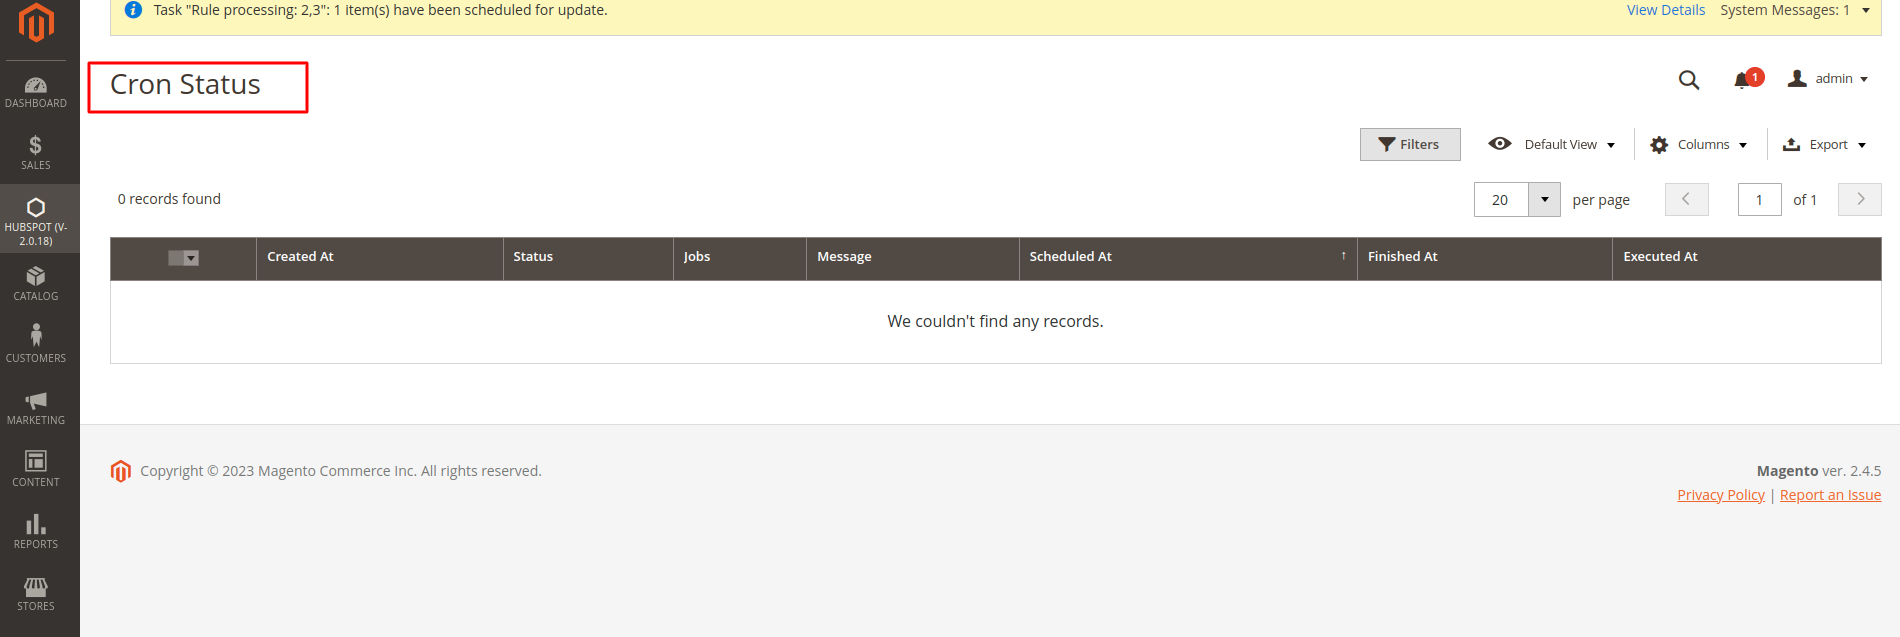
9.Cron Status
To automatically sync your Magento Store data into HubSpot, Cron is used. Here admin can check the status of the cron by referring to the below images.
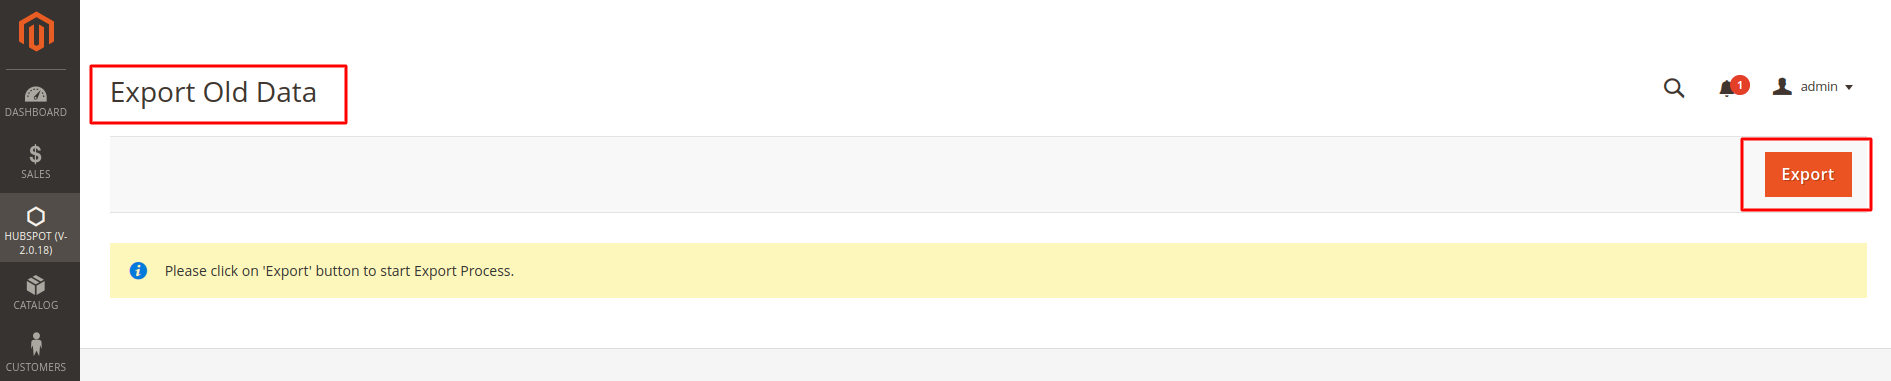
10.Data Transfer
Admin can export all existing Magento store data via the export option of data transfer, it will ask to export existing abandoned cart data via a popup message, once it is selected to yes then it will also export the existing abandoned cart. If you select No then it will not export the abandoned cart, refer to the below images.


11.Export Products, Customers, Orders, and Login Customer’s Abandoned Cart Data to HubSpot
The admin can export product data as well as customers, orders, and abandoned cart data to HubSpot once the Hubspot gets connected to the admin’s Magento store by following the below steps.
11.1.Export Products
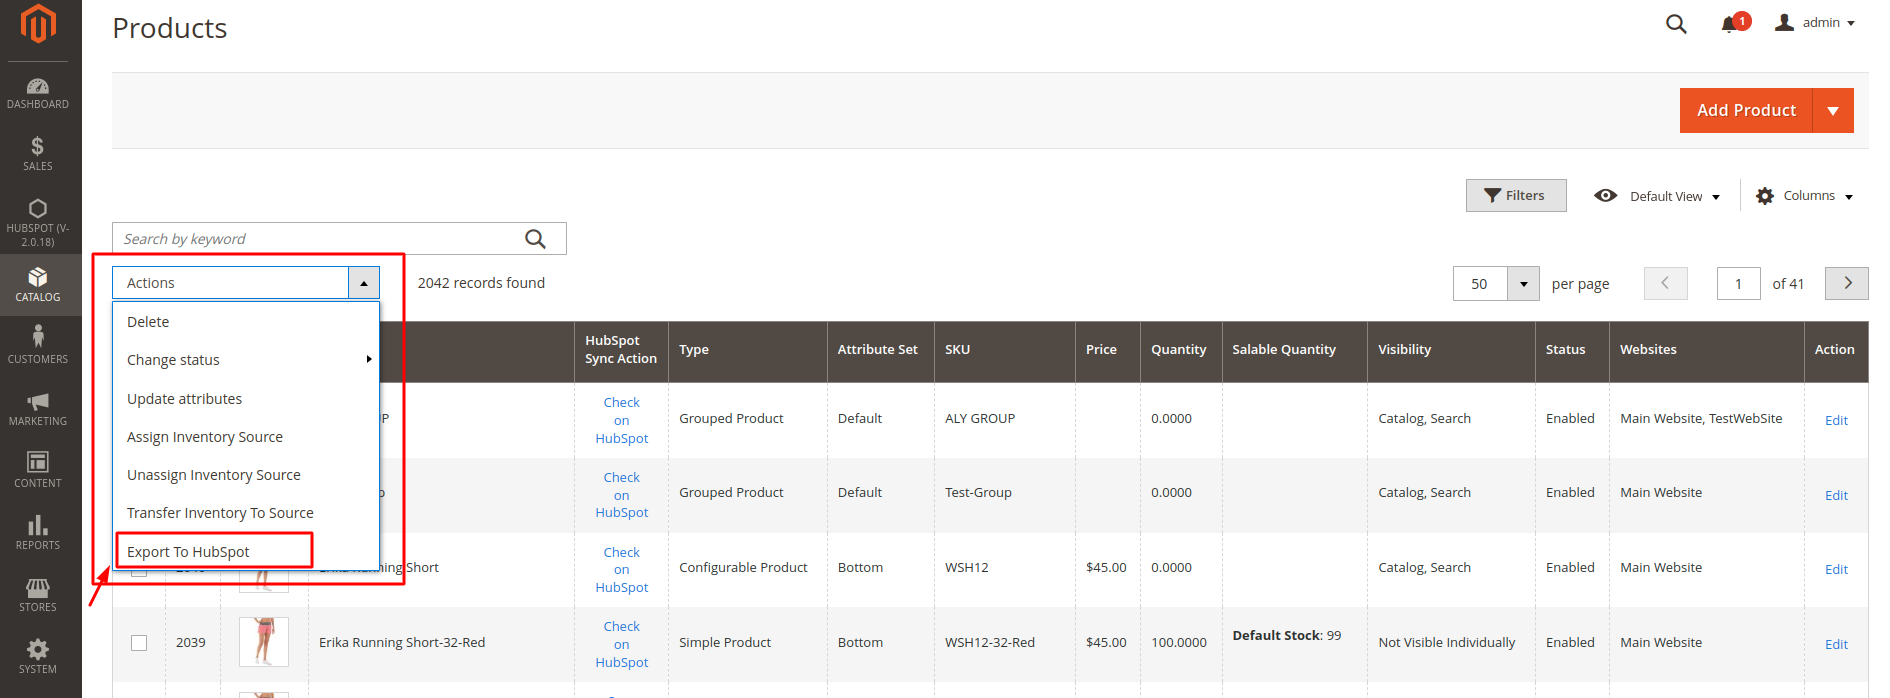
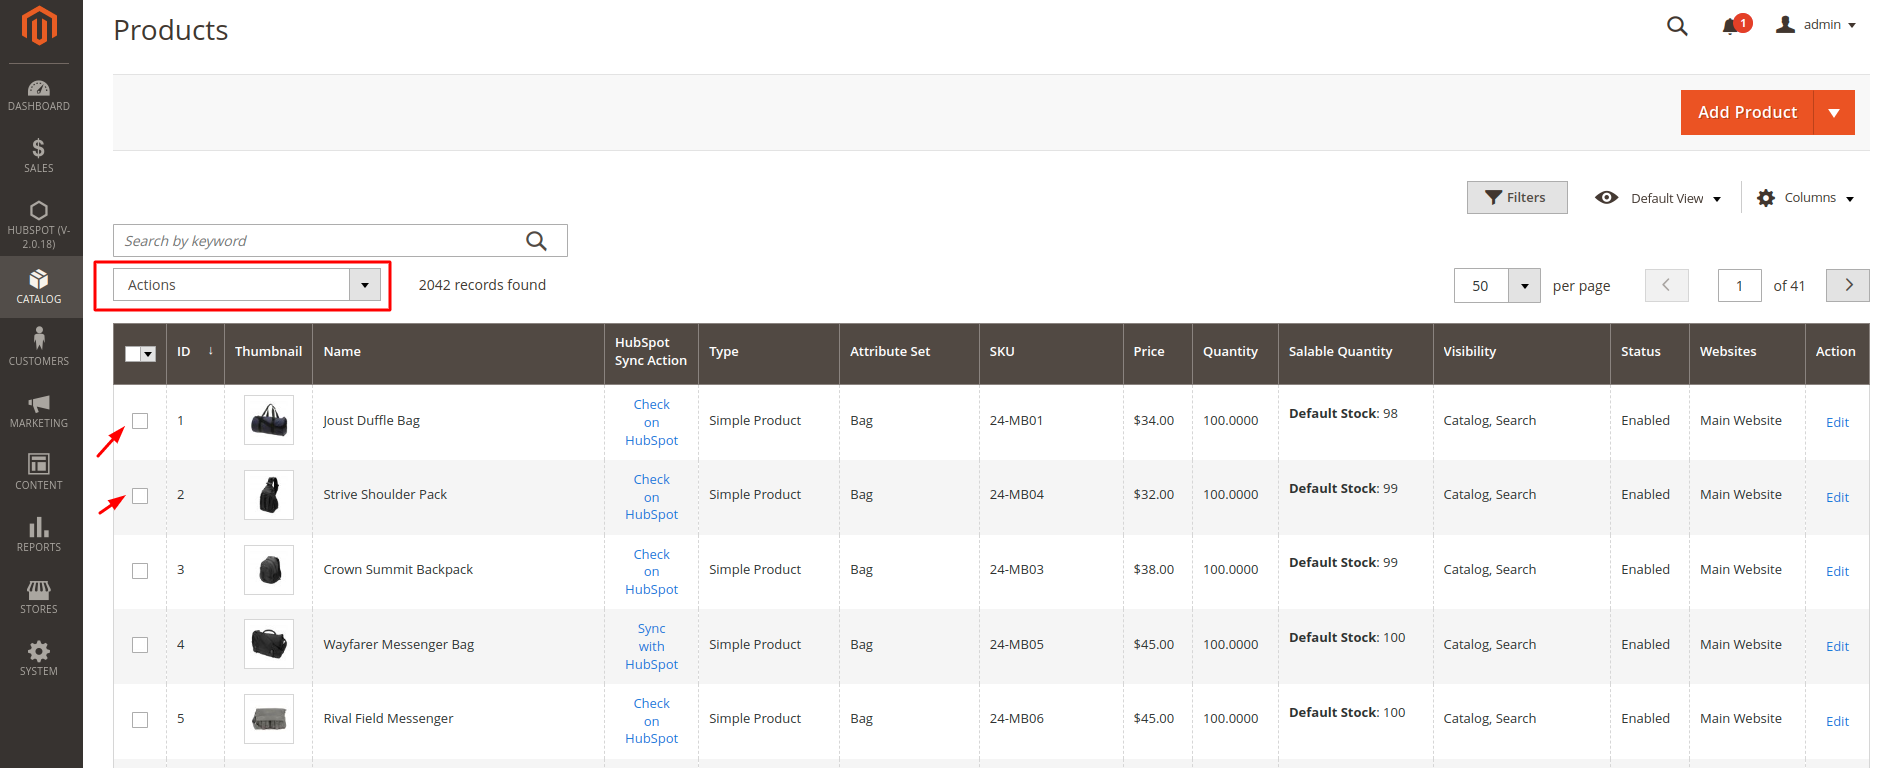
Login to admin panel > Catalog > Product.
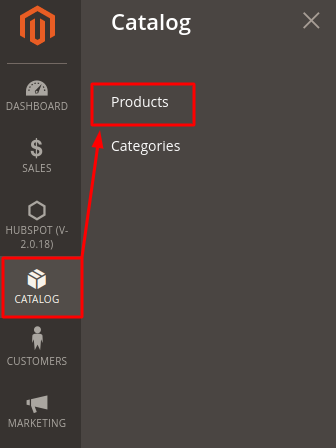
- Select the option products and a new page will open up showing the details of the listed products.

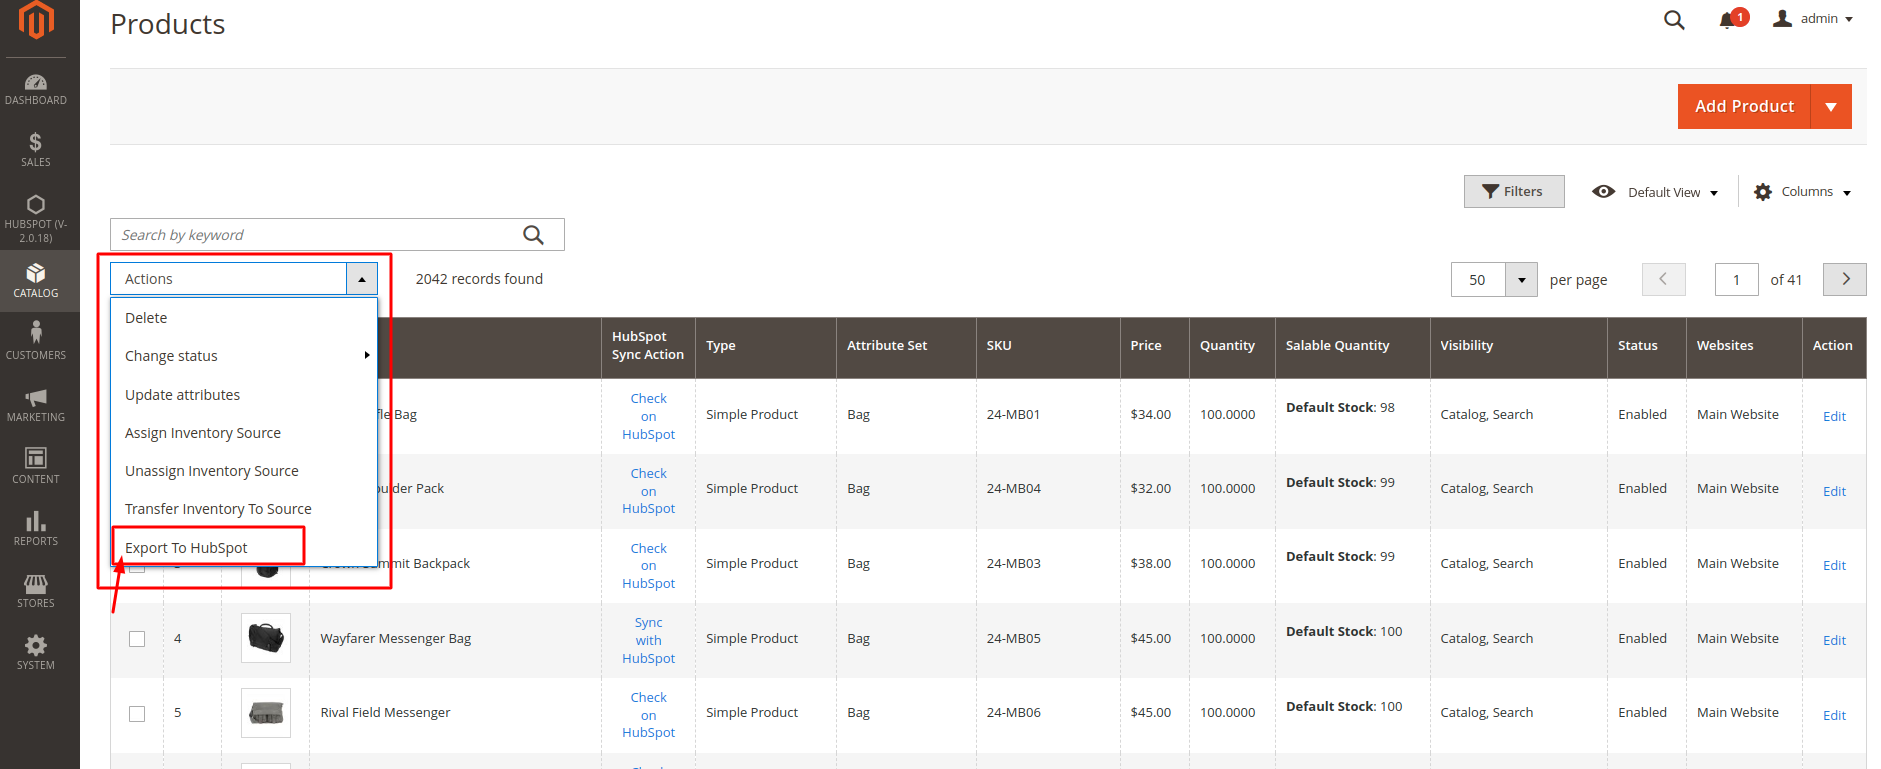
- Select the products and then select the option available in the drop-down list of ACTION refer to the above images for more clarity.

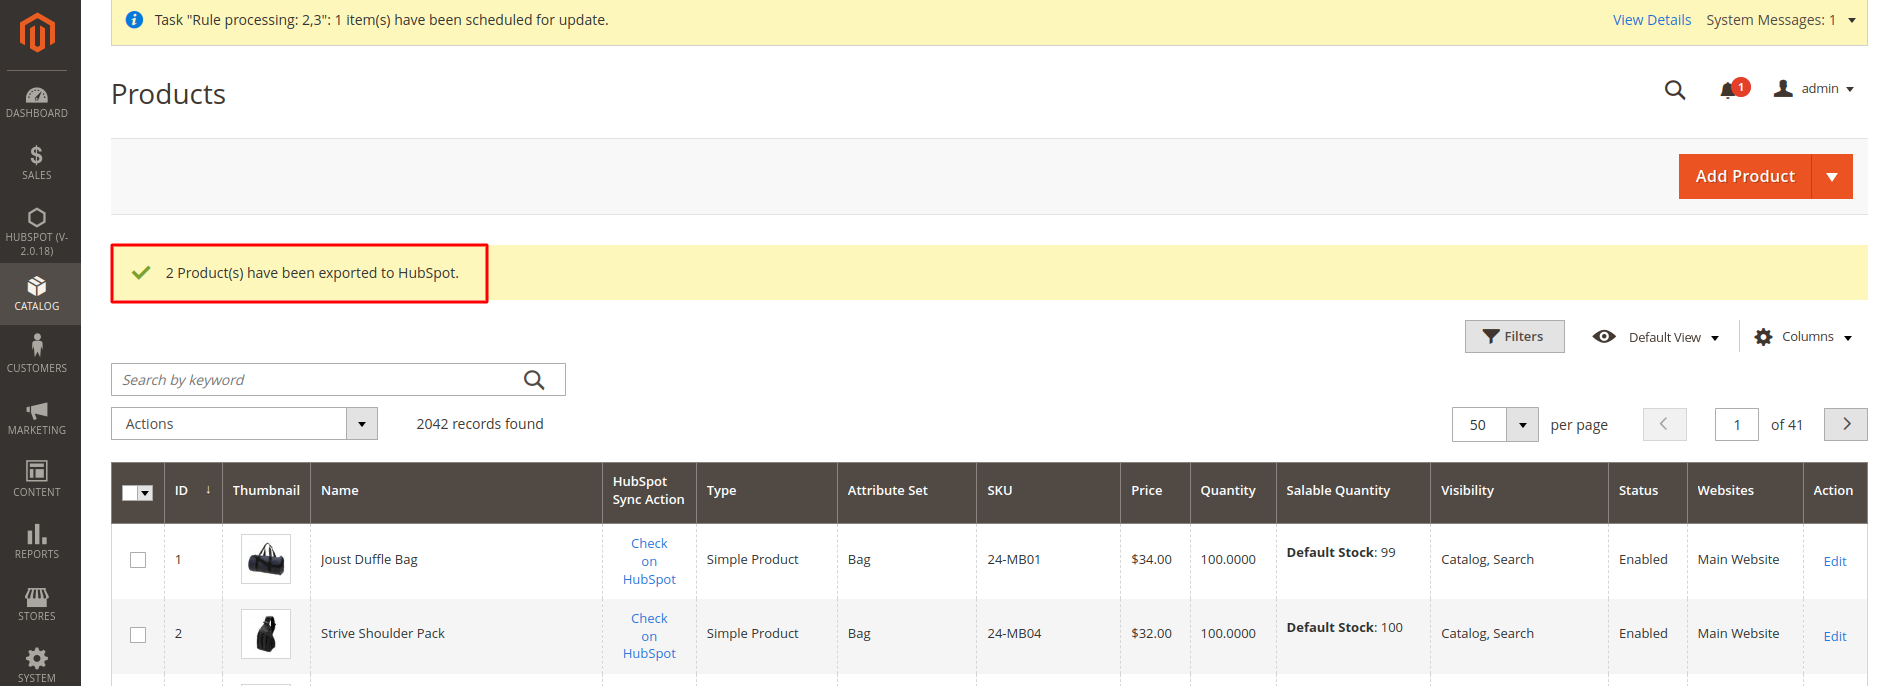
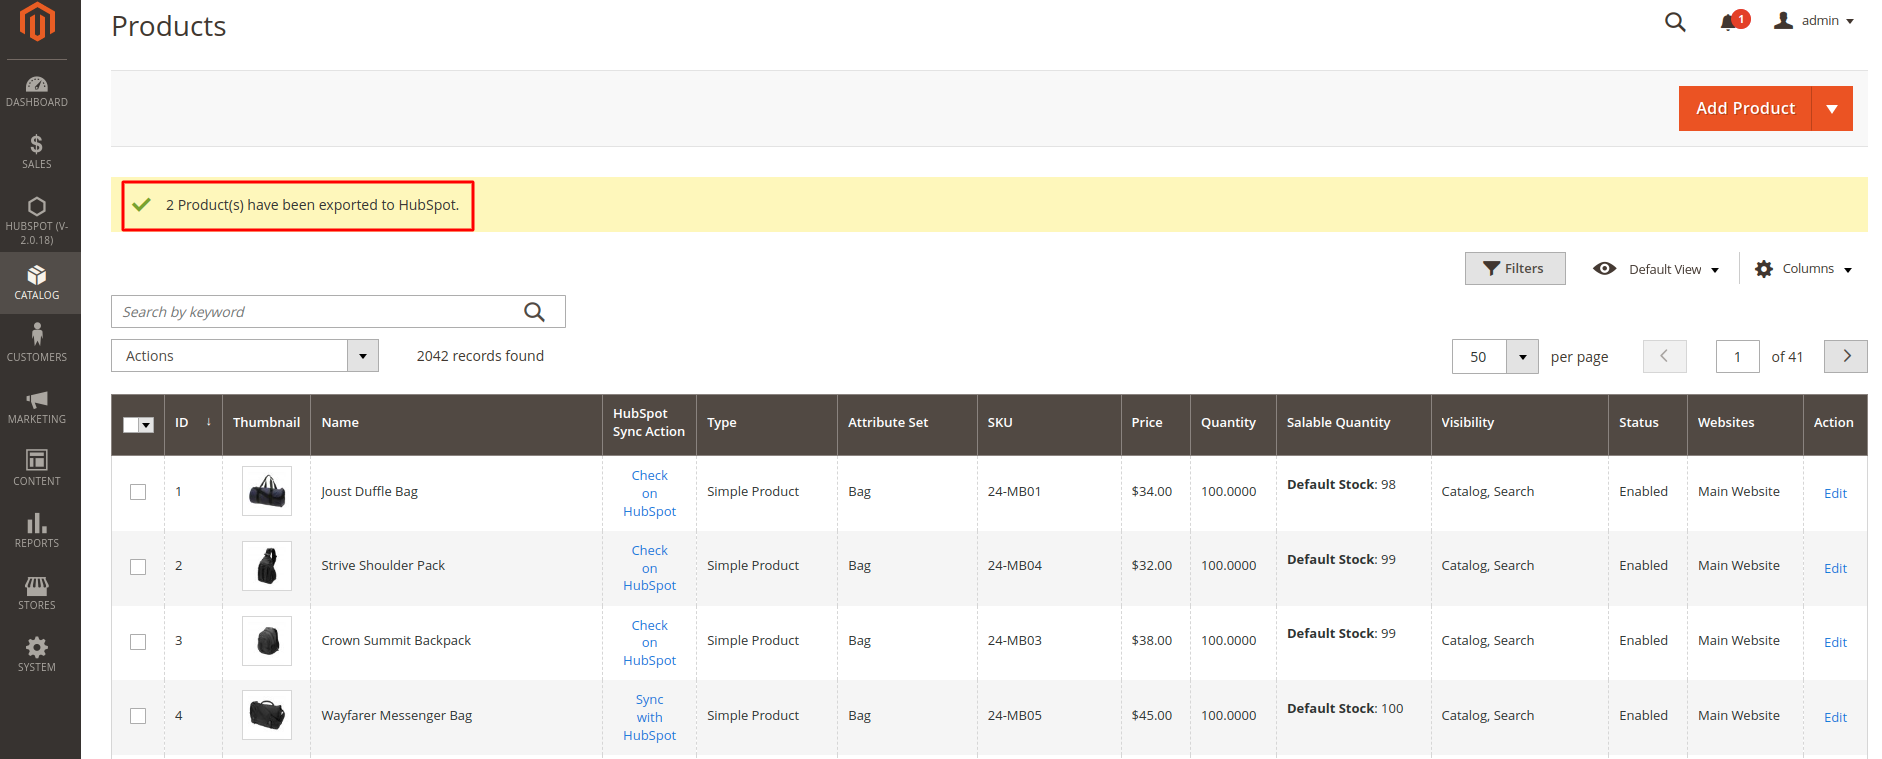
- Select the option Export to HubSpot from the available ACTION menu, once done it will show a message that the product has been exported to HubSpot.
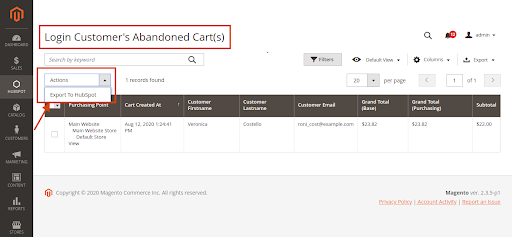
 Similarly, the admin can also do the same process for customer data, orders, and login customer’s abandoned cart data to HubSpot refer to the below images for more clarity.

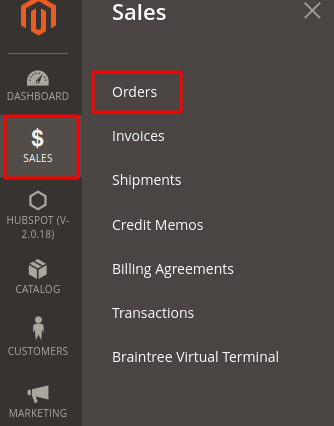
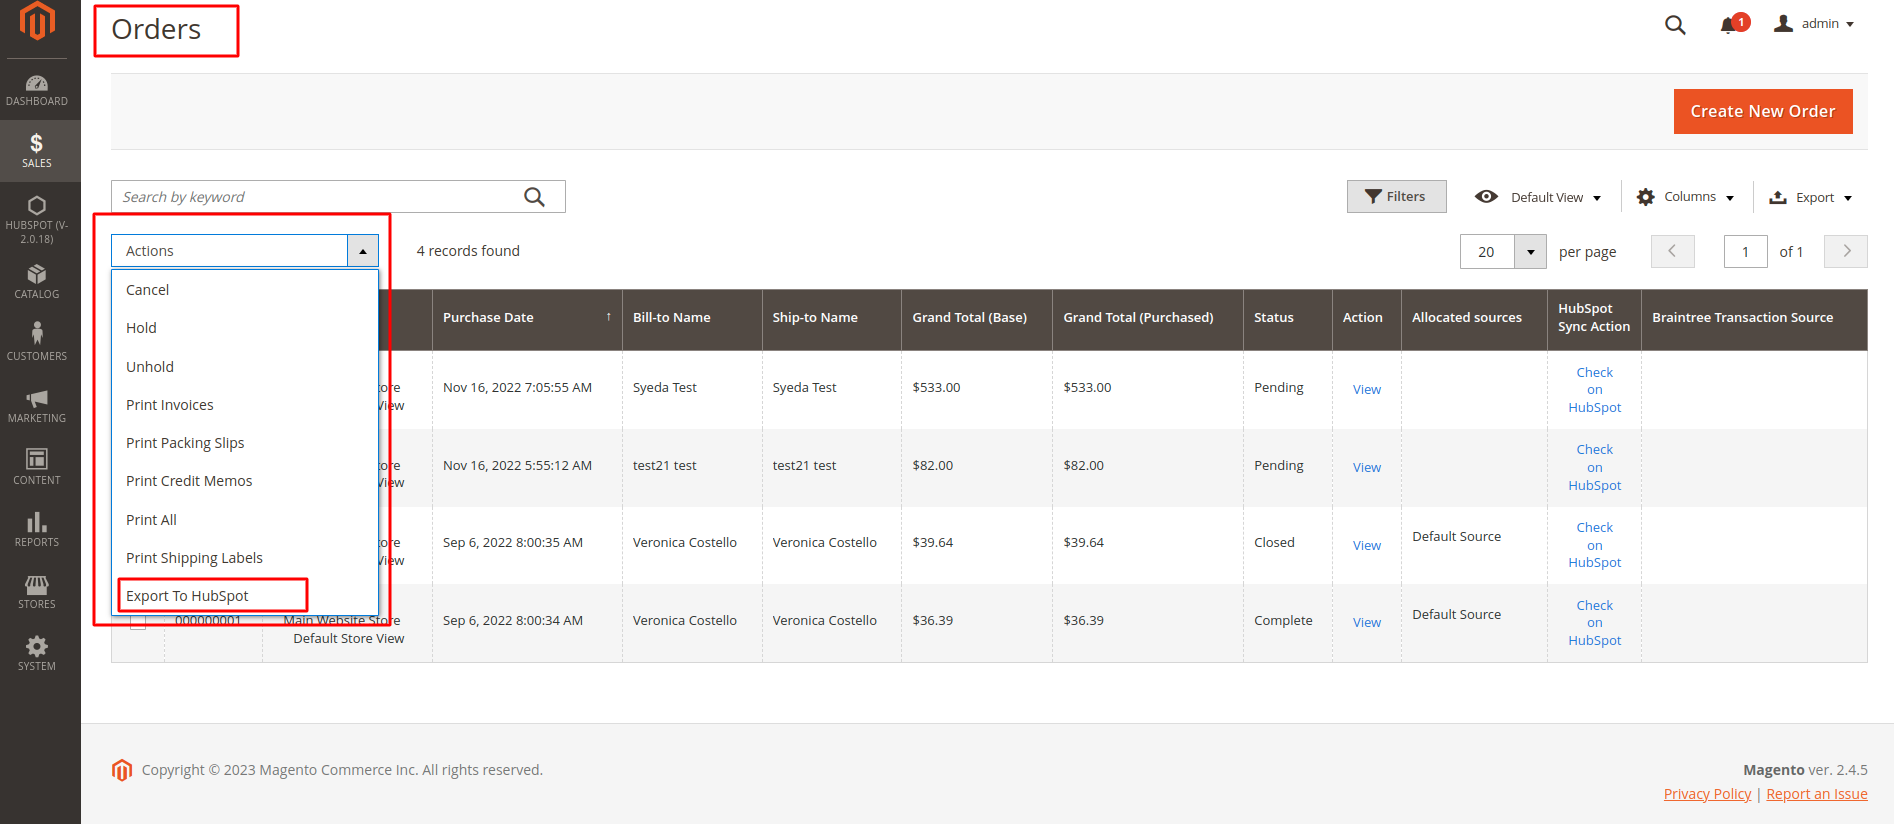
11.2.Export Orders
Login to admin panel > Sales > Orders.
You’ll see all the orders listed here. You can export them to HubSpot manually in 2 ways:
- Bulk Order Export: If you want to export multiple orders to HubSpot at once, select the orders > click on Actions dropdown > click on Export to HubSpot, and the orders will be synced on the CRM.

Single Order Export: If you want to export a specific order to HubSpot, you can click on Sync with HubSpot link in the HubSpot Sync Action column and your order will be synced over HubSpot.


11.3.Export Customers
Login to admin panel > Customers > All customers.
11.4.Export Abandoned Cart
Login to admin panel > HubSpot > Abandoned cart.
12.Catalog
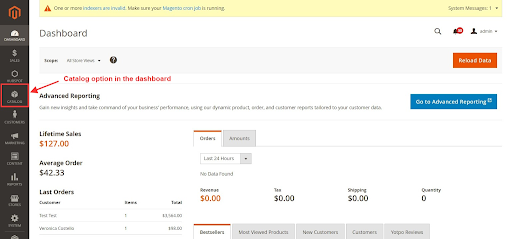
Right below the HubSpot icon in your dashboard, you’ll see a “Catalog” icon in the left sidebar.
You can use this setting to check the detail of your products and export any number of products manually.
Here’s how to do it.
Click on the Catalog button. After clicking on it, these settings will appear:
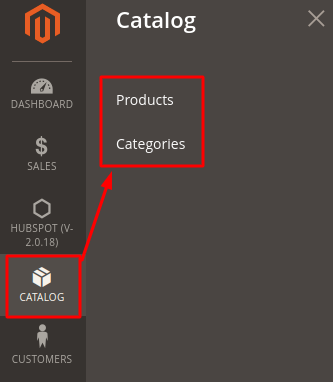
Click on Products and you will see this kind of page as shown below:

Now to export products, select the ones you want to export and click on the Actions dropdown as shown below.
Click on the Export to HubSpot option and the products will be exported to HubSpot. Once the products are exported, you’ll see a message.
Click on the Export to HubSpot option and the products will be exported to HubSpot. Once the products are exported, you’ll see a message.
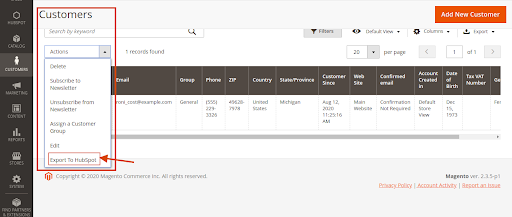
13.Customers
Just like the Products, you can export any specific customer data to HubSpot as well. For this, you’ll need to click on the Customers button which you can see below the Catalog button.
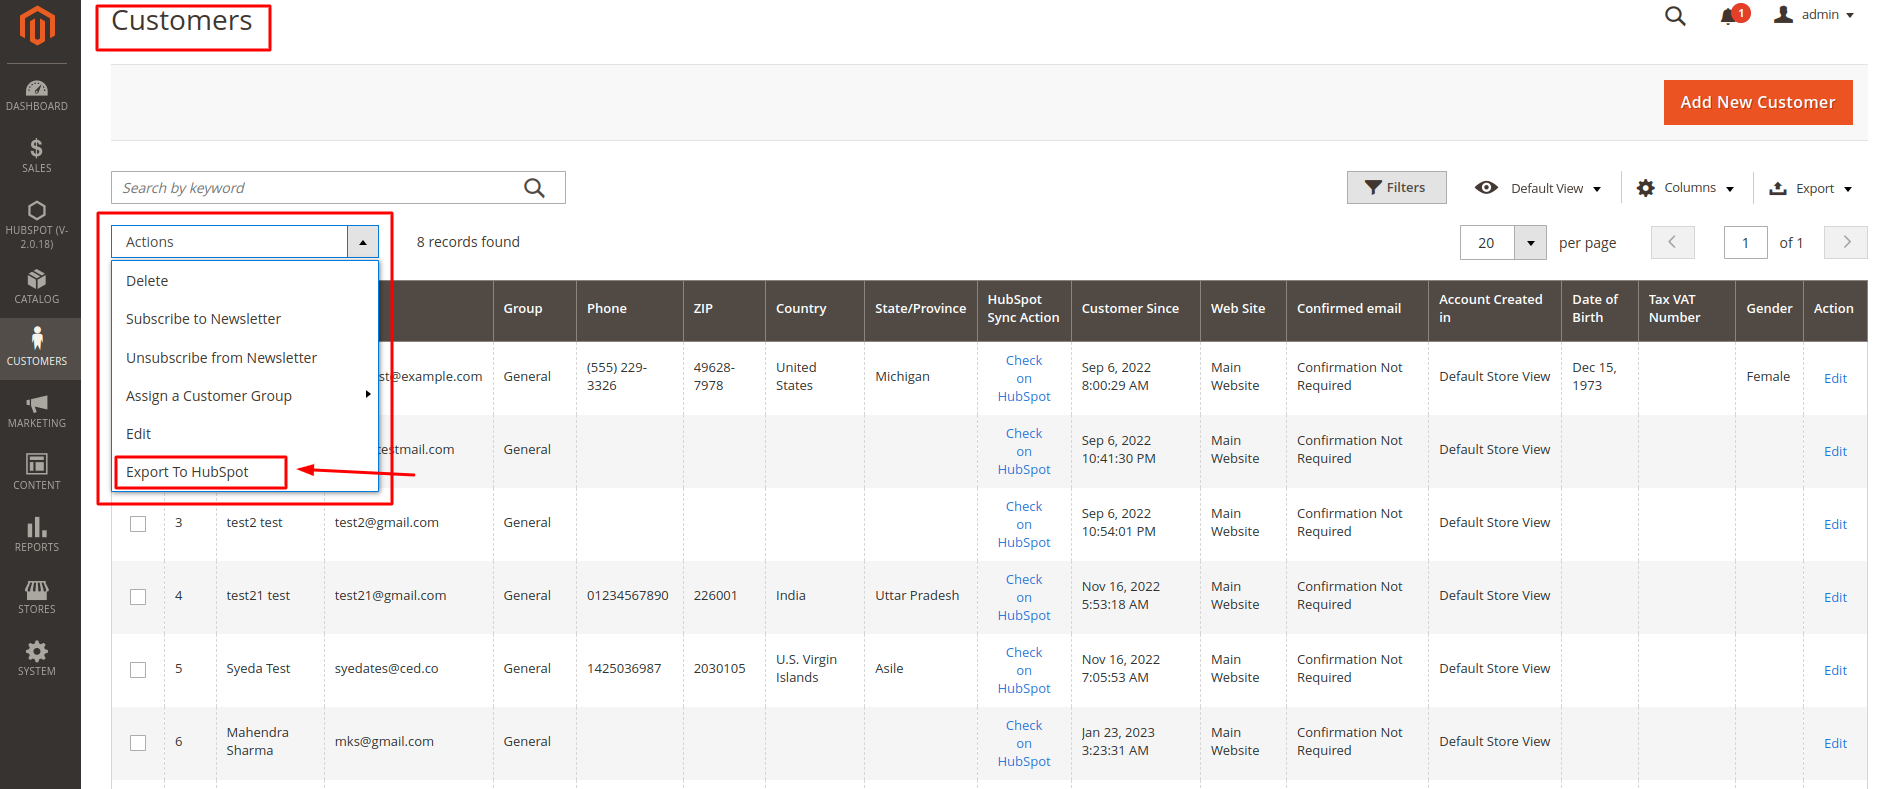
Click on the Customers icon and you’ll see the settings as shown below.
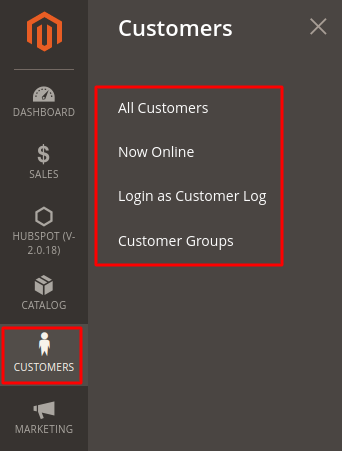
To export any specific customer’s data to HubSpot, click on the All Customers button and you’ll land on this page.
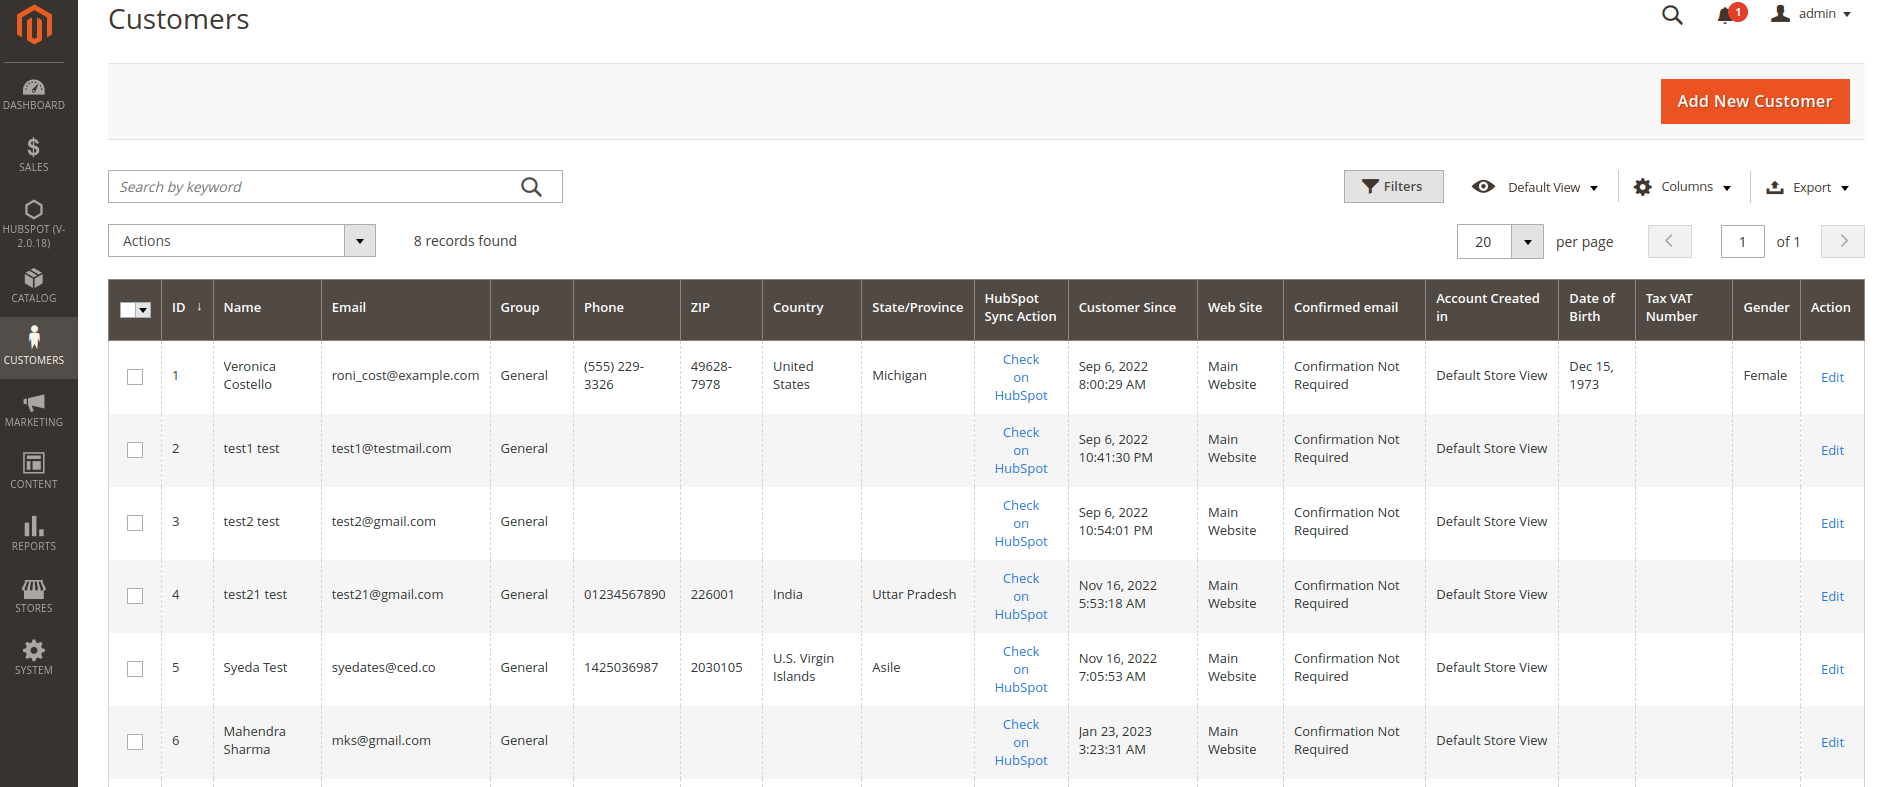
Now repeat the same steps you followed to export the product data. Select the customers you want to export to HubSpot. Click on the Export to HubSpot button from the dropdown and your data will be exported.
14.HubSpot Workflows
HubSpot gives you the privilege to create a workflow that will reduce manual efforts and speed up the business processes. Marketing automation will help in sales, marketing, lead generation and lead nurturing.
15.Frequently Asked Questions
Can I change My HubSpot Account any time?
Yes, You can easily change the HubSpot account by clicking on the "Re-Authorised/Authorised" button.
How many properties does this Magento Integration create?
Our HubSpot Magento Integration creates 136 properties. Each of these properties belong to a group. The groups are mentioned below along with the number of properties fall under them:
- Product: 6
- Contact: 69
- Deal: 17
- Line Item: 7
- List: 21
- Workflow: 16
Can this integration be used with a free HubSpot Account?
Yes. You can use this integration with a free HubSpot account.
What data can you sync from Magento to HubSpot?
You can sync data of your Products, Orders (as Deals with their Line Items), Customer, and Abandoned Cart.
Can we sync all the existing data of our store after installing the plugin?
Yes. You can sync all the existing data of your magento store to HubSpot.
Which pipeline and stages the order will be synced in HubSpot?
The orders will be synced in the eCommerce pipeline and with stages: Checkout Abandoned, Checkout Pending, Processed, Shipped, Canceled, Checkout Completed.
Does your module sync cart items with images?
Yes. Our module can sync cart items with their images.