5.Listings ↑ Back to Top
In this section, we’ll delve into the core functionality that empowers you to seamlessly list and manage your Shopify products on the Amazon platform. Listing your products on Amazon through our app opens up new avenues for growth, sales, and brand exposure. This guide will walk you through the essential aspects of the product listing process, ensuring that you make the most of this powerful integration. From understanding the intricacies of different status codes to performing bulk operations and resolving any potential errors, we’ve got you covered.

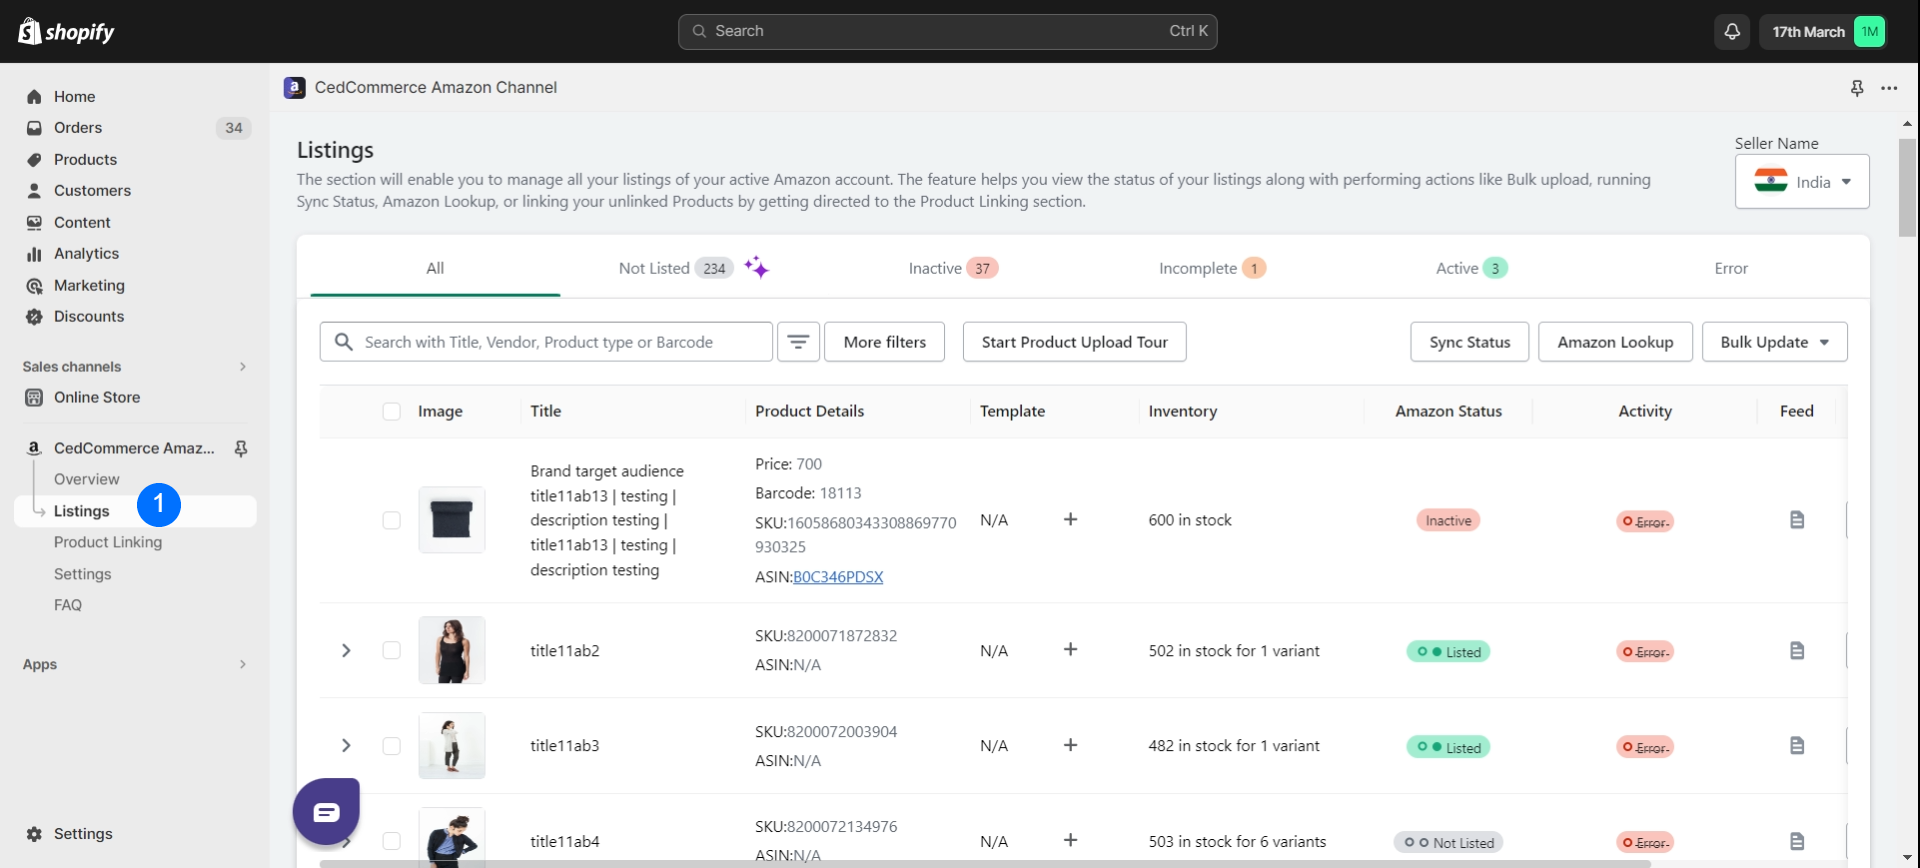
Once you import your Shopify products into the app and set up your preferences, reach the Listing page from the main menu.
Navigating the Product Listing Page
The Product Listing page is your central command center for seamlessly managing your Shopify products on Amazon through the CedCommerce Amazon Channel app. This page provides you with a comprehensive overview of your Amazon listings and facilitates various essential operations to ensure your products are accurately listed and continuously updated.
Understanding Listing Status

The Amazon Listing Status serves as a vital indicator of the current state of your products on Amazon. Each status conveys specific information about your product’s presence, readiness, and eligibility for sale on the Amazon platform. Here’s a breakdown of the different Amazon Listing Statuses and the corresponding actions you can take for each:
Not-listed
Status Meaning: The item is not listed on Amazon.
Action: Upload the product. The CedCommerce Amazon Channel app will automatically pull the Shopify SKU and ISBN, UPC, and GTIN from your catalog and perform a lookup to check if an ASIN (Amazon Standard Identification Number) already exists. In the app’s user interface (UX), merchants will be informed that this process is running.
Inactive:
Status Meaning: The item is listed on Amazon but is not fit for sale.
Actions: Similar to the “Active” status, merchants can update offer information, update product information, or delete the product. This includes updating Price, Quantity, and Offer Start/End dates for selected SKUs. If there are multiple SKUs (e.g., multiple child SKUs with existing products on Amazon), merchants can provide the necessary offer info for each SKU. The initial values for price, quantity, and offer start/end dates will be populated from Seller Central, and merchants can adjust prices based on their Shopify catalog.
Incomplete:
Status Meaning: The item is missing some information.
Action: Update product information. Merchants can update Price, Quantity, and Offer Start/End dates for selected SKUs. If multiple SKUs exist (e.g., multiple child SKUs with existing products on Amazon), merchants can provide the required offer info for each SKU. The initial values for price, quantity, and offer start/end dates will be populated from Seller Central, and merchants can adjust prices based on their Shopify catalog.
Active:
Status Meaning: The item has an Amazon SKU in the Shopify catalog.
Actions: Sellers can update offer information, update product information, or delete the product. Merchants have the flexibility to update Price, Quantity, and Offer Start/End dates for selected SKUs. If multiple SKUs exist (e.g., multiple child SKUs with existing products on Amazon), merchants can provide the necessary offer info for each SKU. The initial values for price, quantity, and offer start/end dates will be populated from Seller Central, and merchants can adjust prices based on their Shopify catalog.
Error:
Status Meaning: There was an error in the listing process.
Action: Correct the error to proceed with the listing.
What you can view from the product listing page?
When you access the Product Listing page, you’ll notice a neatly organized table, each row representing a specific product. Here’s what you can expect to find:

Product Image (with Variations):
The first column features high-quality images of your products. If you offer variations of a product, such as different colors or sizes, these variations will be displayed alongside the main product image, providing a visual snapshot of your offerings.
Title:
In the second column, you’ll see the product title. This piece of information helps you quickly identify and manage different products with ease.
Product Details:
Under this you can view product price, barcode, SKU and ASIN (if assigned). This gives a clear and crisp view of all the product detail that are listed or yet to be listed.
Template:
The fourth column might showcase the template associated with each product. Templates are predefined configurations that ensure your product information aligns with Amazon’s listing requirements, enhancing the quality of your listings. If you want to create a new template just click on + button to do so.
Inventory:
The third column displays the current inventory levels for each product. This real-time insight into your stock levels is crucial for maintaining adequate availability and preventing overselling.
Amazon Listings Status:
The fourth column provides a clear overview of the Amazon listing status for each product. This status informs you about the product’s presence on Amazon – whether it’s live, pending approval, or facing any listing-related issues.
Activity:
The final column, labeled “Activity,” logs recent actions performed on each product. From listing a new product to updating inventory or making changes, this column serves as a chronological record of activities related to the product.
Feed:
When you click on the feed, you can view all the recent activities performed related to that product listing.
Smart lister:
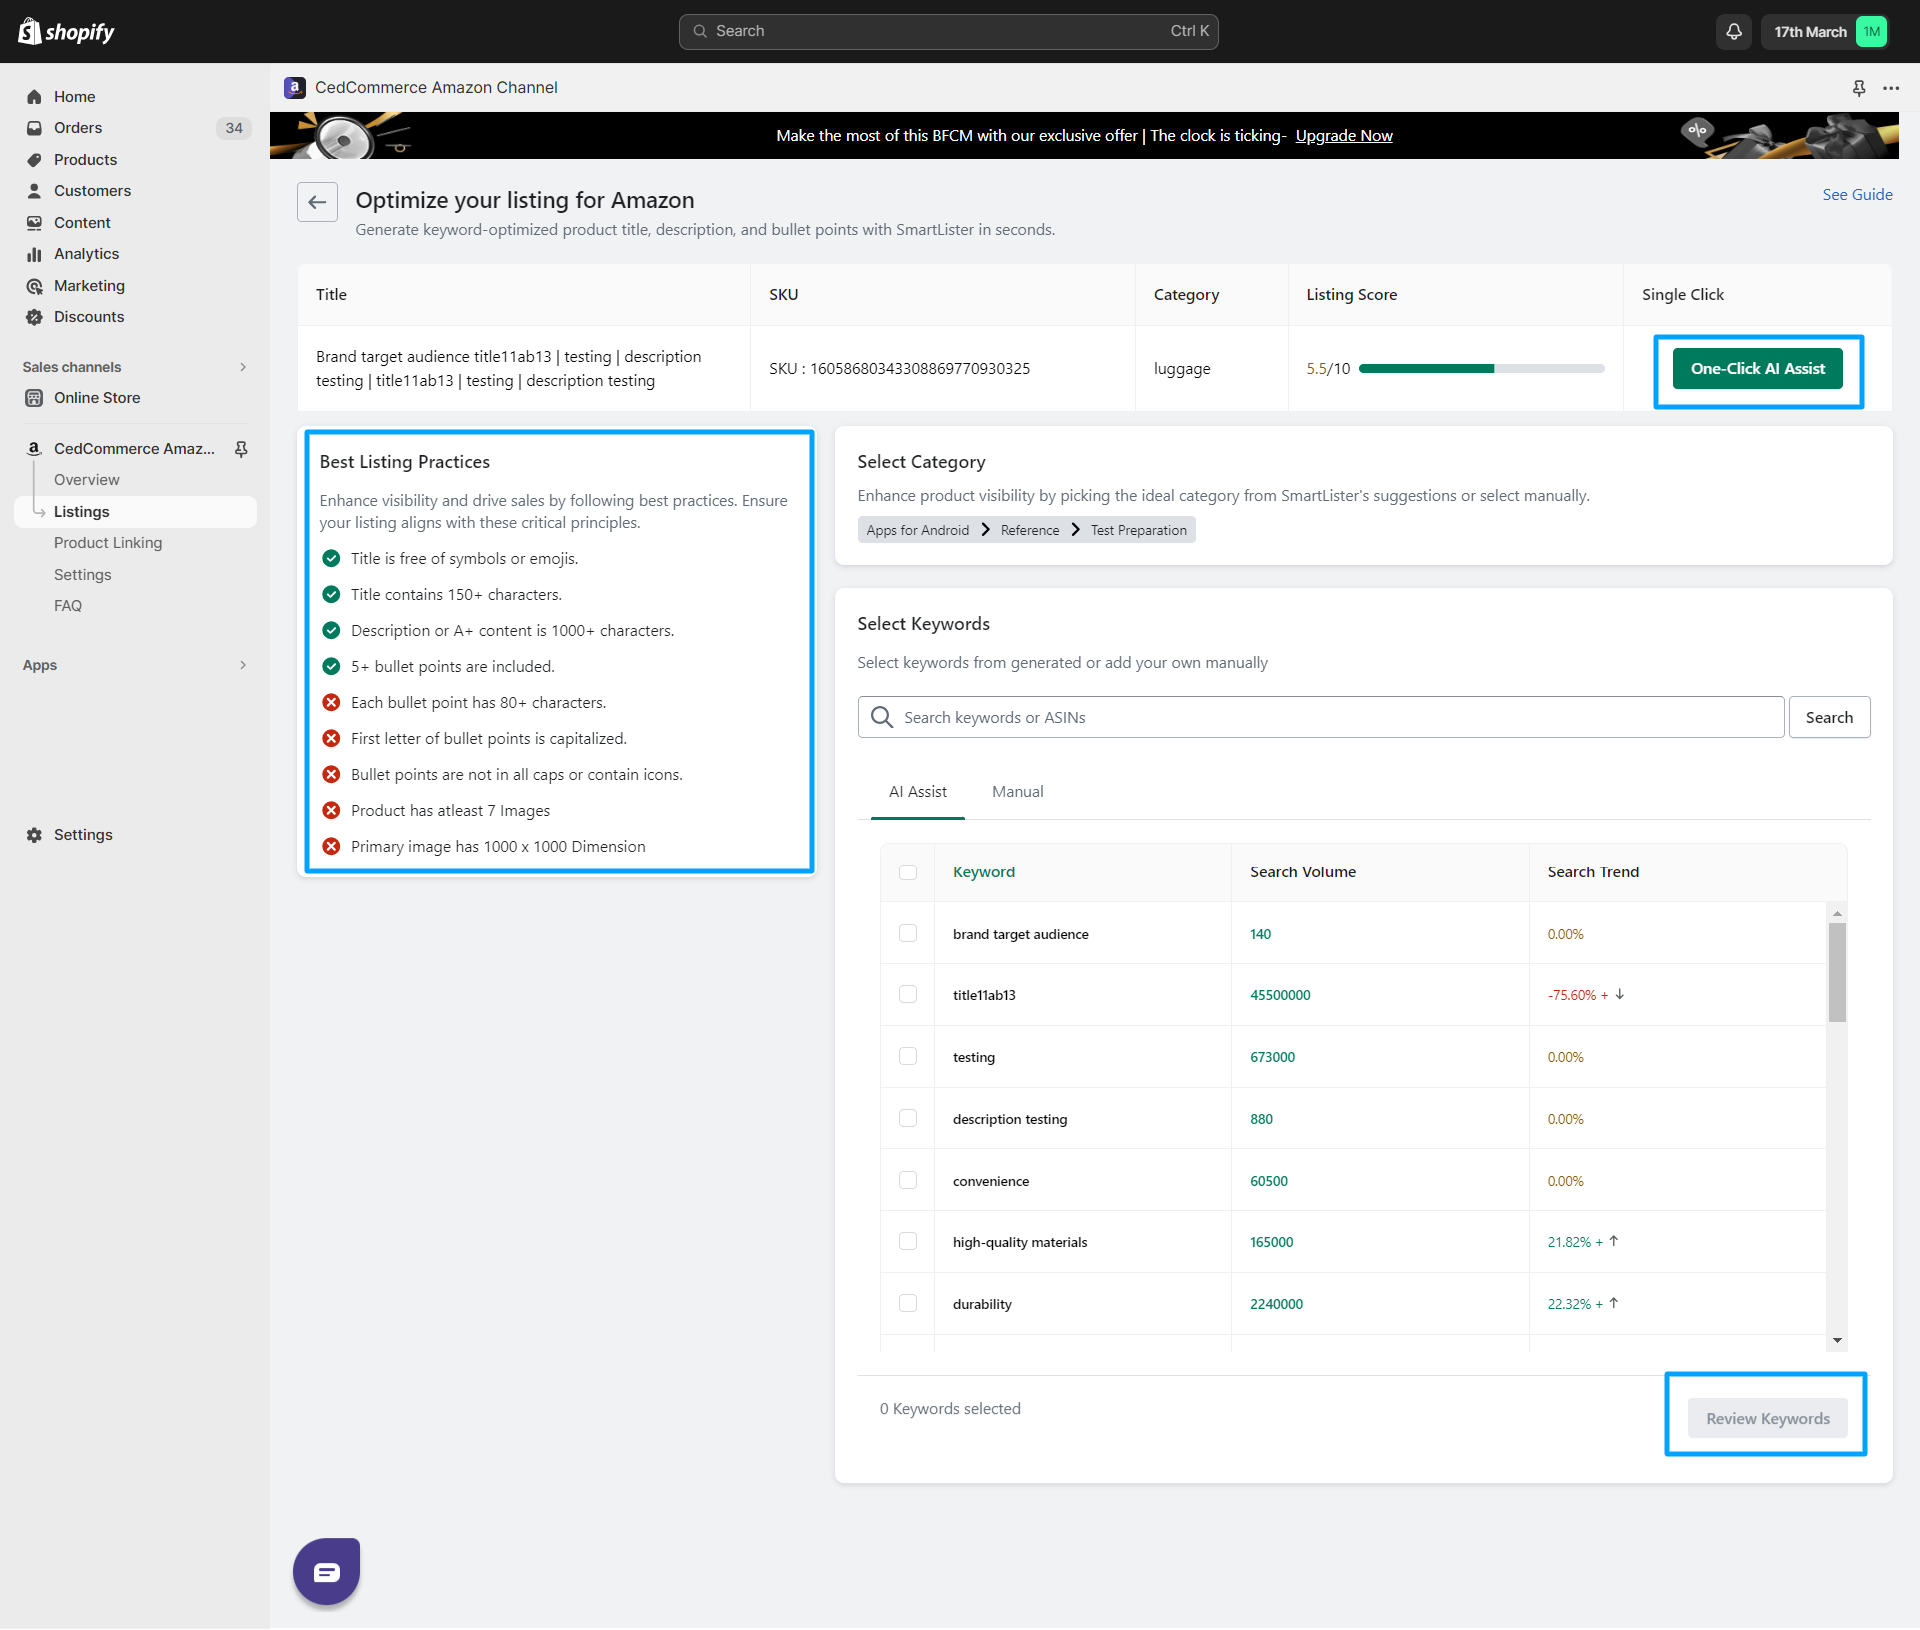
Smart lister is a new tool introduced by CedCommerce, it helps you optimize your Amazon listing with the help of AI. It incorporates relevant keywords, and bullet points, checks image dimensions, and suggests ways to rank your product higher.
When you click on ‘Assist AI’, you will be redirected to a page where you can view all the details of the product along with suggested edits.

Operations from the Product Listing Page
From the Product Listing page in the CedCommerce Amazon Channel app, you have access to a range of operations that empower you to efficiently manage your Amazon listings.

These operations enable accurate synchronization, streamlined inventory management, and effective updates. Here’s an overview of the key operations you can perform:
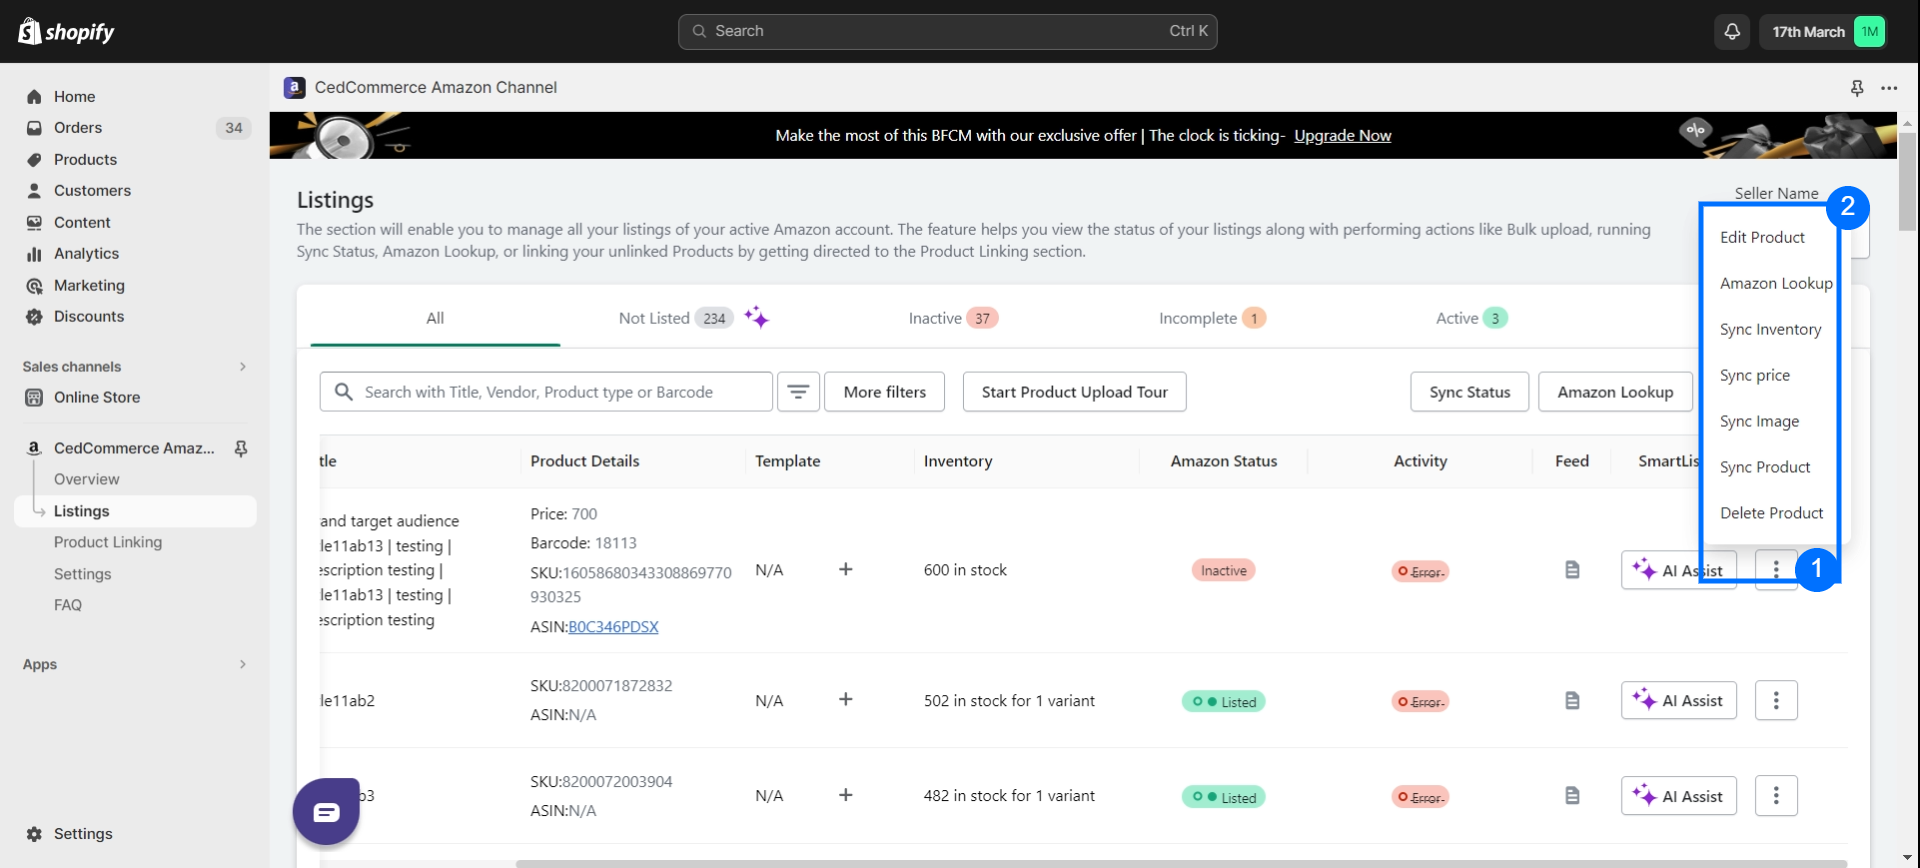
Edit Product:
Allows you to edit product details directly from the Product Listing page. This is particularly useful for making quick updates without navigating to each product’s individual settings.
Amazon Lookup (Previously known as Search on Amazon):
This feature checks if your product barcodes are unique or if they already exist on Amazon. If a barcode is already available, the product becomes eligible for offer listing. Its status changes from “Not Listed” to “Not Listed: Offer”.
Sync Inventory:
Synchronizes inventory levels between your Shopify store and Amazon listings. This ensures that stock availability remains accurate across platforms.
Sync Price:
Updates the product price on Amazon to match the price in your Shopify catalog. Maintaining consistent pricing helps you provide a seamless shopping experience for customers.
Sync Image:
Enables you to sync updated product images from Shopify to Amazon. Visual consistency is crucial for building brand trust and attracting buyers.
Sync Product:
Initiates the synchronization process for a specific product or product, ensuring that all relevant information is up-to-date and accurate on Amazon.
Delete Product:
Allows you to remove a product from your Amazon listings. This is useful when you no longer wish to offer a particular item on Amazon.
You can also perform these additional actions

Sync Status (Previously known as Match From Amazon):
This action links existing Amazon listings with Shopify products imported into the app based on SKU and barcode. This ensures accurate synchronization and efficient inventory management.
Bulk Update:
This process facilitates the bulk import or update of Shopify products into the app.
- Export Product Information:
Export details of selected or all products as a CSV document. Make necessary changes to this exported information, and then use the updated CSV to import changes back into the app.
- Import Updated Product CSV:
For seamless product updates, export product information as a CSV file, make necessary updates to the file and then import the updated CSV back into the app. All changes will be reflected on the app and your Shopify store.
How to Synchronize Individual Product Data?
You can choose to sync individual product’s specific data such as Inventory, price, image, or all information corresponding to the product from here. Here is how:
- Click the the three dots in the Action column.
- Choose the information you want to sync.
- Confirm the process by clicking the “Start” button.
- Check the status from the Activity section on the Overview page for progress.
How to Delete Product?
- Click the the three dots in the Action column.
- Click the Delete Product option.
- Confirm the process by clicking the “Start” button.
- Check the status from the Activity section on the Overview page for progress.
How to edit a single Product?
- Click the the three dots in the Action column.
- Click the Edit Product option.
- Check out the Product detail page that opens up for you.
- Scroll to find the information you want to change.
- Make the change and click save.


