
Amazon Prestashop Integration Configuration Settings
After installing the Amazon PrestaShop Integration module, the store owner (admin) has to set up the Amazon Integrations configurations. Prior to this, the admin has to first create a seller account on Amazon seller panel.Once the seller account is created and is approved by Amazon, the store owner can use the Amazon Username and Password while setting up the Amazon Configuration settings in the PrestaShop Admin panel.
To set up the configuration settings in the PrestaShop Admin panel
- Go to the Prestashop Admin panel.
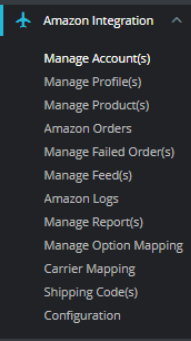
- In the left navigation panel, place cursor on Amazon Integration and the section expands as:
- Now click on Configuration.
- You will redirect to configuration page:
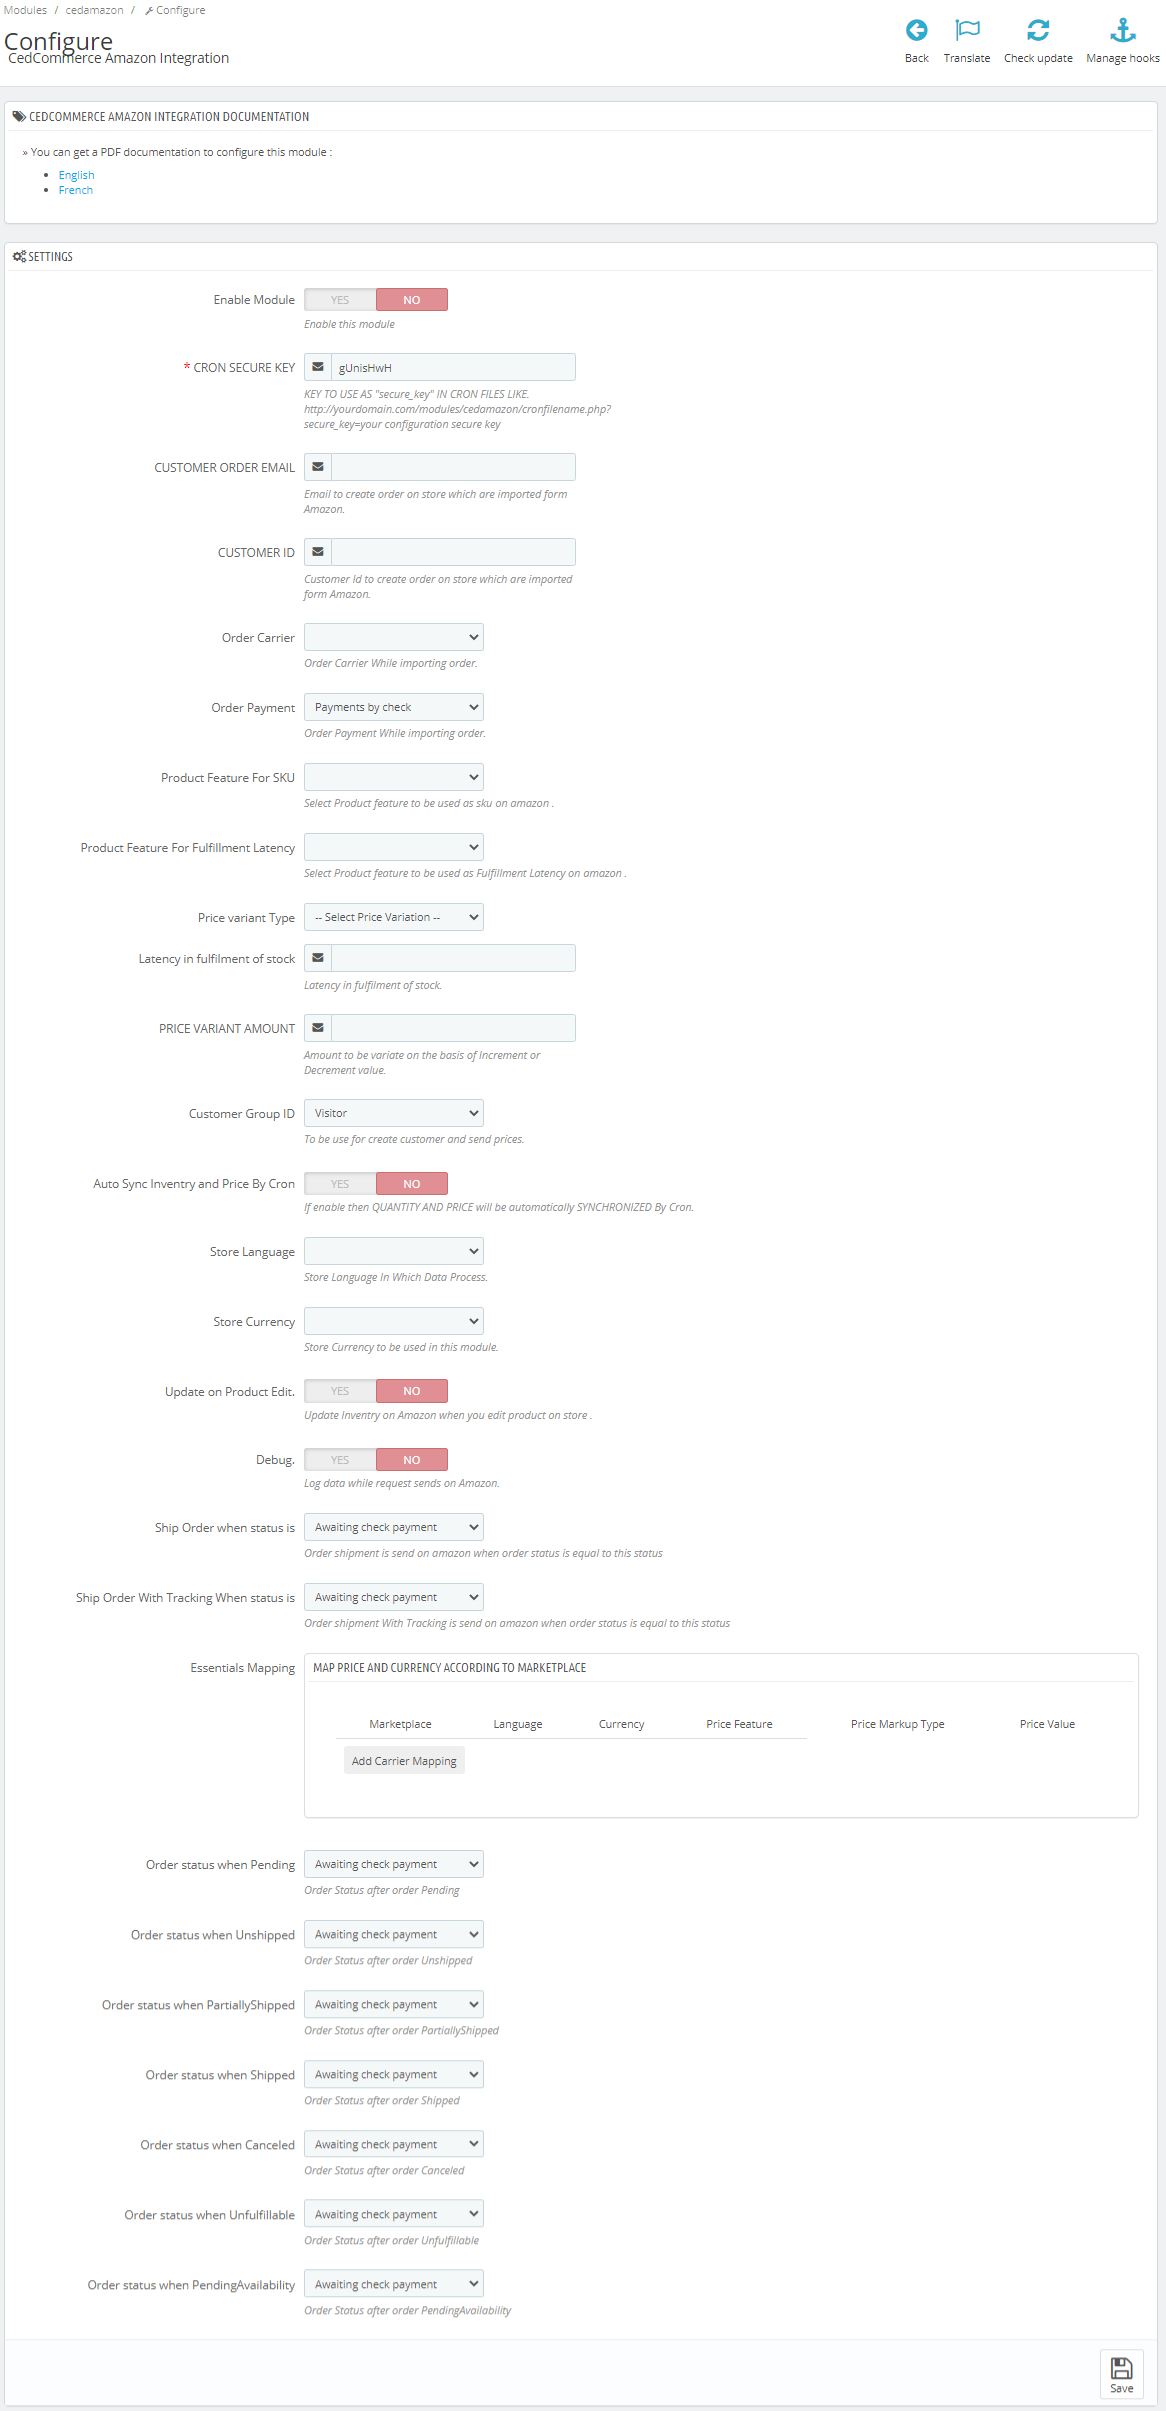
- In this configuration setting, do the following steps:
- In the Enable Section, Select Yes. By choosing Yes the Amazon extension gets enabled and all the changes made on the Prestashop Dashboard will get reflected back to the marketplace.
- The next option is the Cron Secure Key. Here you need to enter the cron key that validates the URL. By doing so a perfect synchronization is established between the Amazon and Prestashop as regular updates from the Cron updates the current scenario.
- In the Customer Order Mail, you need to provide the Email to create order on the store which is imported from Amazon.
- Enter the Customer Id in the next section. Customer Id is a unique id which is used to create order on the Prestashop store which is imported from Amazon.
- In the Order status when shipped, select the order status to appear when the order has been shipped.
- In the Order Carrier, select the order carrier set for particular orders while importing the Amazon order.
- In the Order Payment Method, select the order payment method set for each order while importing the Amazon order.
- In Product Feature by Sku, you can select product feature used as Sku on amazon marketplace.
- In
- In the Price Variant Type, you have the options to select the pricing to be reflected on Amazon for your products, as shown be low:
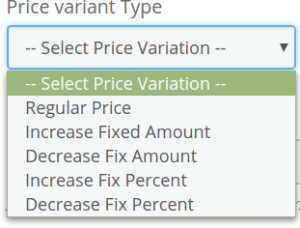
- Increase by Fixed Amount: If you select this option, a bar gets opened as shown in the image below: Now suppose if your product price on Prestashop is 100 and you enter 50 in this tab, the price of the product that will be reflected on Amazon will be 150 now. It is because you have selected Increase By Fixed Amount and entered 50 in the corresponding fieldSuppose, your product is available on Prestashop for 100 and you enter 50 in the corresponding box, then the 50% of your product’s Prestashop price will be added to it and it will be reflected on Amazon. So now your product will be available on Amazon for 150. (As 50% of 100 = 50.)
- Increase by Fixed Percentage: If you select this option, you may increase the product price by a fixed percentage.
- Decrease by Fixed Amount: It works in the same manner as Increase by Fixed Amount works, but it decreases the price of the Prestashop product on Amazon marketplace by a fixed amount.
- Decrease by Fixed Percentage: It works in the same manner as Increase by Fixed Percentage works, but it decreases the price of the Prestashop product on Amazon marketplace by a fixed percentage.
- In Price Type Amount you need to enter the Amount to be variated on the basis of Increment or Decrement value.
- Auto Sync Inventory and Price By Cron, select Yes or No in accordance with your needs. By selecting yes, the Inventory and Price will be synchronized between Prestashop and Amazon.
- In Store Language, select the default language of the store in which the data is processed.
- In Store Currency, choose the default currency in which you wish to see the transactions for your store.
- In Remove Free Shipping, select Yes or No in accordance with your needs. If you select yes, then free shipping gets removed from the product feed.
- In Update on Product Edit, select Yes or No in accordance with your needs. If you select yes, the Inventory and Price will be updated in product feed when you edit the products in the store.
- In the Debug section select Yes if you wish to Log data while the request is being sent on Amazon.
- At completing the process, you need to click on the Save Config button on the bottom right of the page as shown in the figure below:

- A confirmation message appears as shown:

×


