
Sears Configuration Settings
Once the extension is successfully installed on the Magento 2 store, the Sears menu appears in the Magento 2 Admin Panel. The merchant has to fill out the API credentials on the Sears Configuration page of the admin panel.

After obtaining the details, the merchant has to copy all of them one by one from the Sears Seller account and paste it one by one to the Sears Configuration page of the admin panel of the merchant.
To follow the process of copying and pasting of the Id, key and fulfillment location details, open the Sears Seller account and the Magento Admin Panel in two different tabs or windows of the browser. Thus, copy the details from the Sears Seller account and paste them one by one to the Magento Admin Panel.
To copy the Id, key and fulfillment location details from the Seller panel
- Go to the Sears Seller panel.
- In the right upper corner, click the Arrow icon next to the account holder’s name.
The menu appears as shown in the following figure:
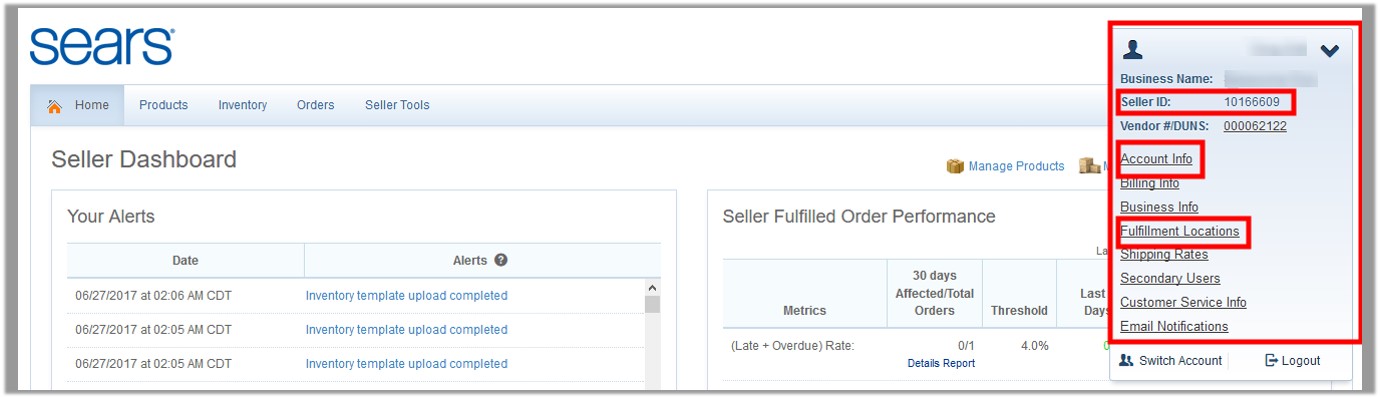
- Copy the Seller ID value, and then paste it in the Seller ID box appearing on the Sears Configuration page of the Magento Admin panel.
- Click the Account Info link, and then scroll down to find the API Authorization Key section.
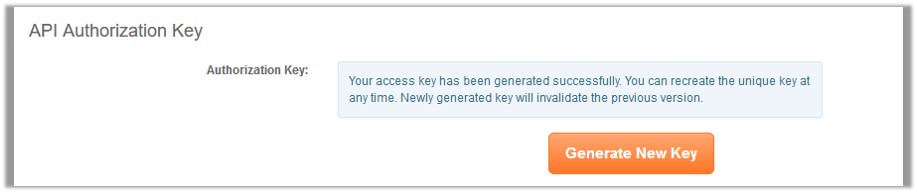
- Click the Generate New Key button.
The key is generated. - Copy the generated key and then paste it in the Authorization Key box appearing on the Sears Configuration page of the Magento Admin panel.
- Click the Fulfillment Locations link.
The page appears as shown in the following figure:

- Copy the Fulfillment Locations value and then paste it in the Fulfillment Locations Id box appearing on the Sears Configuration page of the Magento Admin panel.
To set up the configuration settings in the Magento 2 Admin panel
- Go to the Magento 2 Admin panel.
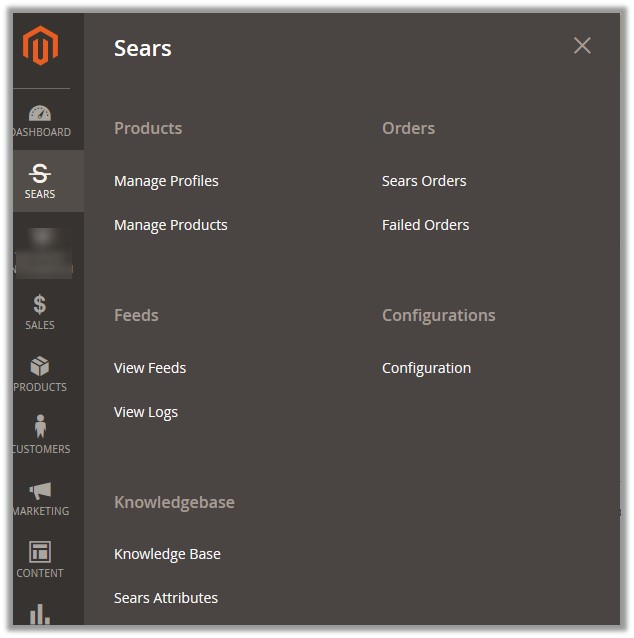
- On the left navigation bar, click the SEARS menu.
The menu appears as shown in the following figure:
- Click Configuration.
The Configuration page appears. - In the left navigation panel, click the Sears Configuration menu.
The corresponding Configuration Settings tabs appear in the right panel as shown in the following figure:

- Click the Sears Api Settings tab.
The corresponding fields appear as shown in the following figure:
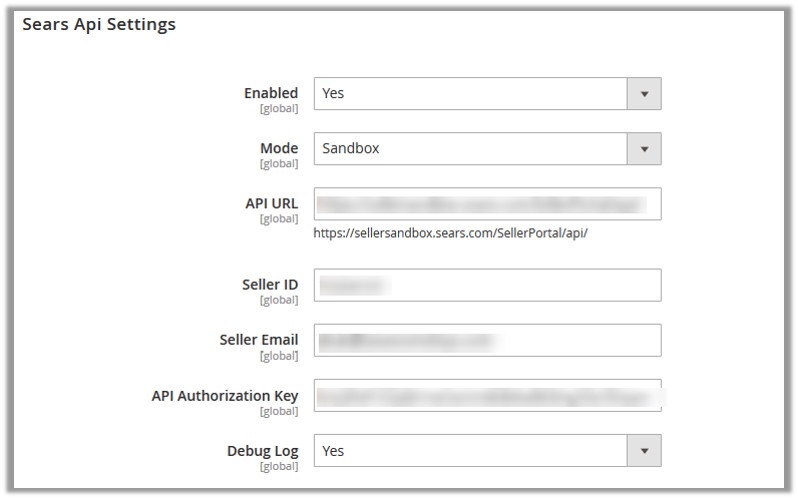
- Under Sears Api Settings, do the following steps:
- In the Enabled list, select Yes.
Note: Selecting the No option disables the Sears Integration extension. - In the Mode list, select Sandbox or Production as per the requirement.

- In the API Url box, enter https://sellersandbox.sears.com/SellerPortal/api/
- In the Seller Id box, paste the corresponding Id copied from the Sears Seller account.
- In the Seller Email box, enter the email id of the seller account.
- In the API Authorization Key box, paste the corresponding key copied from the Sears Seller account.
- In the Debug Log list, select Yes to enable Sears Debug Mode for logging.
- In the Enabled list, select Yes.
- Scroll down to the Sears Global Settings tab, and then click the tab.
The corresponding fields appear as shown in the following figure:

- Under Sears Order Settings, do the following steps:
- In the Select Store list, select the single store.
- In the Sears Order Id Prefix box, enter the prefix for Sears Order Id.
Note: Sears Order Id Prefix can be a combination of numbers, alphabets, or special characters. This is for your own recognition since the orders from the Sears marketplace will have the same prefix & will be easy to analyze. So make sure to mark them as per your ease.
- Scroll down to the Sears Inventory Settings tab, and then click the tab.
The corresponding fields appear as shown in the following figure:
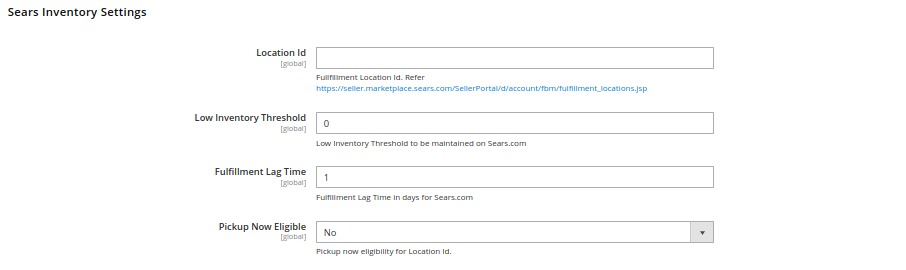
- Under Sears Inventory Settings, do the following steps:
- In the Location Id box, paste the Fulfillment Locations value copied from the Sears Seller account.
- In the Low Inventory Threshold box, enter the required numeric value to maintain the minimum Inventory threshold.

- In Fulfilment Lag Time, enter the inventory fulfilment lag time for Sears marketplace.
- In the Pickup Now Eligible list, select Yes to enable the Store pickup for all the customers.
- Scroll down to the Sears Price Settings tab, and then click the tab.
The corresponding fields appear as shown in the following figure:
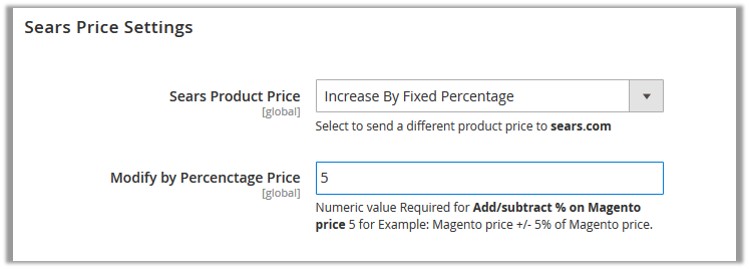
- Under Sears Price Settings, enter the values in the corresponding fields.
- Sears Product Price: This is to set a different price for all the products as shown in the Sears Price Setting figure:
The user can set the price on the following basis: –- Increase by Fixed Price: If selected, then the Modify by Fixed Price field appears.
- Increase by Fixed Percentage: If selected, then the Modify by Percentage Price field appears.
Enter the numeric value to increase the price of the sears product price by the entered value % of Magento price
For Example, Magento price + 5% of Magento price.
Magento Price = 100
Select Increase By Fixed Percentage option
Enter Percentage = 5
100 + 5% of 100 = 100 + 5 = 105
Thus, Sears Product Price = 105 - Decrease by Fixed Price: If selected, then the Modify by Fixed Price field appears.
- Decrease by Fixed Percentage: If selected, then the Modify by Percentage Price field appears.
Enter the numeric value to decrease the price of the sears product price by the entered value % of Magento price
For Example, Magento price – 5% of Magento price.
Magento Price = 100
Select Decrease By Fixed Percentage option
Enter Percentage = 5
100 – 5% of 100 = 100 – 5 = 95
Thus, Sears Product Price = 95
- Sears Product Price: This is to set a different price for all the products as shown in the Sears Price Setting figure:
- Scroll down to the Sears Cron Settings tab, and then click the tab.
The corresponding fields appear as shown in the following figure:
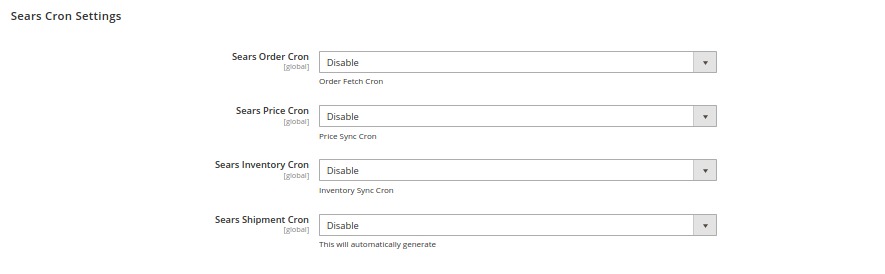

- Under Sears Cron Settings, do the following steps:
- In Sears Order Cron, select Enable if you want to fetch the orders. Order Crons are used to fetch waiting for shipment orders. This cron runs at every 30 minutes.
- In the Sears Price Cron list, select Enable to synchronize the Sears Product Price between Magento and Sears at regular intervals of time. This cron runs every 1 Day to sync.
- In the Sears Inventory Cron list, select Enable to enable the Inventory synchroisation automatically at regular intervals of time. This cron runs every 1 hour to sync.
- In Sears Shipment Cron, select Enable synchronise the shipment of the Sears orders automatically. This cron runs every 2 hours to sync.
- Click the Save Config button.


