4.Configuration Setting ↑ Back to Top
Once the extension is successfully installed on the Merchant’s store, the Kaufland tab appears in the Magento Admin Panel.
The admin has to set up the configuration settings for establishing the connection between the Magento store and the Kaufland marketplace.
To set up the configuration settings in the Magento Admin panel:
- Go to the Admin panel.
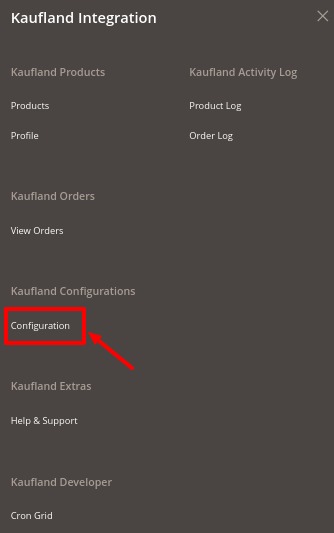
- On the left navigation bar, you will find the Kaufland option.

- Click on Configuration.
The Kaufland Configuration page appears as shown in the following figure:

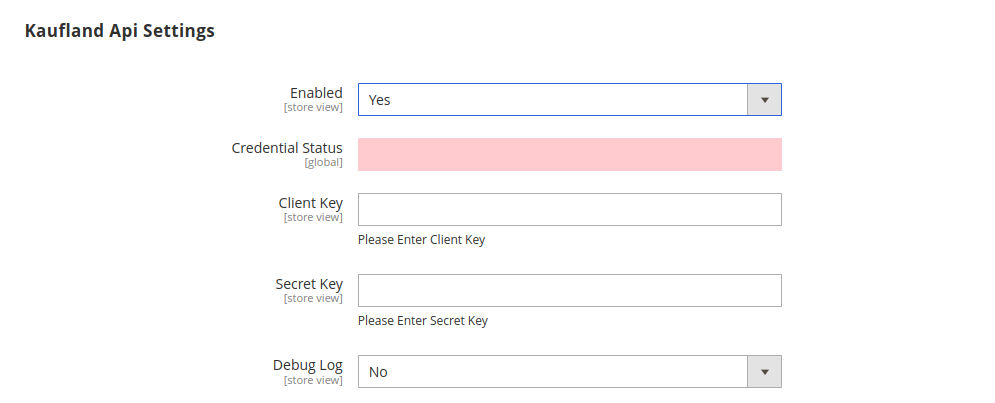
- Now click on Kaufland API Settings. The section expands as shown below:

- Under Kaufland API Settings do the following steps:
- In the Enabled select Yes from the drop-down menu to enable the extension configuration settings.
- Enter the Client Key and Secret Key in the respective fields which you have fetched from the seller panel. If you don’t have the details then please refer to Retrieve API credentials from the Kaufland section
- If you want to enable the Debug Log then select Yes from the drop-down menu.
- Click the Store Settings tab.
The tab is expanded and the relevant fields appear as shown in the following figure:

- In the Select Store list, select the required store.
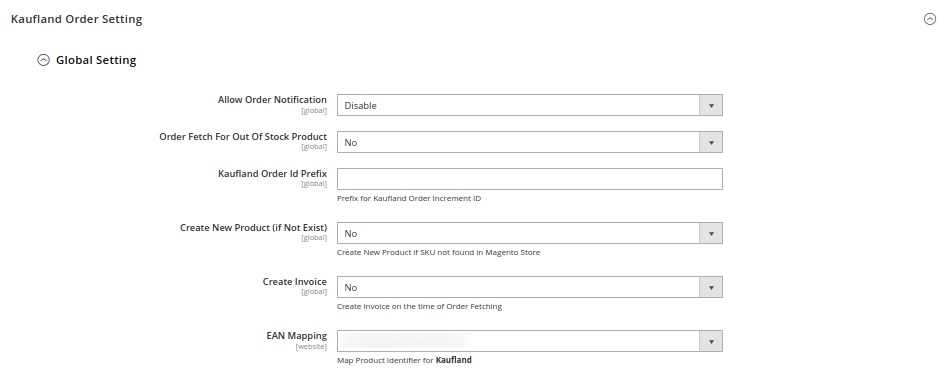
- Now, click on Kaufland Order Setting. The section is expanded as shown below:

- Under Kaufland Order Setting, click on Global Setting; the section is expanded as shown below:

- Under Global Setting, do the following steps:
- In Allow Order Notification, choose either enable or disable.
- Next is the Order fetch for Out of stock Products, choose yes if you wish to fetch the order even though it’s currently out of stock.
- Add the order prefix of your choice in the Kaufland Order Id Prefix.
- You can Create New Product if SKU is not found in your Magento Store by selecting Yes from the C
- In Create Invoice, Select Yes, if you want to generate the invoice automatically
- In EAN Mapping, map a product identifier for Kaufland orders.
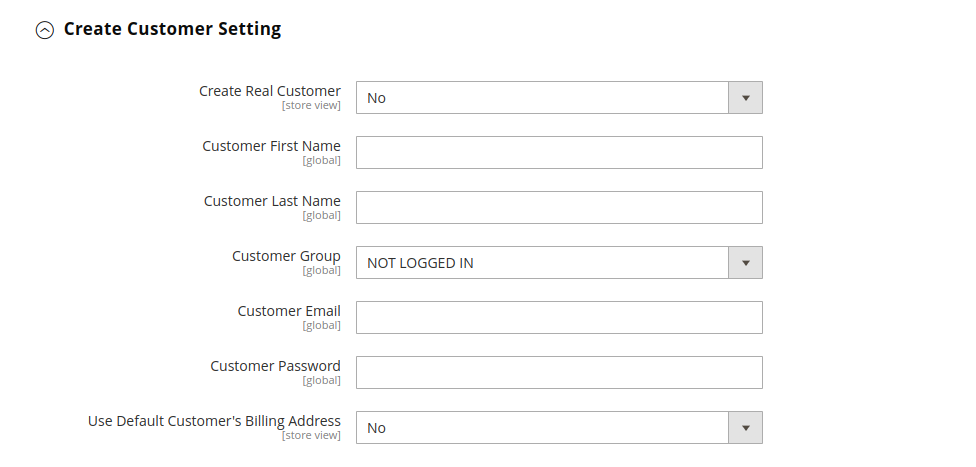
- Now, click on Create Customer Setting, and the section expands as:

- In Create Real Customer, choose Yes if you want to create a default customer, select Guest Checkout if you want to process as a guest.
- In case you select No then you have to enter the details manually in the section shown below.

- Scroll down click on Kaufland Delivery Settings, the section is expanded as shown below:

- Under Kaufland Delivery Setting do the following steps:
- In Minimal delivery time (business days), enter a minimal delivery time (in days) for Kaufland.
- In Maximum delivery time (working days), enter a maximum delivery time (in days) for Kaufland.
- In Shipping Groups, select Shipping Groups for products.
- Now, click on Kaufland Price Setting, and the section expands as:

- In the Product Price list, select one of the following options:
- Increase by Fixed Price: If selected, then the Modify by Fix Price field appears.
- Increase by Fixed Percentage: If selected, then the Modify by Percentage Price field appears.
Enter the numeric value to increase the price of Kaufland, product price by the entered value % of Magento 2 store price.
For Example,
Magento 2 price + 5% of Magento 2 price.
Magento 2 Price = 100
Select Increase By Fixed Percentage option
Modify by Percentage Price = 5
100 + 5% of 100 = 100 + 5 = 105
Thus, Kaufland Product Price = 105 - Decrease by Fixed Price: If selected, then the Modify by Fix Price field appears.
- Decrease by Fixed Percentage: If selected, then the Modify by Percentage Price field appears.
Enter the numeric value to decrease the price of the Kaufland product price by the entered value % of Magento 2 store price. - In the Product Price list, select the price of the product.
For Example,
Magento 2 price – 5% of Magento 2 price.
Magento 2 Price = 100
Select Decrease By Fixed Percentage option
Modify by Fix Price = 5
100 – 5% of 100 = 100 – 5 = 95
Thus, Kaufland Product Price = 95
- In the Product Price list, select one of the following options:
- Under Global Setting, do the following steps:
- Now, click on the Kaufland Inventory Rules tab, and then it expands as:

- In the Send Inventory on Basis of Threshold list, select Enable to send the inventory based on the threshold.
Note: Only when the admin selects Enable, the other fields appear. - In the Inventory Threshold Value box, enter the required threshold value of the products you wish to choose.
Note: The threshold value decides what number of products is shown on the Kaufland website based on the number of products you currently have. - In the Send Inventory for Lesser Than Threshold Case box, enter the value you wish to show when the total number of products is less than the threshold value entered by you earlier.
- In the Send Inventory for Greater Than Threshold Case box, enter the value you wish to show when the total number of products is greater or becomes equal to the threshold value entered by you earlier. Let’s take an example to make things clear:
Suppose, you have entered the threshold value for your inventory to be 50.
The Greater value set is 100 and the lesser value is set as 25.
If you have a product whose quantity is 63, then the number of products available on the Walmart website will be shown as 100.
In case another product whose count is 47, then the number of the product available will be shown as 25.
- In the Send Inventory on Basis of Threshold list, select Enable to send the inventory based on the threshold.
- Click on Kaufland Cron Setting, and the section expands as:

- Under Kaufland Cron Settings, do the following steps:
- In Kaufland Order Cron, select Enable to fetch the orders automatically at regular intervals of time.
- In Kaufland Price Cron, select Enable to sync the price at regular intervals of time.
- In Kaufland Inventory Cron, select Enable to synchronise the inventory automatically at regular intervals of time.
- Click the Chunk Size Setting tab and it will expand as:

- In the Validation Size field, enter the chunk size for the products. The products that will get validated before being uploaded on Kaufland would be the same as the number you enter in this field.
- In the Upload field, enter the number of products that you want to upload in one go from Magento to Kaufland.
- In the Inventory Update field, enter the chunk size of the products. The inventory will be updated in one batch for the number of products that you enter in this field.
- In the Price Update field, enter the chunk size for the number of products. The price will be updated in one batch for the number of products that you enter in this field.
- In the Retire Update field, enter the chunk size of the products. The number of products that you will be able to retire on Kaufland would be the same as the number that you enter in this field.
- In the Sync Status field, enter the chunk size of the products. The number of products that you will be able to sync the status for would be the same as the number that you enter in this field.
×


