- Overview
- Installation of Extension
- Jet Configuration Settings
- Use Extension With Test API Mode
- Importing Jet Categories and Mapping them With Magento Categories
- Fill Required Product Information
- Selected Product Upload
- Bulk Product Upload
- Selected Product Archive
- Bulk Product Archive
- Selected Product Unarchive
- Bulk Product Unarchive
- Attribute Mapping In Jet Integration
- Add Shipping Exception
- Add Return Exception
- Check Rejected Upload Files
- Import and Acknowledge Order
- Shipment of an Order
- Shipment and Cancellation of Jet Orders
- Failed Jet Orders
- Fetch and Submit Return
- Jet Refund
- Base Knowledge
- Cron Status
- Help and Support

13.Attribute Mapping In Jet Integration ↑ Back to Top
With the help of this section, you can understand how to Map your Configurable Products on Jet.com. You do not need to create any category or attribute (unless it is necessary to create in case of required attribute or category does not exist in Magneto). All things can be done by Mapping of Category & attribute to corresponding Jet Category & jet Attributes.
Follow this guide then you can understand Configurable Product Upload process easily.
Basic Steps:
- Map Magento 2 Attribute to Jet Attribute
- Re index all Product & Category related indexing
- Clear All Cache & Upload Products
All the steps details are as follows:
1. Find Category in Jet Category List
Before doing anything you need to first find out in which Jet Category You want to upload Product for this you have to go here Jet->Jet Category List.
Scenario: Configurable Product with Single Attribute Color
You have Configurable Product “Chair” in Magento 2 which is configured by single Attribute Color. So let’s start setting up this Product.
I want to search Chair (which comes under furniture type category) so first go to jet category List page.
In Jet Category List page grid all Jet Category listed you need to search those category terms in grid column name “Jet Category Name” in which you want to upload Product. As per the scenario your Category terms can be “Chair” or “Furniture”.
So we have taken “Chair” term for example enter this term in “Jet Category Name” all categories which includes Chair as a name will be filtered in the Category List. So in these all filtered category you have to find out your preferred category in which you want to upload your store products.
For example we take “Adirondack Chair” see image below See image below:
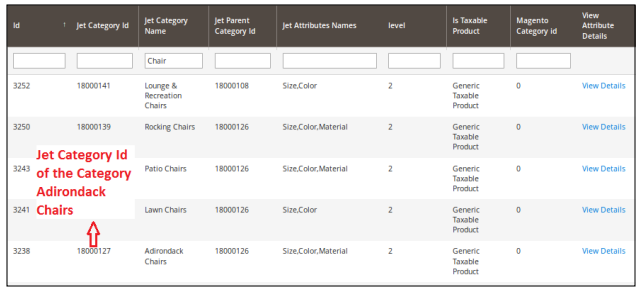
Now you need to Map this Jet Category into your Magento 2 Jet Category to this you need to see Category mapping section of this document. But for uploading Configurable Product which is configured by one or more attribute like:
1. Size
2. Color or etc., we need to check the attribute of your preferred jet Category.
2. Check the attribute of Category (in Case of Configurable Product)
You can see the View Details Link in the above image, click on this link it will open a detailed page of these Jet attributes which is in “Adirondack Chair” Jet Category. Let’s view the image below:
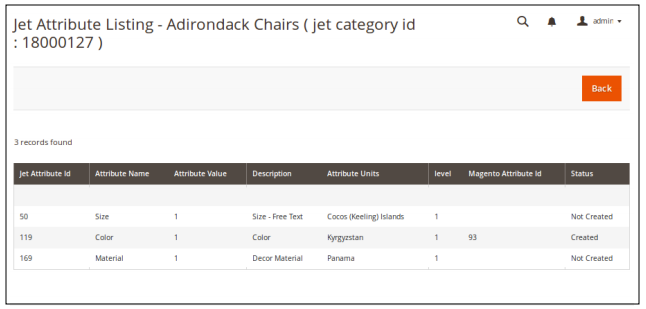
Now from the image it is clear that “Adirondack Chairs” Jet Category has Size , color attributes that means all your Configurable Products which are configured by Color or Size can be uploaded in to this Category .
Note: Important
- In case of Configurable Product Any Jet Category you want to Choose in Jet Category list must have those attributes in Jet Attributes column in Jet Category List Grid.
Example: if your Magento 2 Configurable product is created by Attributes Color or Size, then you Should choose that Category in Jet Category list which also similar attributes so that you can map Your Magento attributes to Jet Attributes.
3. Map Magento 2 Attribute to Jet Attribute
In this section you will learn how to map your Configurable Product Attribute into Jet attribute.
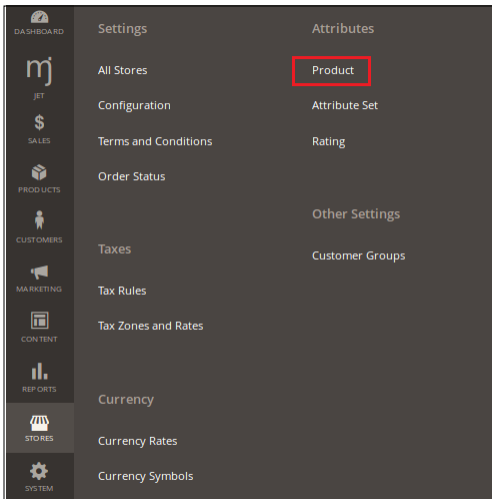
Let us say you have created a product configured with Color attribute. Now you have to move to Catalog > Attributes > Manage Attributes section: Fig below:
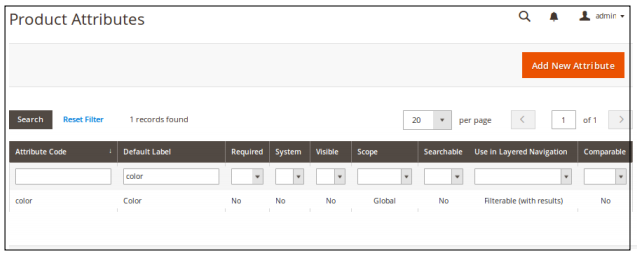
Open this page find attribute color from attribute code or attribute Label column see image below:
After searching the attribute click on the desired attribute. Attribute Edit page open. Now move to Jet Attribute tab.
a) Jet attribute Id – enter the required Jet Attribute Id
see image below
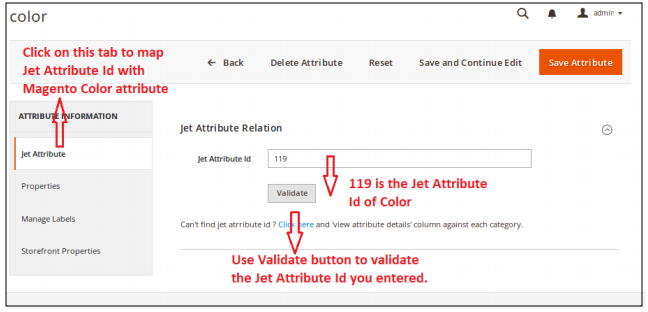
In Jet Attribute id column you need to enter the color Jet attribute id which you have seen in fig.
Similarly, map rest of the required attributes.
Now click on save button here your mapping done.
NOTE: After Mapping Attributes you need to do following things always
- Clear Cache
- Re index data
- Re index – Product Attribute
- Re index- Category Product Data
- Re Index – Category flat Data
- Re index- Product Flat data
3. Configurable Product Upload already mentioned in Jet Extension User guide.
Here: http://cedcommerce.com/media/userguides/m2/JetMagento-2-Integration/jet-magento-2-integration.pdf
Note: Re-index everything to avoid any unnecessary errors.


