
Fruugo Configuration Settings
Once the extension is successfully installed in the Magento 2 store, the FRUUGO INTEGRATION menu appears on the left navigation bar of the Magento 2 Admin panel. The merchant has to first create a seller account in the Fruugo seller panel. Once the seller account is created and is approved by Fruugo, then the Magento 2 store owner can use the Fruugo Username and Password while setting up the Fruugo Configuration settings in the Magento 2 Admin panel.
To set up the configuration settings in the Magento 2 Admin panel
- Go to the Magento 2 Admin panel.
- On the left navigation bar, click the FRUUGO INTEGRATION menu.
The menu appears as shown in the following figure:
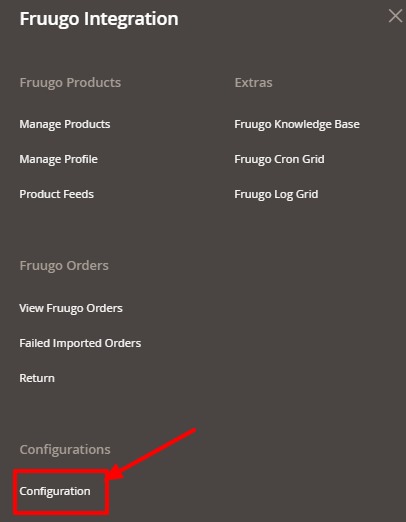
- Click on Configuration.
The page appears as shown in the following figure:
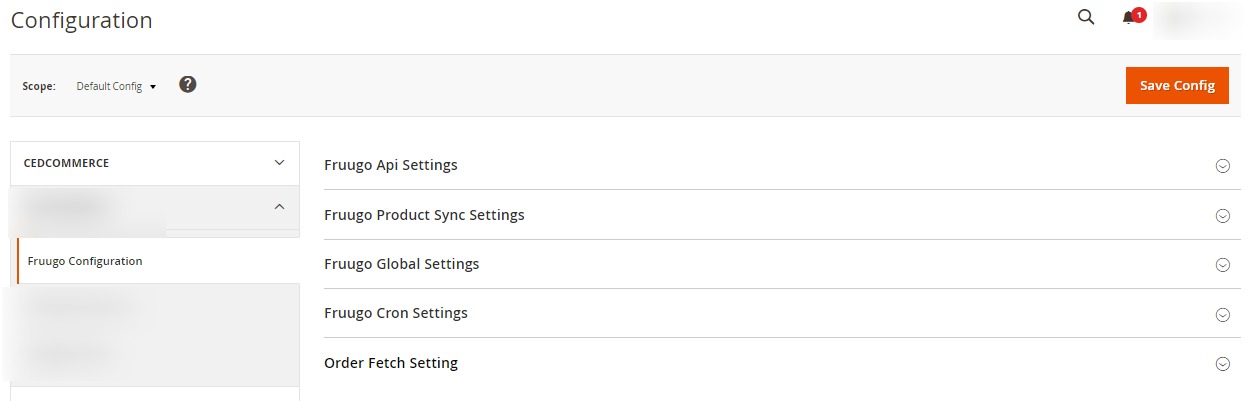
- In the right panel, click on Fruugo Api Settings.
The section is expanded as:
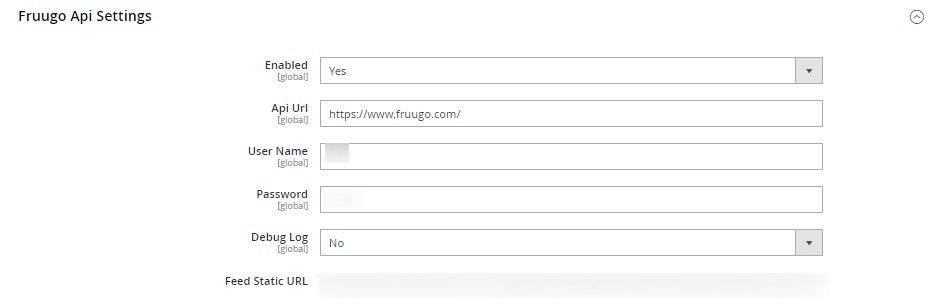
- Under Fruugo Api Settings, do the following steps:
- In the Enabled list, select Yes to enable the extension features.
- In the Api Url box, enter the required URL.
- In the User Name box, enter the Fruugo seller account Username.
- In the Password box, enter the Fruugo seller account Password.
- In the Debug Log list, select Yes to start Fruugo Integration in the debug mode. It captures the log for the debug process.
- In the Feed Static URL, the URL where your feeds will be stored in the store will be fetched.
- Scroll down to the Fruugo Product Sync Settings tab, it is expanded as shown below:
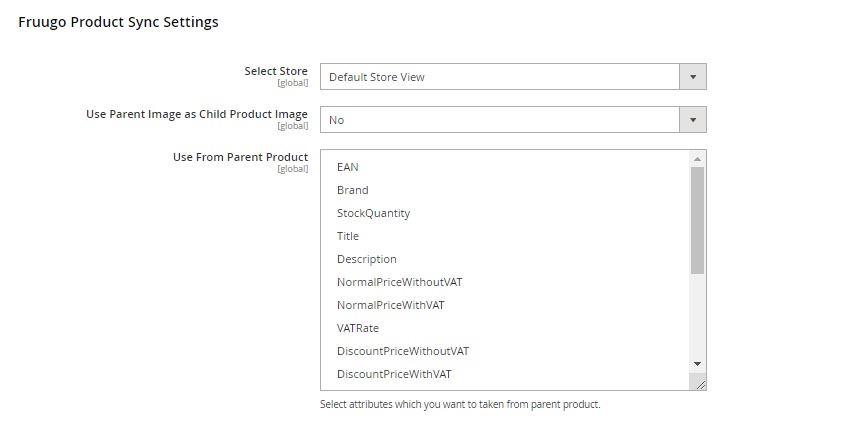
- Under Fruugo Product Sync Settings, do the following steps:
- In the Select Store list, select the required store view.
- In Use Parent Image as Child Product Image, select Yes if want the Parent and Child product images to be the same.
- In Use From Parent Product, select the attributes from the list that you want to take from the parent product.
- Scroll down to the Fruugo Global Settings tab.
The section appears as shown in the following figure:
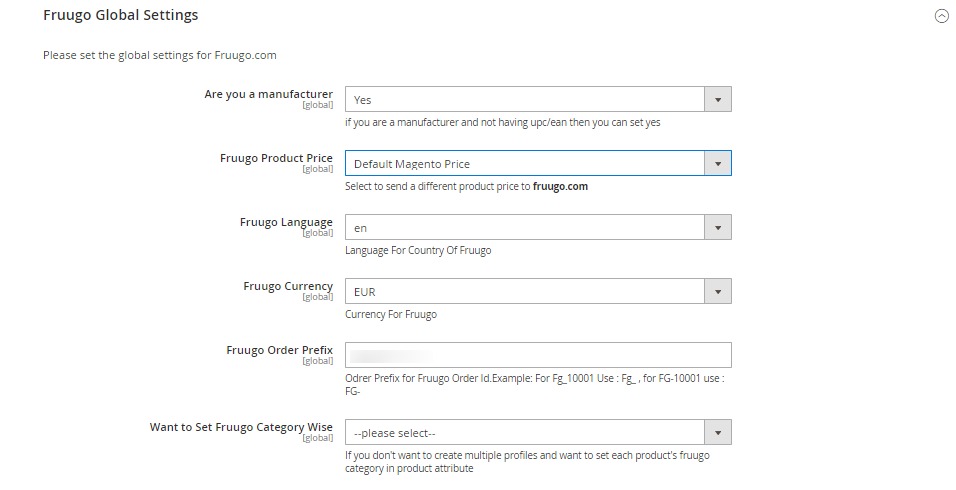
- Under Fruugo Global Settings, do the following steps:
- In Are you a Manufacturer, select Yes if you are a manufacturer and do not have the UPC/EAN.
- In the Fruugo Product Price list, select one of the following options:
- Increase by Fixed Price: If selected, then the Modify by Fix Price field appears.
- Increase by Fixed Percentage: If selected, then the Modify by Percentage Price field appears.
Enter the numeric value to increase the price of the Fruugo, product price by the entered value % of Magento 2 price. - For Example,
Magento 2 price + 5% of Magento 2 price.
Magento 2 Price = 100
Select Increase By Fixed Percentage option
Enter Percentage = 5
100 + 5% of 100 = 100 + 5 = 105
Thus, Fruugo Product Price = 105 - Decrease by Fixed Price: If selected, then the Modify by Fix Price field appears.
- Decrease by Fixed Percentage: If selected, then the Modify by Percentage Price field appears.
Enter the numeric value to decrease the price of the Fruugo product price by the entered value % of Magento 2 price
For Example,
Magento 2 price – 5% of Magento 2 price.
Magento 2 Price = 100
Select Decrease By Fixed Percentage option
Enter Percentage = 5
100 – 5% of 100 = 100 – 5 = 95
Thus, Fruugo Product Price = 95
- In Fruugo Language, select your fruugo store region language.
- In Fruugo Currency, select the currency of the Fruugo store.
- In Fruugo Order Prefix, enter the Order prefix id.
- In Want to Set Fruugo Category Wise, select the category from the list if you want to create multiple profiles and want to set each product’s fruugo category in the product attribute.
- Scroll down and click on Fruugo Cron Settings, the tab is expanded as:

- Under Fruugo Cron Settings, do the following steps:
- In the Fruugo Order Cron list, select Enable to enable the fetch order cron.
- In the Fruugo Price Cron list, select Enable to enable the Price Sync cron.
- In the Fruugo Inventory Cron list, select Enable to enable the Inventory Sync cron.
- Now scroll down and click on Order Fetch Setting, the section is expanded as shown below:

- Under Order Fetch Setting, do the following steps:
- In Auto Acknowledge Fruugo Order, select Yes if you want the orders to be automatically acknowledged.
- In Auto Reject Fruugo Order, select Yes if you want the orders to be automatically rejected.
- In Include Disabled Product in Order, select Yes if you want disabled products to be included as Order items.
- In Include OutOfStock Product in Order, select Yes if you want to include the out of stock products as order items.
- Click on the Save Configuration button.
The configuration settings will be saved.
×


