
4.Configuration Settings ↑ Back to Top
After obtaining the API credentials from the Etsy Developer account, the Magento 2 store owner has to paste them into the respective fields displayed on the Etsy Configuration page of the admin panel.
To set up the configuration settings in the Magento 2 Admin panel
- Go to the Magento 2 Admin panel.
- On the left navigation bar, click the ETSY INTEGRATION menu.
The menu appears as shown in the following figure:
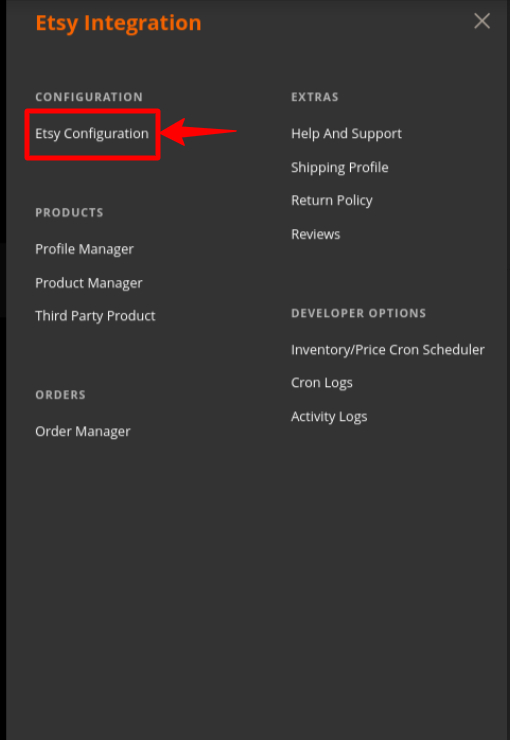
- Click on the Etsy Configuration.
The Configuration page appears as shown in the following figure:

- In the right panel, click on the Etsy Merchant/Account Settings
The tab is expanded and the expanded section appears as shown in the following figure:
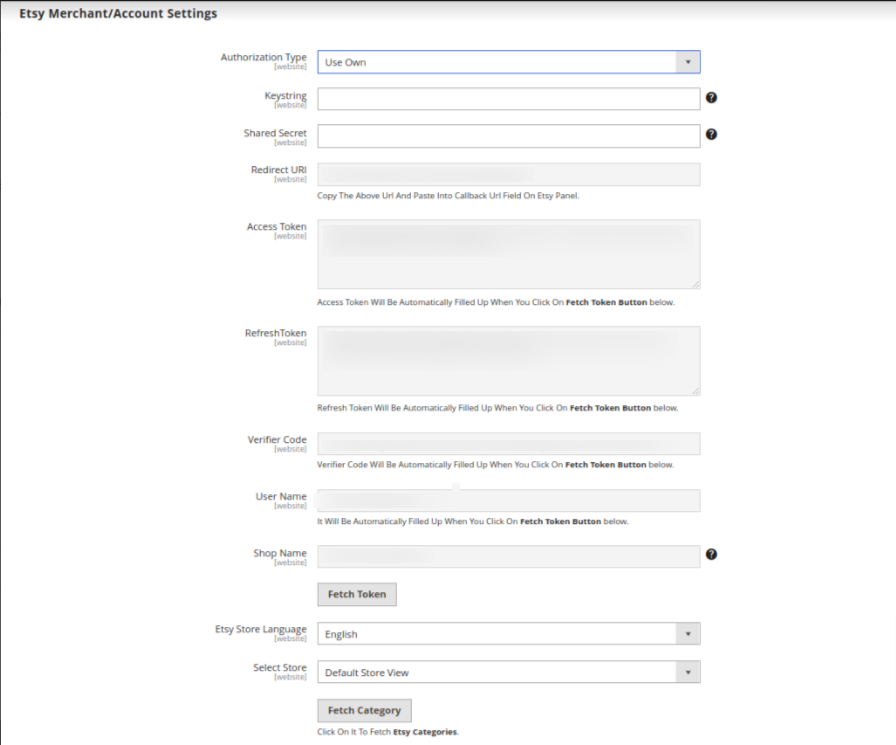
- Under Etsy Merchant/Developer Settings, do the following steps:
- In the Etsy Key String box, paste the corresponding value copied from the Etsy Developer panel.
- In the Shared Secret Key box, paste the corresponding value copied from the Etsy Developer panel.
- In Redirect Url, copy the Url from the box And paste it into Callback Url Field On Etsy Panel.
- Click the Fetch Token button. The page appears as shown in the below figure:
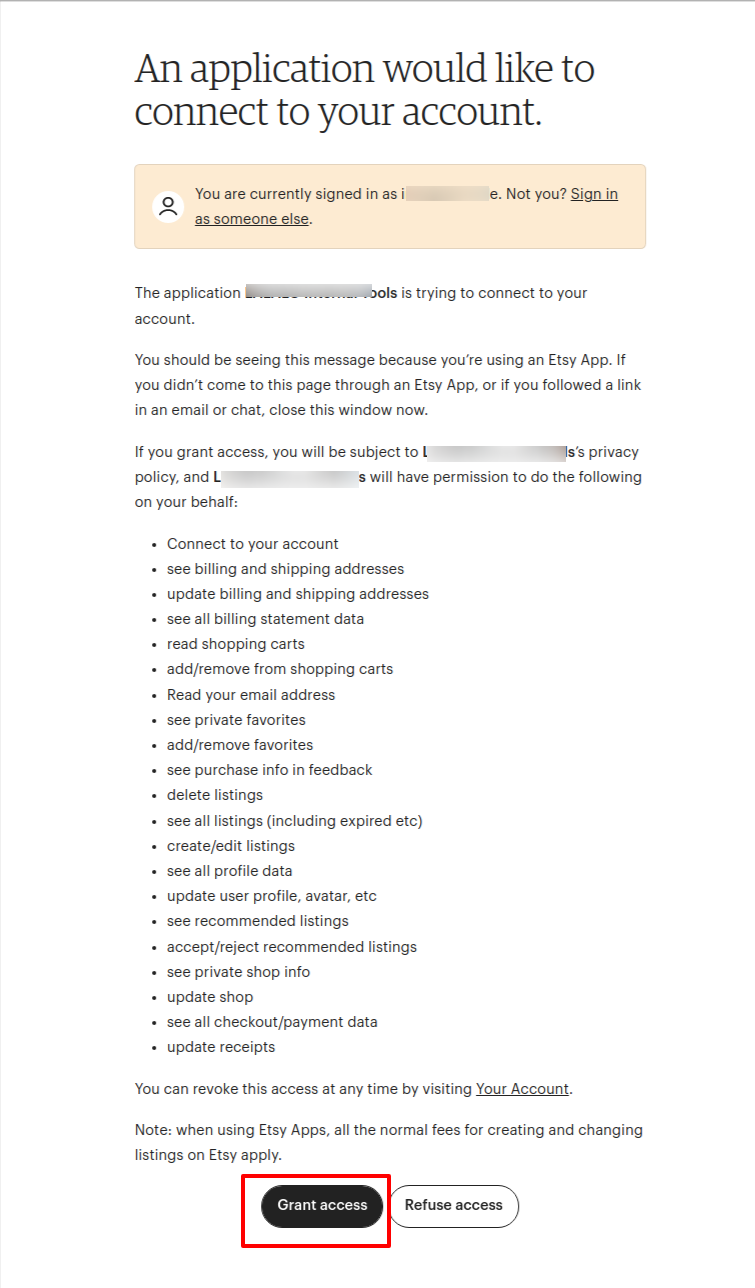
- Click on the Grant Access button, after a click Access Token, Access Token Secret, Verifier Code, User Name will get filled automatically.
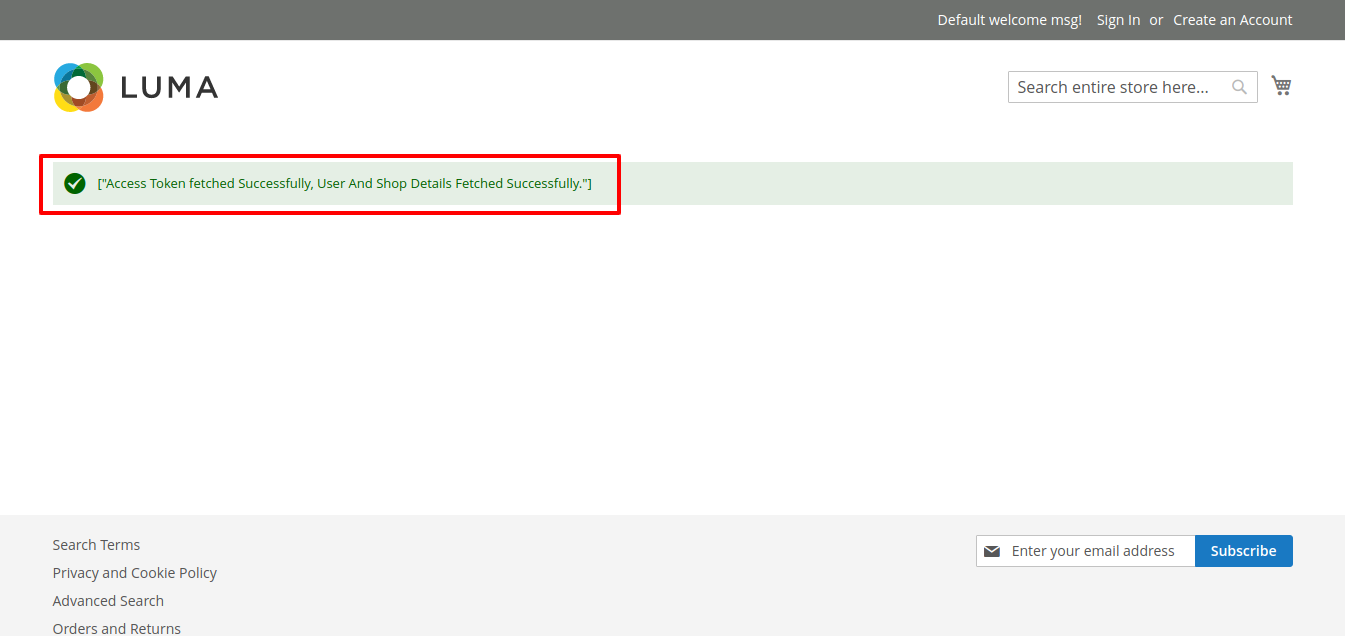
- For Shop name, you first need to login in Etsy developer account, Click on Profile Button:
The page appears as shown in the following figure:


- In the Etsy Store Language box, select the language of your Etsy store.
- In the Select Store list, select the single store.
- Click on the Fetch Category button, then the category is fetched from Etsy and a success message appears on the page.

- Scroll down to the Etsy Product Settings tab, and then click the tab.
The tab is expanded and the expanded section appears as shown in the following figure:
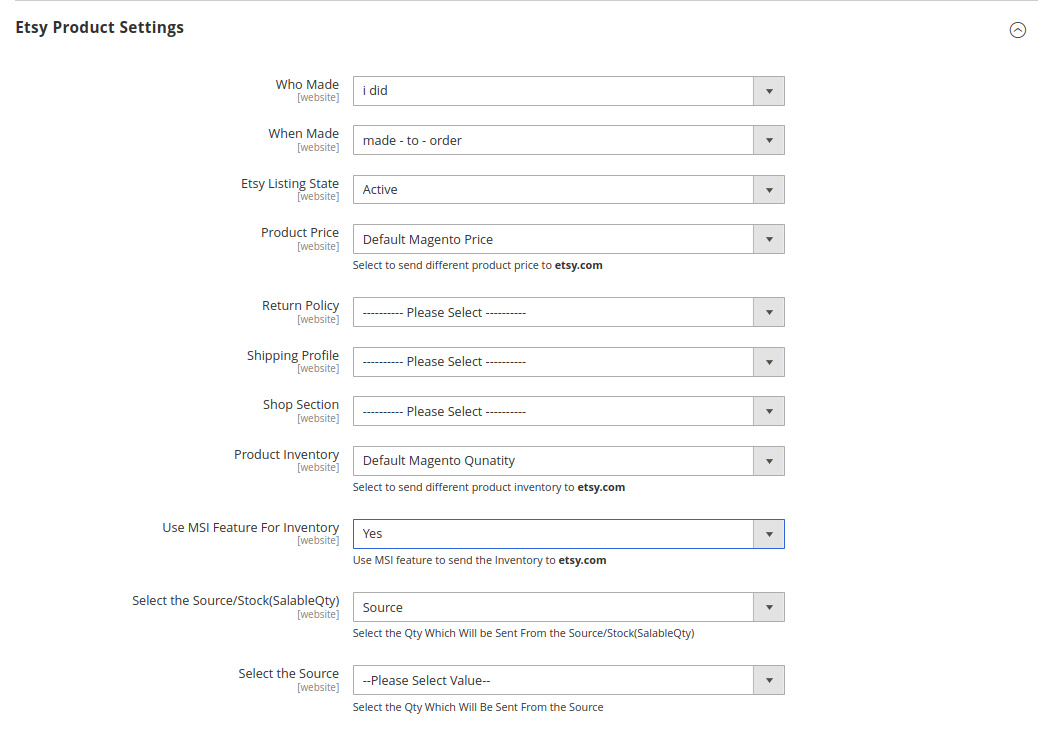
- Under Product Upload Settings, do the following steps:
- In the Who Made a list, select the appropriate option.
- In the When Made list, select the appropriate option.
- In the State list, select the appropriate option.
- Click the Product Price tab,
- The Product Price tab is expanded and the section appears as shown in the following figure:

-
In the Product Price list, select one of the following options:
i) Increase by Fixed Price: If selected, then the Modify by Fix Price field appears.
ii) Increase by Fixed Percentage: If selected, then the Modify by Percentage Price field appears.
Enter the numeric value to increase the price of the Etsy, product price by the entered value % of Magento price.
For Example,
Magento 2 price + 5% of Magento 2 price.
Magento 2 Price = 100
Select Increase By Fixed Percentage option
Modify by Percentage Price = 5
100 + 5% of 100 = 100 + 5 = 105
Thus, Etsy Product Price = 105
iii) Decrease by Fixed Price: If selected, then the Modify by Fix Price field appears.
iv) Decrease by Fixed Percentage: If selected, then the Modify by Percentage Price field appears.
Enter the numeric value to decrease the price of the Etsy product price by the entered value % of Magento 2 price.
For Example,
Magento 2 price – 5% of Magento 2 price.
Magento 2 Price = 100
Select Decrease By Fixed Percentage option
Modify by Fix Price = 5
100 – 5% of 100 = 100 – 5 = 95
Thus, Etsy Product Price = 95 - Under Shipping Template, do the following step:
- In the Select Shipping Template list, select the required Shipping template.
- In the Select Shop Section box, select your shop section.
- Click on the Product Inventory tab,
1. The Etsy Product Inventory Settings tab is expanded and the section appears as shown in the following figure:
2. Under Etsy Product Inventory Settings, do the following step:- Increase by Fixed Quantity: If selected, then the Modify by Fix Quantity field appears.
- Decrease by Fixed Quantity: If selected, then the Modify by Fix Quantity field appears.
- In Use MSI Feature for Inventory, select Yes, if you want to use MSI for the inventory.
- The Product Price tab is expanded and the section appears as shown in the following figure:
- Scroll down to the Etsy Order Setting tab, and then click the tab.
The tab is expanded and the expanded section appears as shown in the following figure:
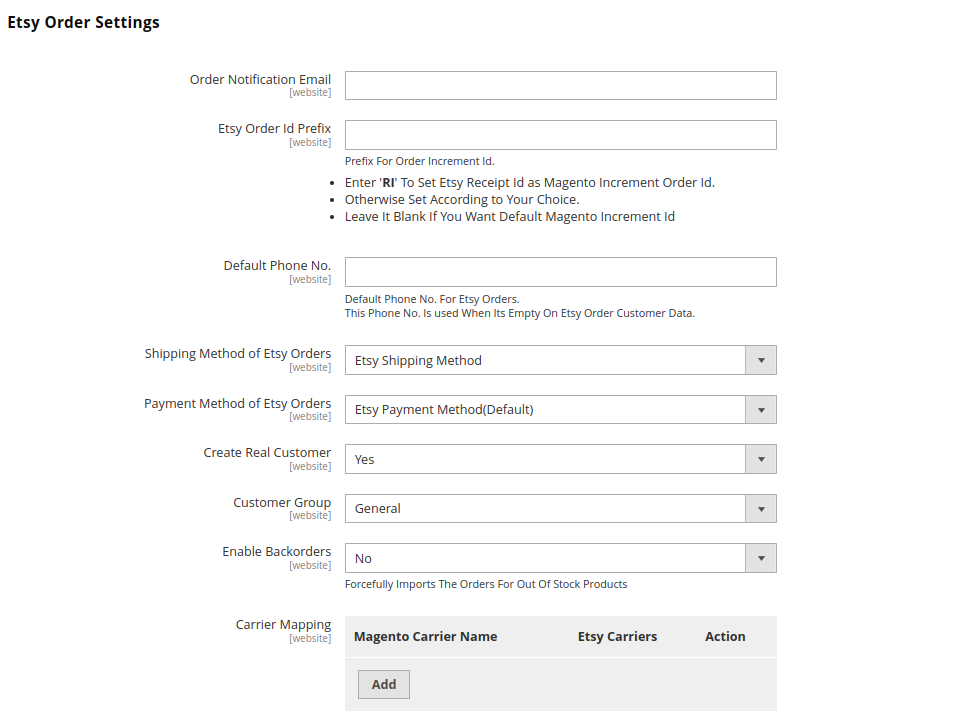
- Under Etsy Order Setting, do the following steps:
- In the Order Notification Email box, enter the required email id.
- In the Etsy Order Id Prefix box, enter Prefix for Etsy Order Increment id.
- In the Default Phone No. box , enter a Phone number, this number is used when the phone number box is empty in Etsy Order Customer Data.
- In the Shipment Method for Etsy Orders box, select the shipment method for Etsy order.
- In the Payment Method of Etsy Order box, select the payment method for Etsy order.
- In the Create Real Customer box, select the Yes option, to create a real customer of Etsy.
- In the Customer Group box, enter the category to which customer group belongs.
- In the Enable Backorders box, select the Yes for importing back orders otherwise select No option.
- In Carrier Mapping, map the Magento carrier with the Etsy carrier.
- Now scroll down to Etsy Third Party Product Setting, the tab is expanded as:

- Under Etsy Third-Party Product Setting, do the following steps:
- In the Sync Product On the Bases of Attribute box, select the option on which basis you need to sync the Etsy Products.
- In the Auto Sync Third-Party Product box, select the Yes option, to auto-sync third-party products.
- Click on Etsy Cron Setting, the tab is expanded as shown below:
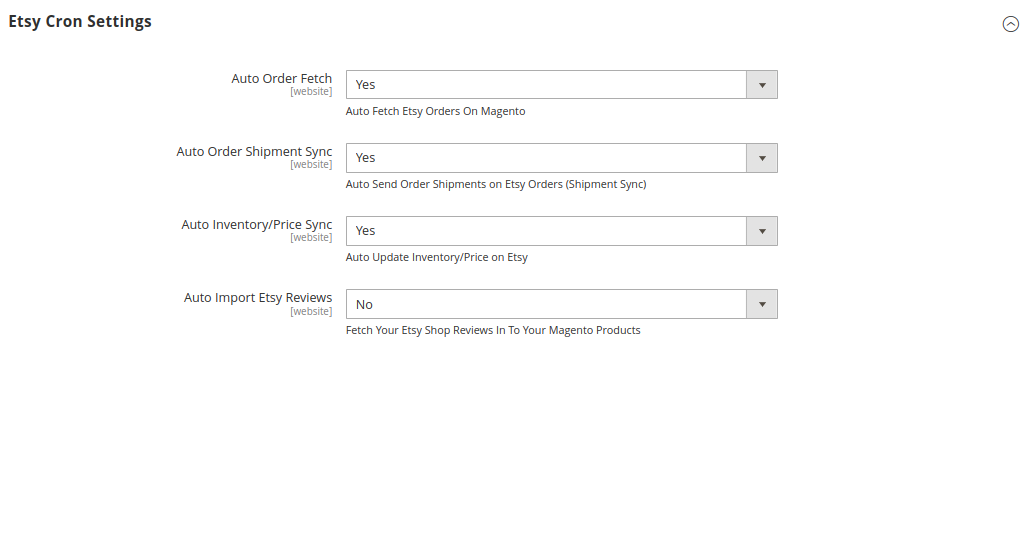
- Under Etsy Cron Settings, do the following steps:
- In the Auto Order Fetch box, select the Yes option, to auto fetch Etsy orders on Magento.
- In the Auto Order Shipment Sync box, select the Yes option, to auto send order shipments on Etsy Orders.
- In the Auto Inventory/Price Sync box, select the Yes option, to auto-update inventory or price on Etsy while product edit.
- In Auto Import Etsy Reviews, select Yes to import the reviews automatically otherwise select No.
- Click the Save Config button.
The configuration settings are saved.


