
App Onboarding
Step 1: Connect your Shopify account
- Log in to the app and click on the “Connect” button.

- You will be taken to a form where you can mention details of your Shopify store. Like, API key, API secret key, store URL, and admin API access token, which you will get from the custom app you created on your store.

After entering all details, click the “Save” button, and the Shopify store will connect successfully.
Note: These API credentials enable the Integration app to establish API communication with your Shopify store to communicate and sync data properly.
Step 2: Connect your Joom Merchant account
- After connecting your Shopify store, you now need to connect the app with your ‘Joom Merchant account’ and authorize the Joom merchant account.

- When you click on connect button, you will be redirected to the “Joom merchant account.”

- Authorize and grant access to the “Joom connector app” app to access & update your Joom store.
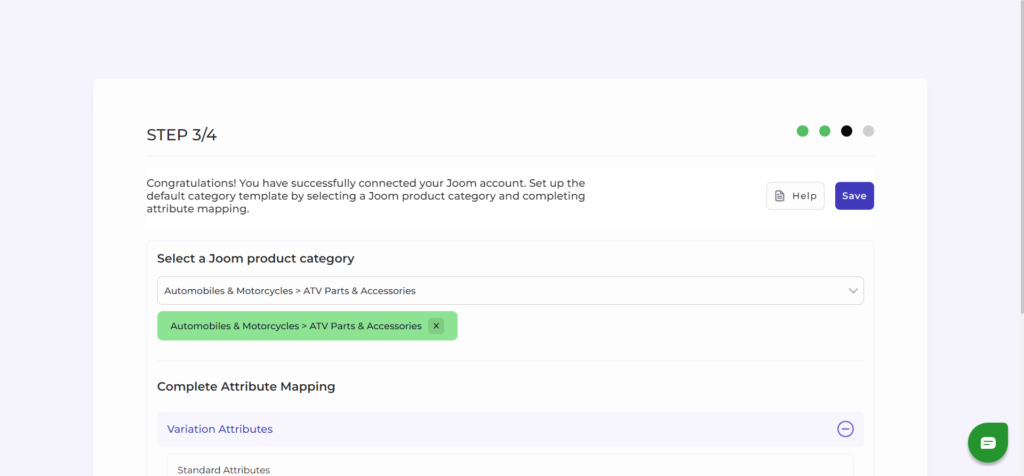
Step 3: Category Template
After successfully connecting the app with Joom Marketplace, next, you need to map Shopify product attributes with Joom product attributes. Default Category Template basically helps to create a default setting that is utilized by the Integration to upload your Shopify products successfully to the Joom merchant account. This Category Template works for all your Shopify products by default. A Category template includes Joom Category Selection, product attributes mapping, product price customization, threshold inventory, etc.
You can always set different rules for different types of products via the Category Template feature later in the app.
- Select the Joom product category from the drop-down menu.

2. Fill in all details, like setting a unique template name.
3. Further, you need to select & set “Rule Group” to fetch data from a similar set of products.
- Product Match: The rule is based on ANY and ALL conditions that define whether you want all the selected conditions to be fulfilled or any of them to be true.
- Filter & fetch products based on product type, attribute set, name, or category.
- Now select the value from equals and not equal.
Once you have entered all values, click on “Run Query.” A list of all products containing the mentioned value will be fetched & displayed.
4. Map Shopify Attribute with Joom attribute
A few of product selling categories require information such as Size, Color, Material, and other information to provide complete product information to the buyer.
To achieve the same, you can map the attributes of your Shopify product with the attributes of the Joom marketplace for better visibility of product information at the buyer’s end.
- Map product variant attribute, i.e., size & color.
Joom offers a predefined list of color values for better product visibility on the Joom marketplace. If you have your own custom product color values (such as All Black, and Denim Blue) in the Shopify store then you need to map the color values accepted by Joom to approve a product for selling.
- For size or color mapping, choose an attribute from the drop-down menu and click on “Option ValueMapping.”
- A pop-up will appear where you can choose a particular Joom size with Shopify Size. For example, you can map “All Black of Shopify with the Dark Blue or Deep Black of Joom. And same follows for the size family too.
5. Now choose the product title for listing products on Joom.
6. Lastly, set the price rule for the products falling under this category template. For example, if you want an increase of 10% in all products of this template, choose percentage increment & then write 10%. Under the price rule, you can set a fixed percentage or multiply the price rule.
7. Save the settings, and now a category template is created successfully. You can view or edit them from the category template section.
Step 4: Default Configuration
Once the category template data is saved successfully, proceed with the default configuration.
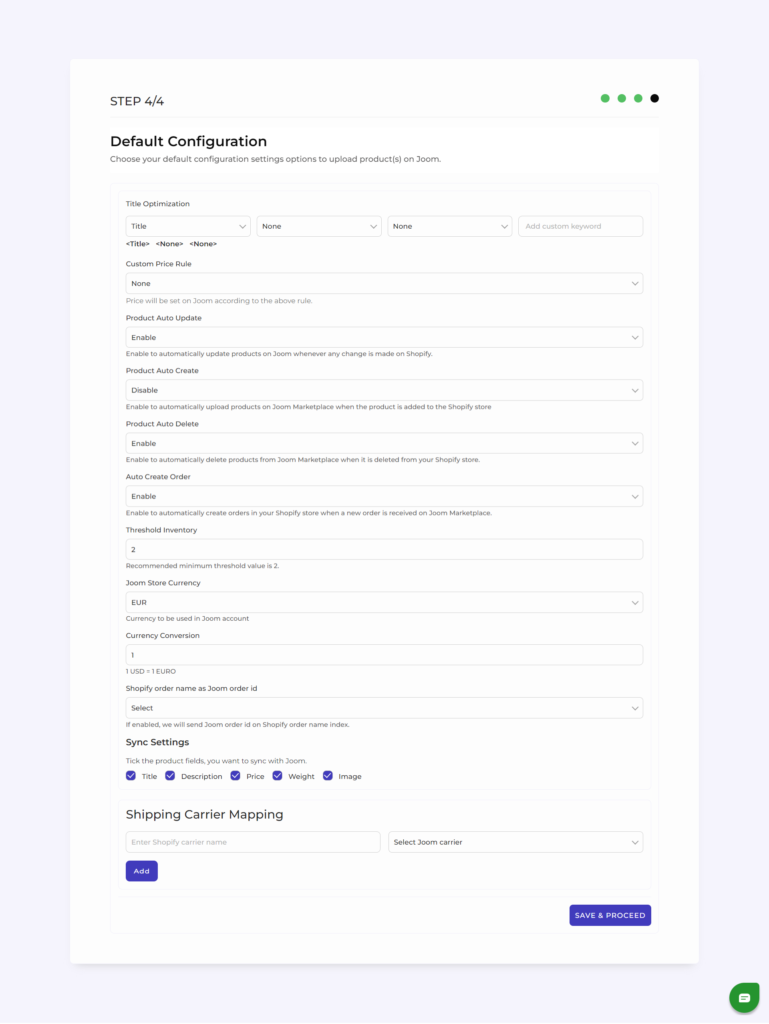
- Title Optimization: You can customize product title, before listing it on Joom Marketplace. Add relevant keywords and optimize it as per SEO for better visibility.
- Custom Price Rule: You can also set price rules for selling on Joom. For example, a 10% increase in price rule will lead to a 10% hike in the price of the product when listed on Joom.
- Product Auto Update- With this being enabled, whenever any change is made on the Shopify store, it is also reflected in your Joom Marketplace in near real-time. For example, if the stock level or product description of any product is updated on Shopify, it will automatically be updated on Joom Marketplace as well.
- Product Auto Create: By enabling this, you can automatically create and list products on Joom Marketplace when any new product is added to Shopify Store. But if there is any error in product data, then the product will not be listed on Joom, and you must correct the error to list it.
- Product Auto Delete: Any product deleted in the Shopify store will also be removed from the Joom Marketplace. For example, if you delete a product with SKU 09876 on Shopify, same product will also be deleted and delisted from your Joom store.
- Auto Create Orders: Whenever an order is received on Joom Marketplace, it will automatically be created in your Shopify store. So that you can fulfill it at your convenience.
- Threshold inventory: Set minimum inventory level, after reaching which product will reflect “Out Of Stock” status on Joom Marketplace. This prevents you from overselling.
- Currency Conversion: Here, you can input and mention the currency conversion rate for your Joom store. For example, if your default currency on Shopify is US dollars, but on Joom, you use the Pound (GBP), so using the currency conversion feature, you can update the price on Shopify, but it will be shown on GBP on Joom with the converted price.
- Sync Setting: Select the product details that you wish to sync with the Shopify store, like product title, description, etc. Don’t tick the box if you don’t want the details to sync between Shopify and the connector app.
- Shipping Carrier Mapping: Here, you can map the Shopify shipping carriers with the Joom Shipping carriers and fulfill your order seamlessly.
Joom supports a large number of Shipping companies and has a predefined list of Shipping carriers to fulfill Orders. When you fulfill an order in Shopify that was received on the Joom marketplace, you need to add a Shipping carrier like UPS or USPS with order shipment details.
As Joom supports a predefined list of accepted Shipping Carriers, it is recommended to map Shipping Carrier names available in your Shopify store with the Shipping carrier names accepted by Joom marketplace. This helps integration to sync correct & valid Shipping carrier names to Joom as per the pre-defined list.
- After selecting your option, save & proceed.


