
Configuration Settings
To set up the Configuration Settings in the Magento 2 Admin panel
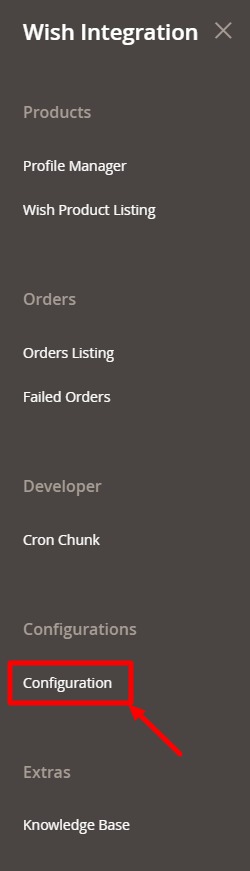
- Go to the Magento 2 Admin panel.
- On the left navigation bar, point to the Wish Integration menu, and then click Configuration.
- On clicking it, you will be navigated to the configuration page which appears as:
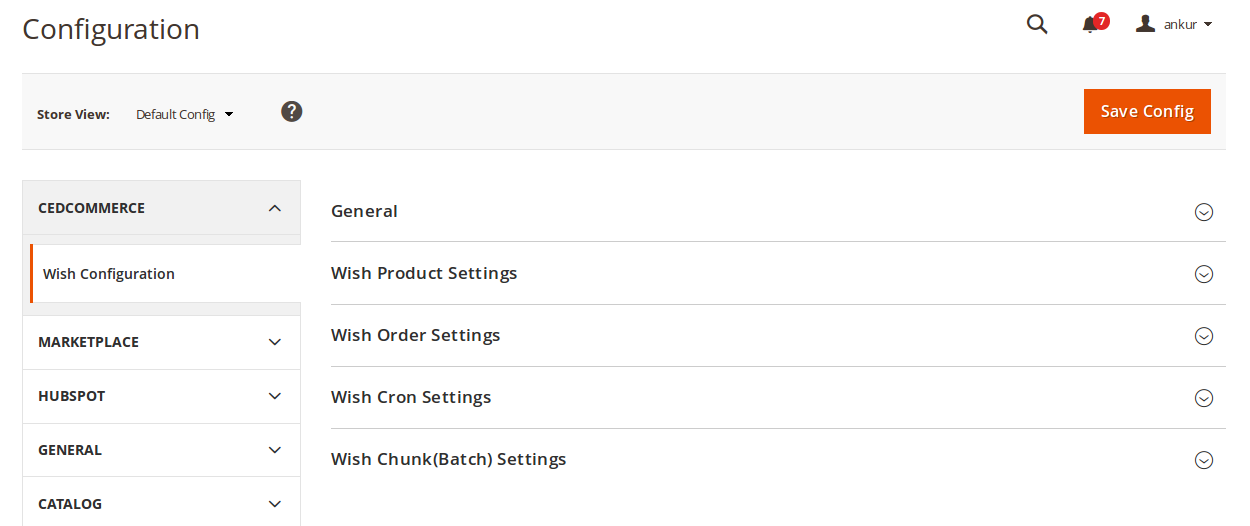
- Click on General and the section will expand as:
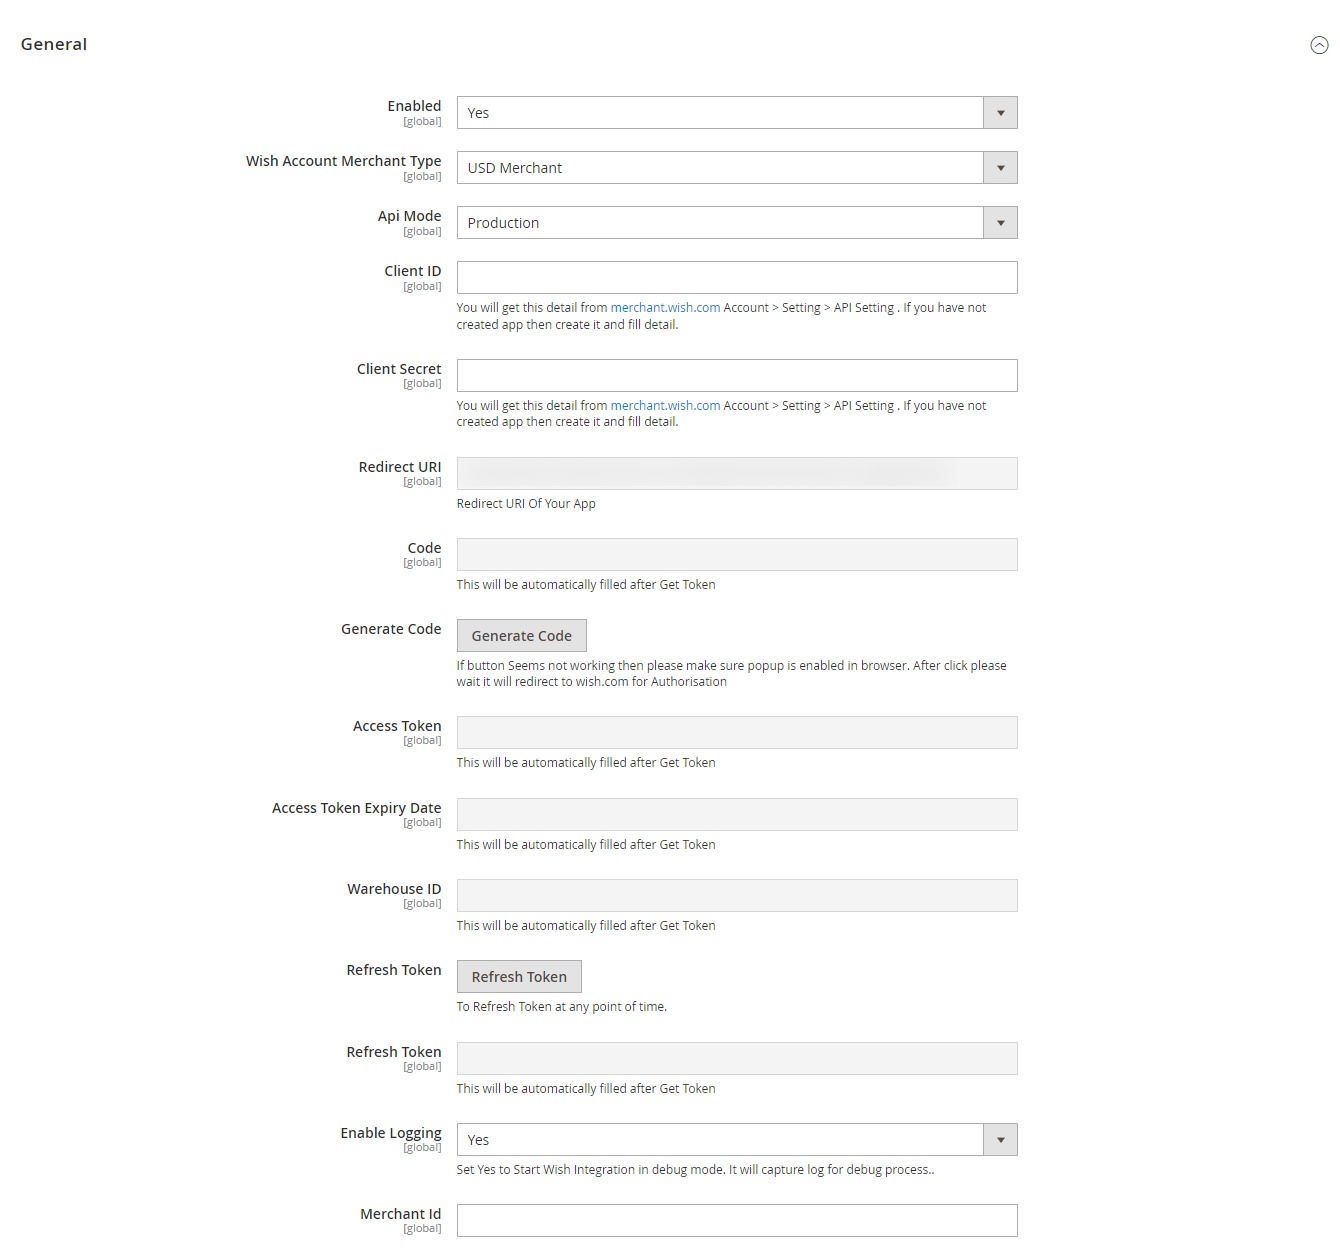
- In Enabled, select Yes to enable the extension.
- The next step is to Choose Account Merchant Type where you have to choose whether you are a USD merchant or not.
- In API Mode, select from Sandbox/Production as per your requirement.
- In Sandbox/Production Client ID, you need to enter the ID that you may get from your Wish seller panel.
- For, that, click on the link as has been highlighted in the red box in the above image.
- On clicking it, you will be asked to log in to your Wish account and once you have logged in, you will be navigated to the page as shown below. If you have already logged in, the page will appear to you as:
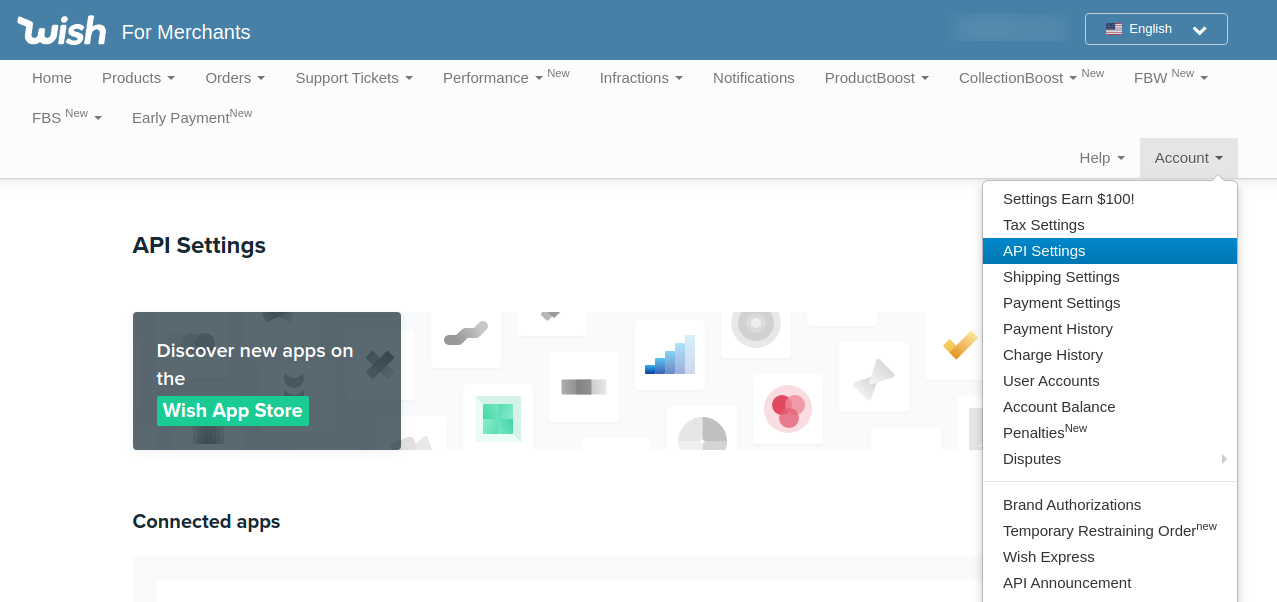
- On this page, you may see your client id and you may copy it from here to paste it in the configuration section in the Magento 2 admin panel.
- In Client Secret, enter the secret which also you can get from the Wish seller panel as shown in the image above.
- To get it, you may also click on the link below the Client Secret box after which you’ll be taken to the page as:
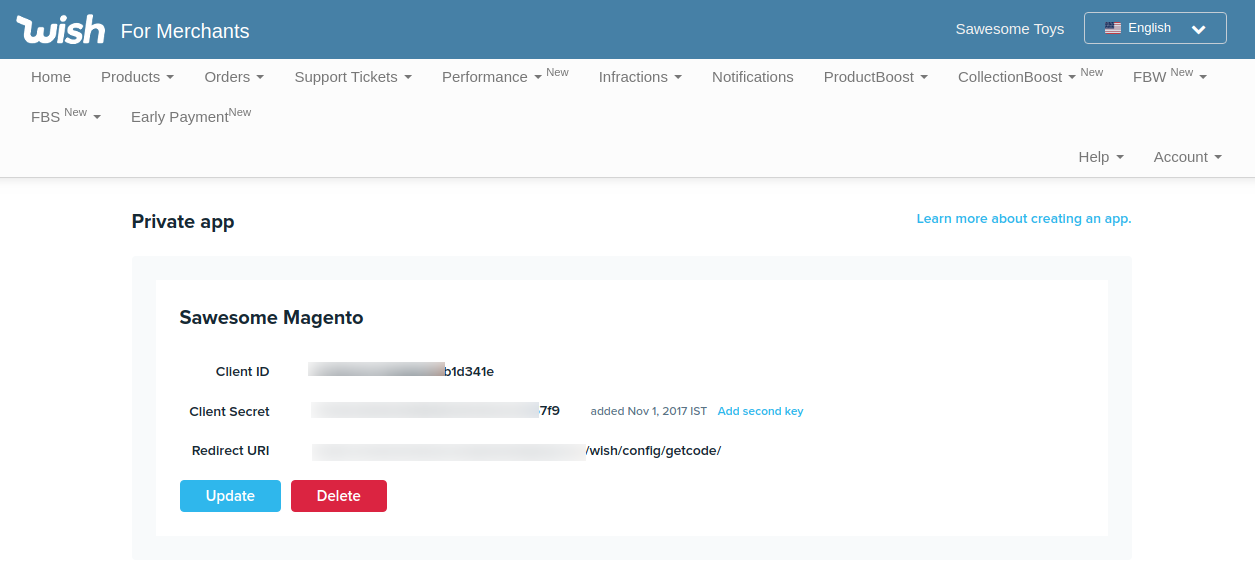
- You may see your client secret and you may copy it from here to paste it in the configuration section in the Magento 2 admin panel.
- In the Redirect URL, enter the redirect URL which you get from the same section where you get your Client ID and Client Secret, as shown in the images above.
- In Generate Code, click on Generate Code button and the code will be generated.
- The Access Token will appear automatically after taking the mentioned steps.
- You may refresh the token by clicking on the Refresh Token button.
- In Enable Logging, select Yes to Start Wish Integration in debug mode. It will capture the log for debug process.
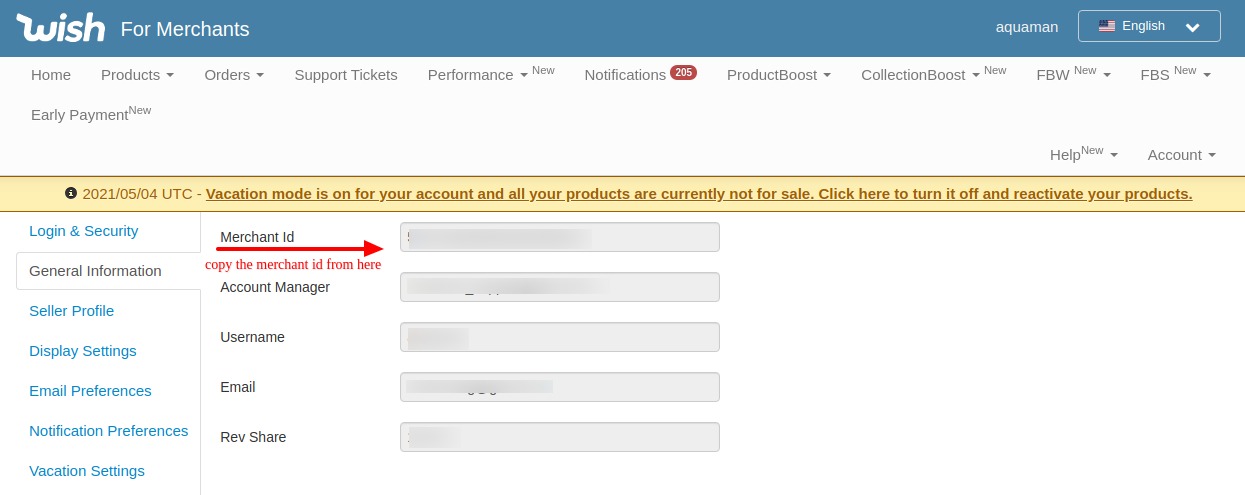
- In Merchant Id, copy your merchant ID from the Wish seller panel and paste it here.
- Once done, you may move on to the next section.
Wish Product Settings
- On clicking the Wish Product Settings, the section will expand and appear as:
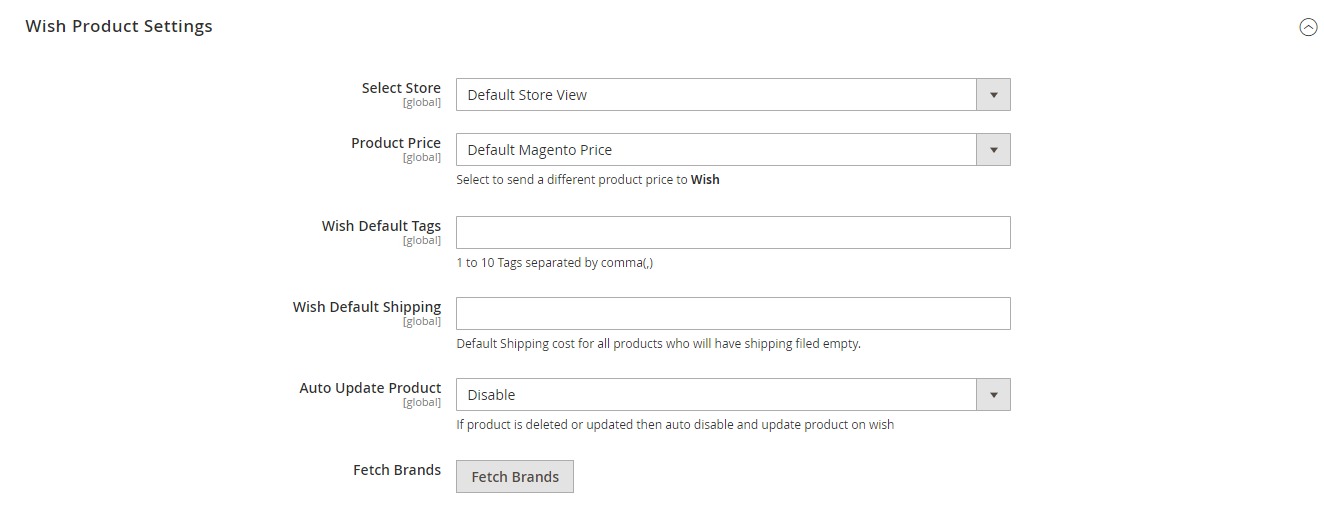
- In the Select Store, select the store view.
- In Product Price, you may keep the option Default Magento Price or may select from the options as shown below:
- Decrease by Fixed Percentage: You may choose this option if you want the price of your Magento 2 product to be decreased on Wish by a particular percent. If selected, then the Modify by Percentage Price field appears as:
- Now suppose your product is for $100 on Magento 2 store and if you enter 50 in the Modify by Fix Price, then the price for your products that will reflect on the Wish marketplace will be $50 as you have chosen the Decrease option and have entered 50, so that is the price that will be deducted to your Magento 2 store product price and will reflect on Wish. However, the price will be the same on Magento 2 store.
- Decrease by Fixed Price: You may choose this option if you want the price of your Magento 2 product to be decreased on Wish by a particular amount. If selected, then the Modify by Fix Price field appears as:
- Now suppose your product is for $100 on Magento 2 store and if you enter 20 in the Modify by Percentage Price, then the price for your products that will reflect on Wish marketplace will be $120 as 20% of 100 is 20 and it’ll be added to 100. However, the price will be the same for Magento 2 store.
- Increase by Fixed Percentage: You may choose this option if you want the price of your Magento 2 product to be increased on Wish by a particular percent. If selected, then the Modify by Percentage Price field appears as:
- Now suppose your product is for $100 on Magento 2 store and if you enter 50 in the Modify by Fix Price, then the price for your products that will reflect on the Wish marketplace will be $150 as you have chosen the Increase option and have entered 50, so that is the price that will be added to your Magento 2 store product price and will reflect on Wish. However, the price will be the same on Magento 2 store.
- Increase by Fixed Price: You may choose this option if you want the price of your Magento 2 product to be increased on Wish by a particular amount. If selected, then the Modify by Fix Price field appears as:
- Now suppose your product is for $100 on Magento 2 store and if you enter 20 in the Modify by Percentage Price, then the price for your products that will reflect on Wish marketplace will be $80 as 20% of 100 is 20 and it’ll be deducted from 100. However, the price will be the same for Magento 2 store.
- In Wish Default Tags, you may enter 1 to 10 tags separated by commas. These tags are used as the name of the categories that a seller wants for its products.
- In Wish Default Shipping, enter the default shipping cost for the products which have the shipping field empty.
- In Auto-Update Product, you select enable if you want the product to be updated on Wish if there is any change to its inventory or other details or if the product has been deleted on Magento 2 store. If you don’t want to auto-update, select Disable.
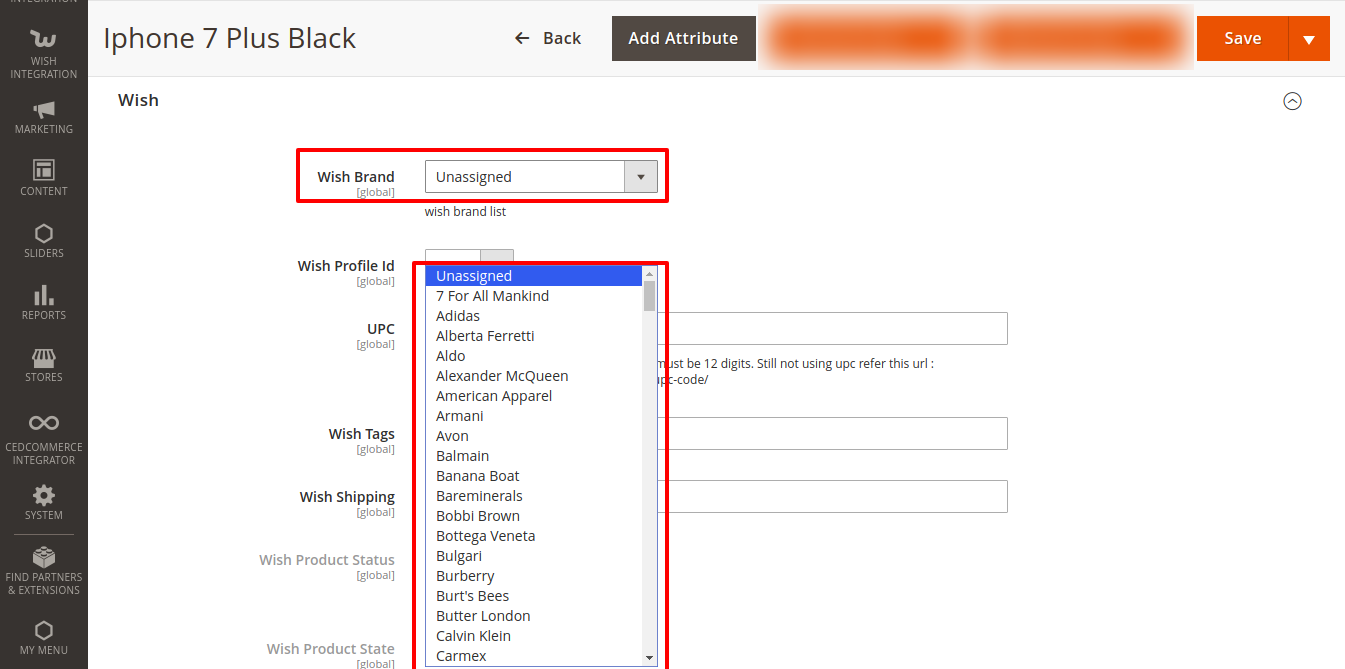
- On the Clicking Fetch Brands button all the brands will be visible on the catalog page.
- A success message will appear.
- You can see these fetched brands on the catalog page.
- Now come back to the configuration page and proceed with the remaining settings.
Wish Order Settings
- On clicking the Wish Order Settings, the section expands as:
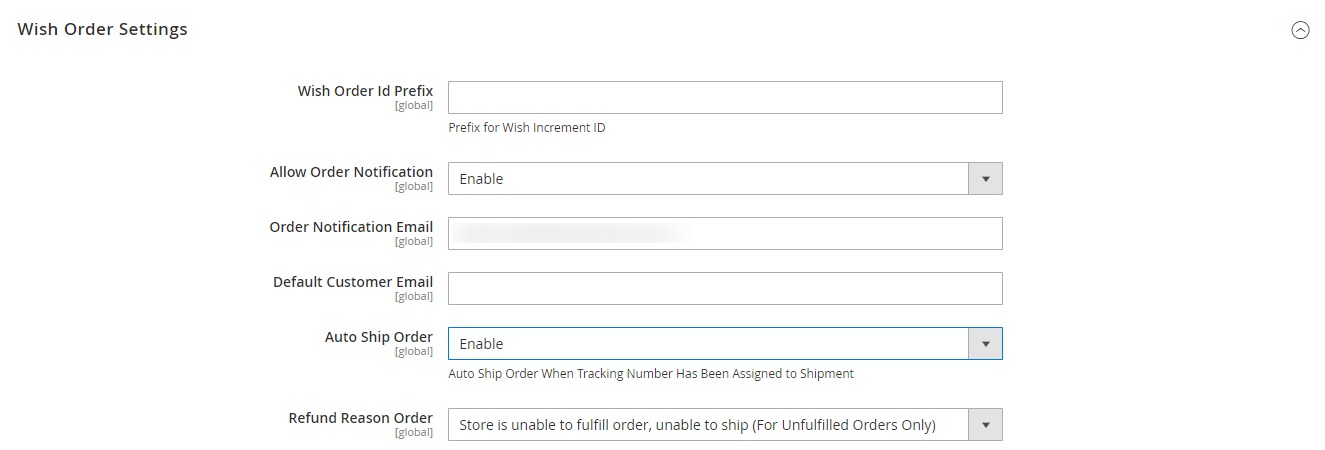
- In Wish Order ID Prefix, enter the prefix that you want to be added to each order for your product that has been placed on Wish.
- In Allow Order Notifications, select Enable if you want to be notified about the orders placed for your products on the Wish marketplace.
- In Order Notification Mail, enter the email on which you want the notifications to be sent regarding the orders.
- In Default Customer Mail, enter the email ID and assign all the Wish orders to it in case the customer details are not available.
- In Auto-Ship Order, select Enable if you want the orders to be shipped automatically if the tracking number has been assigned to them. If you don’t watch such action to be taken, select Disable.
- In Refund Reason Order, select the reason for the order refund.
Wish Cron Settings
- On clicking it, the section will expand as:
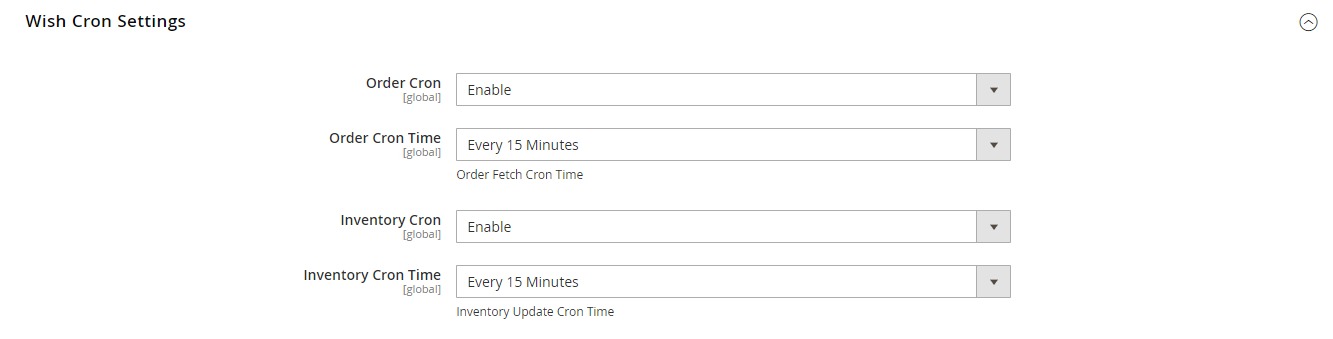
- In Order Cron, if you want to Enable the crons to run for Wish orders, select Enable. On selecting Enable, a box will appear as:
- In Order Cron Time, select the time after which the orders will be synced and updated between Wish and Magento 2 store, periodically.
- In Inventory Cron, select Enable if you want the inventory to be updated between Wish and Magento 2 store after a particular time interval. On selecting enable, the box will appear below it as:
- In Inventory Cron Time, enter the time after which you want the inventory to be synced and updated between Wish and Magento 2 store, periodically.
Wish Chunk(Batch) Settings
- On clicking it, the section will expand as:
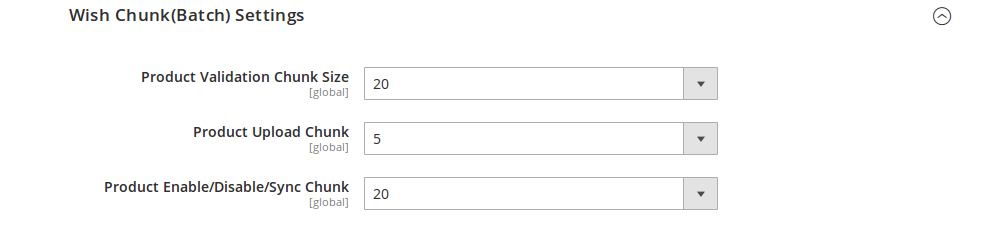
- In Product Validation Chunk Size, select the number of products you want to be sent to Wish for validation in one batch.
- In Product Upload Chunk, select the number of products you want to be sent to Wish for uploading, in one batch.
- In Product Enable/Disable/Sync Chunk, select the number of products you want to be sent to Wish to be Enable/Disabled/Synced, in one batch.
Once you have completed all the actions mentioned above in all the sections, click on the Save Config button on the top right of the page. The configuration will be completed successfully.
×


