- A Brief Overview On MyWorld Integration
- How To Install MyWorld Integration in Magento 2 Store
- How To Perform Configuration Settings
- How To Add & Manage Multiple MyWorld Seller Accounts
- How To Manage MyWorld Profiles
- How To Manage Product Listings
- How To Manage Orders Received From MyWorld
- Additional Developers Section
- How To Get Help and Instant Support For MyWorld Magneto 2 Integration

4.How To Add & Manage Multiple MyWorld Seller Accounts ↑ Back to Top
The merchant has to first create a seller account in the MyWorld seller panel. Once the seller account is created and is approved by MyWorld, the Magento 2 store owners have to obtain multiple seller credentials such as API Key values from the MyWorld Seller account, and then have to paste it in the respective fields displayed on the MyWorld Account Form of the admin panel of CedCommerce Integration.
To add the account,
- Go to the Magento 2 Store Admin
- On the left navigation bar, click the MYWORLD INTEGRATION
A menu appears as shown in the following figure:

- Click Manage Accounts.
The Manage Accounts page appears as shown in the following figure:

- Click the Add Account
The page appears as shown in the following figure:

- In Active, select Yes
- Enter the Account Name in the corresponding field.
- Now scroll down and click Api Information. The section will expand as:

- Here you have to enter the Seller Id, Access Key Id and Secret Key.
- To know the information that you need to fill in this section, you check your mail at the time of seller account creation on MyWorld.
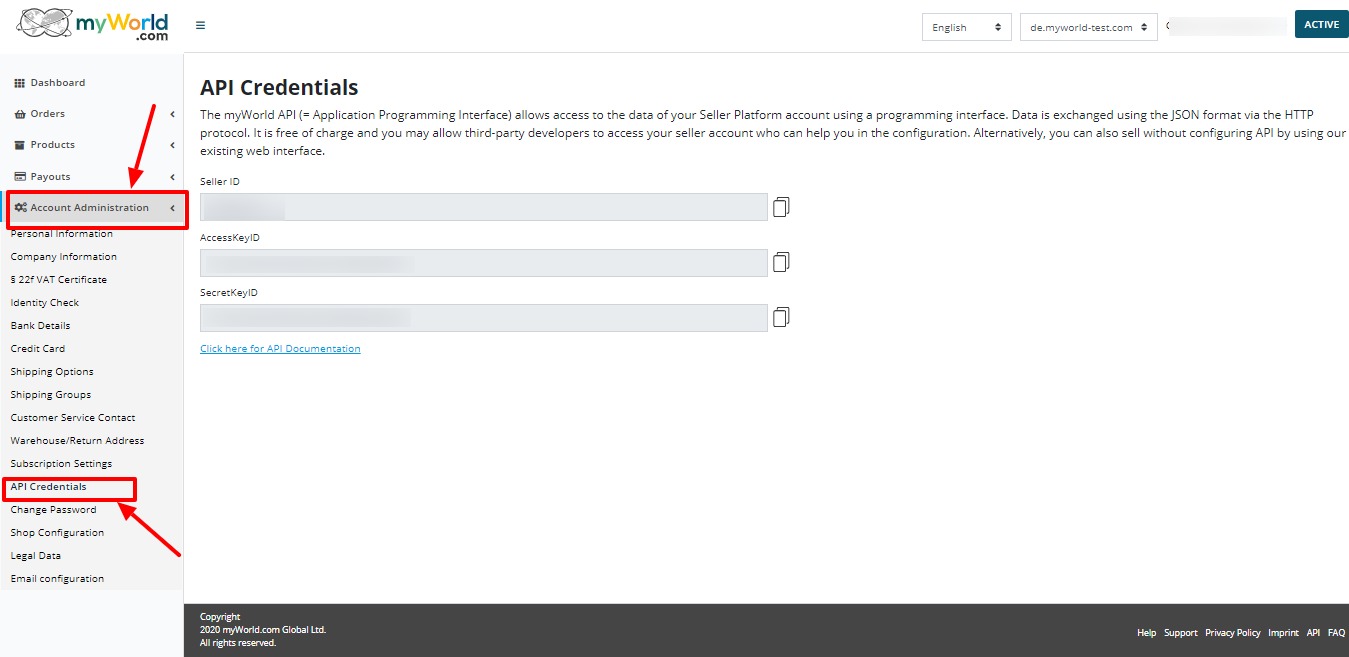
- Step 1. Login here https://sellerplatform-de.myworld.com/ Please note on the domain. \for Germany its de, Austria its AT, etc
- Step 2: Once you log in – You can get API credentials from Account administration or direct link here https://sellerplatform-de.myworld.com/en-us/api-credentials

- MyWorld provides you with all these details in your mail inbox after successful account creation.
- Once you get the Acess Key Id and the Secret Key from here move back to the Magento panel to fill all these necessary details.
- Once the information has been filled, you can select one or more Marketplaces in the corresponding field
- Now click on the Validate button and the message of Credentials are valid will appear.
- Scroll down and click the Order section and it will expand as:

- In Order Section, do the following steps:
- In Multi-Store, select Yes for multiple stores.
- In the Default Store, select the default Magento store view.
- The Shipping Method is automatically assigned by MyWorld. If you want to make changes in these, the go to your MyWorld seller panel and make the changes there.
- The Payment Method is also automatically assigned by MyWorld. Similar to the shipping method, if you want to make changes in these, the go to your MyWorld seller panel and make the changes there.
- Scroll down and click on Developer section and it will appear as:

- Select Account Mode. There are two basic modes available
- Mock Mode: mocks the live Api calls, used for integration testing and development. Do not use in production as live credentials will not be validated or used.
- Live : live api calls are used for integration of products and orders.
- Add notes if you want any.
- Click on Save on the top right side of the page.
- The account will be created.
To view the account,
- On the MyWorld Accounts page, click the view button for the account that you want to see, as highlighted in the image below.

- On clicking it, the details would appear on the page as shown:

To edit the account,
- On MyWorld Accounts page, click the edit button for the account that you want to edit, as shown in the image below:

- The page will appear as:

- Click the required section, and then make the changes as per requirement in the respective section.
- Click the Save button.
The edited account will be saved.
To delete the account,
- On the MyWorld Accounts page, click on the delete button as highlighted in the image below, for the account that you want to delete.

- On clicking it, the MyWorld account will be deleted and the message will appear on the same page.
×


