
Add A New Profile
To add a new profile
- Go to the Magento 2 Admin panel.
- On the left navigation bar, click the FRUUGO INTEGRATION menu, and then click Manage Profile.
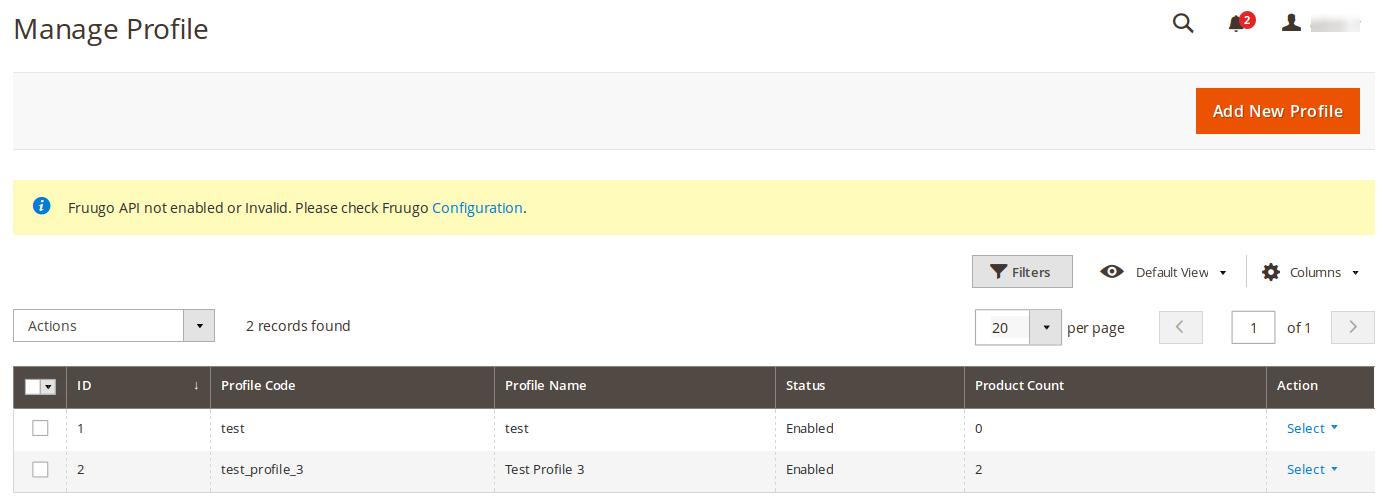
The Manage Profile page appears as shown in the following figure:
- Click the Add New Profile button.
The New Profile page appears as shown in the following figure:
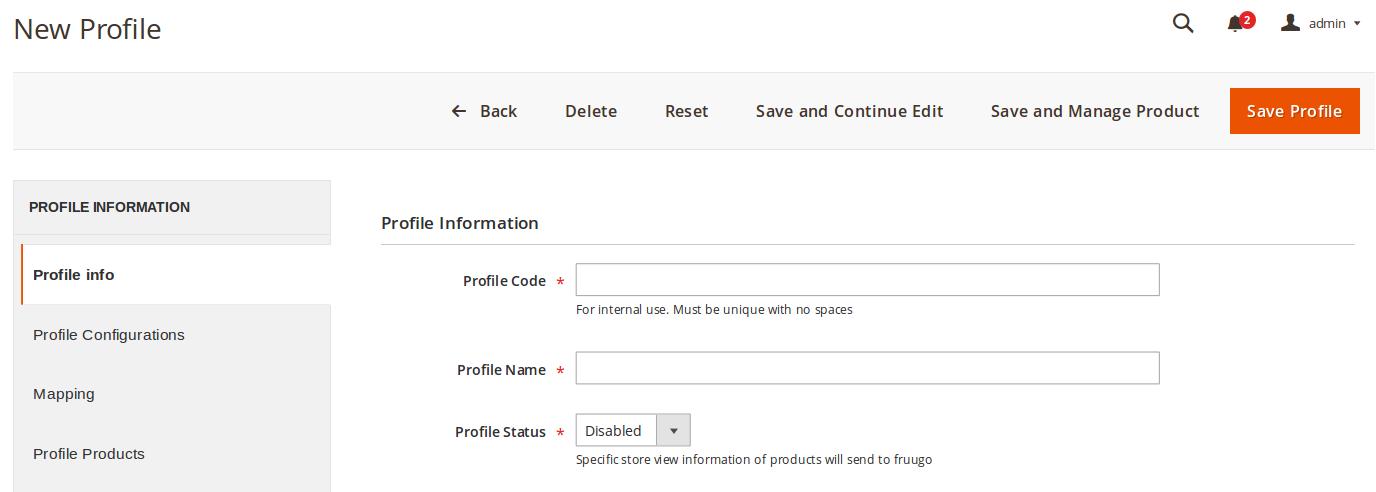
- In the right panel, under Profile Information, do the following steps:
- In the Profile Code box, enter a profile code.
Note: It is only for the internal use. Use the unique profile code with no spaces. Start with small letters. - In the Profile Name box, enter the name of the profile.
Note: Use the unique name to identify the profile. - In the Profile Status list, select Enabled to enable the profile.
Note: The Inactive option disables the profile.
- In the Profile Code box, enter a profile code.
- Click the Save and Continue Edit button.
- In the left navigation panel, click the Profile Configurations menu.
In the right panel, the page appears as shown in the following figure:
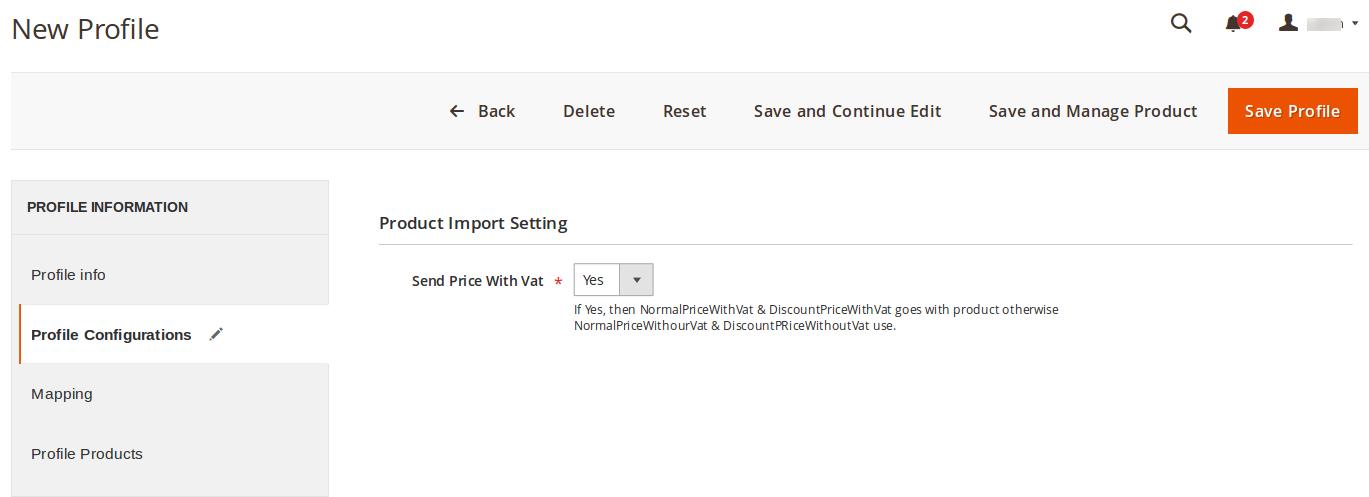
- Under Product Import Setting, do the following steps:
- In the Send Price With Vat list, select Yes to upload the Normal Price or the Discount price including Vat.
- Click the Save and Continue button.
- In the left navigation panel, click the Mapping menu.
In the right panel, the page appears as shown in the following figure:
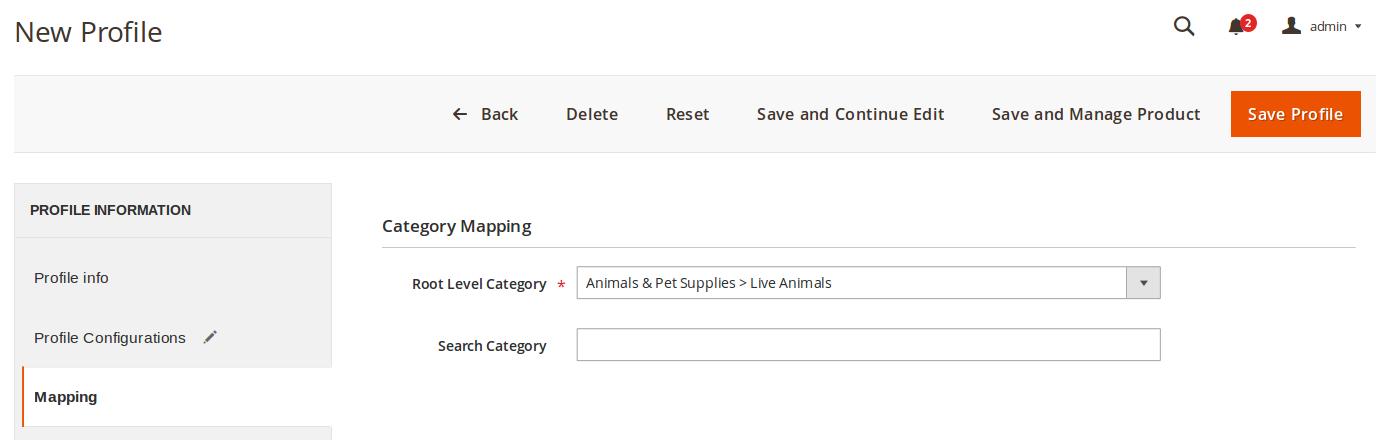
- Under Category Mapping, do the following steps:
- In the Root Level Category list, select the required category to map.
OR
In the Search Category box, enter the category initials to search for the required category.
A list appears with the suggested categories. Select the required one. Once selected the category appears in the Root Level Category field.
- In the Root Level Category list, select the required category to map.
- Scroll down to the Fruugo / Magento Attribute Mapping (Required/Optional mapping) section.
The section appears as shown in the following figure:
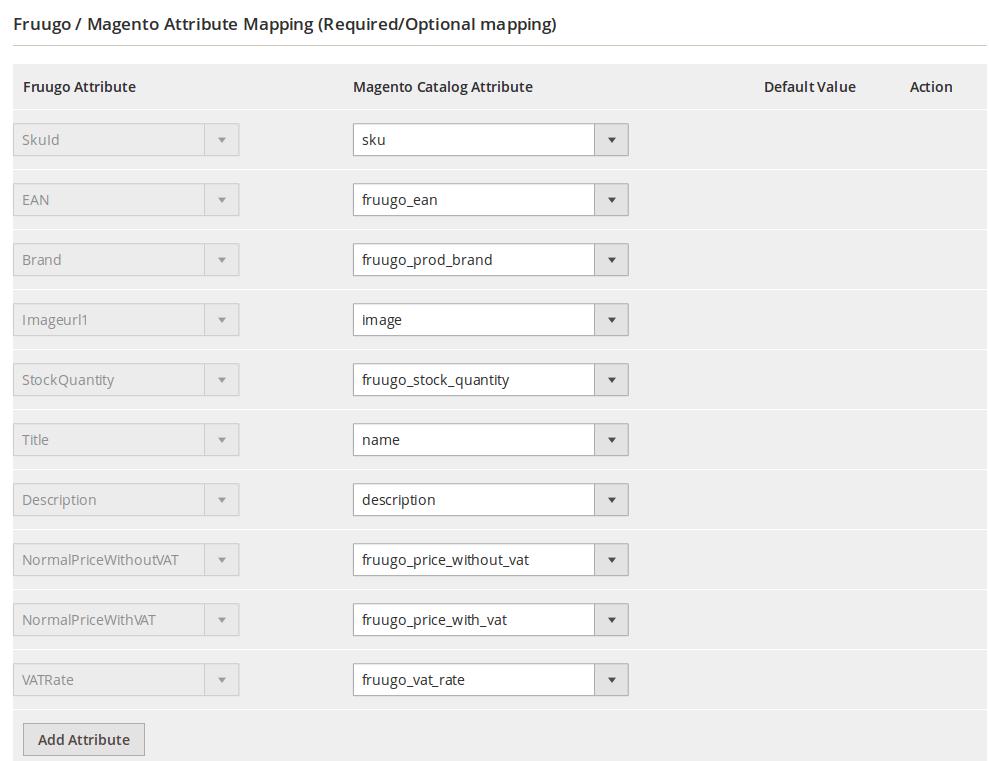
- Under Fruugo / Magento Attribute Mapping (Required/Optional mapping) , do the following steps:
- In the Magento Catalog Attribute column, select the required Magento attribute from the corresponding list to map it with the corresponding Fruugo attribute.
Note: In case the required attribute does not exist in the corresponding list, then select -Set Default value- from the corresponding list. A text box appears in the Default Value column next to corresponding Magento Catalog Attribute column. - Repeat the mapping of all the required or optional Magento attributes listed with the corresponding Fruugo attributes.
- Click the Add Attribute button to add more attributes if required.
- In the Magento Catalog Attribute column, select the required Magento attribute from the corresponding list to map it with the corresponding Fruugo attribute.
- Scroll down to the Fruugo / Magento Attribute Mapping (Variant Attribute mapping) section.
The section appears as shown in the following figure:
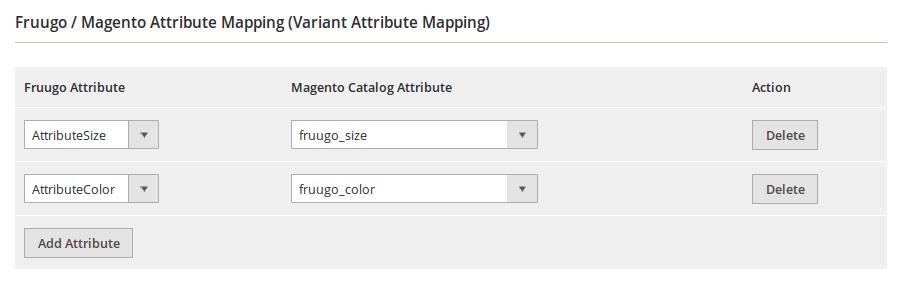
- Under Fruugo / Magento Attribute Mapping (Variant Attribute mapping), do the following steps:
- Click the Add Attribute button to add attributes if required.
- In the Fruugo Attribute column, select the required Fruugo attribute to map it with the corresponding Magento attribute.
- In the Magento Catalog Attribute column, select the required Magento attribute.
- Scroll down to the Fruugo / Magento Attribute Mapping (Optional mapping) section.
The section appears as shown in the following figure:
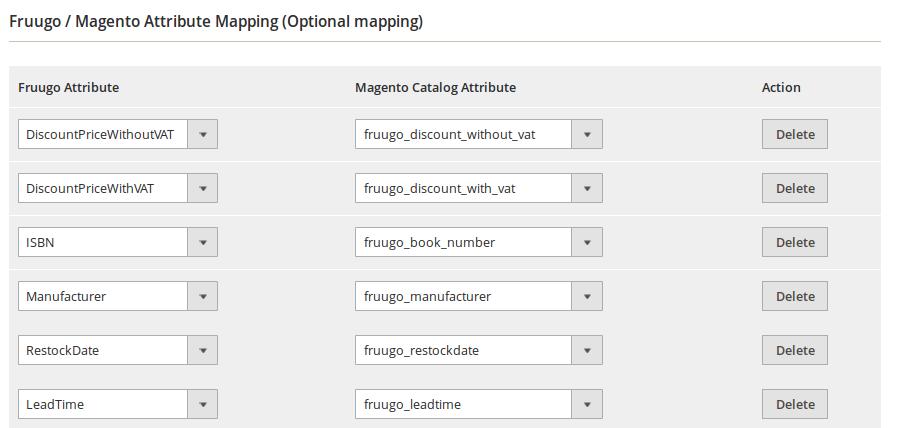
- Similarly, under Fruugo / Magento Attribute Mapping (Optional mapping), do the following steps if required:
- Click the Add Attribute button to add attributes if required.
- In the Fruugo Attribute column, select the required Fruugo attribute to map it with the corresponding Magento attribute.
- In the Magento Catalog Attribute column, select the required Magento attribute.
- Click the Save and Continue Edit button.
- In the left navigation panel, click the Profile Products menu.
In the right panel, the page appears as shown in the following figure: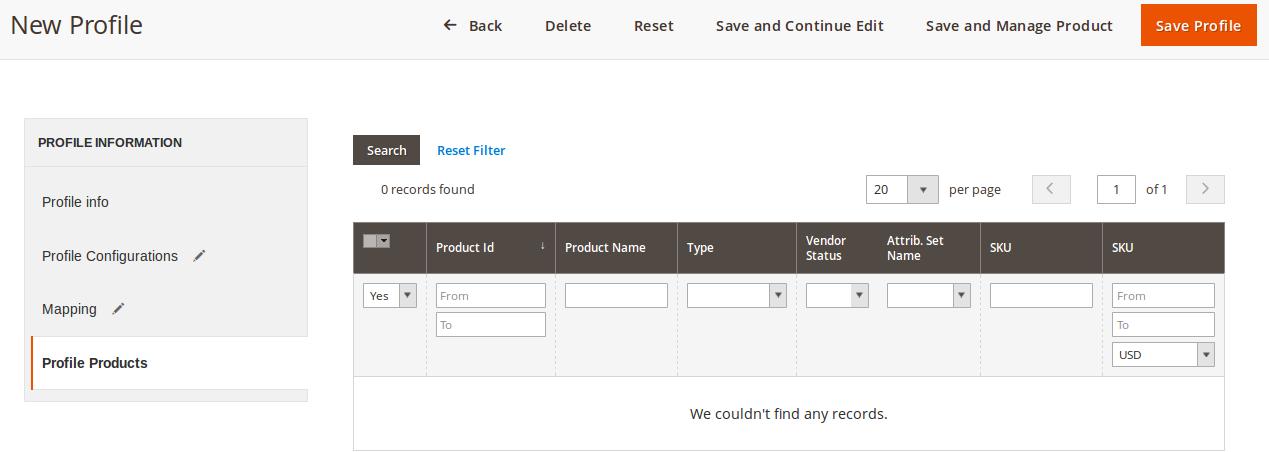
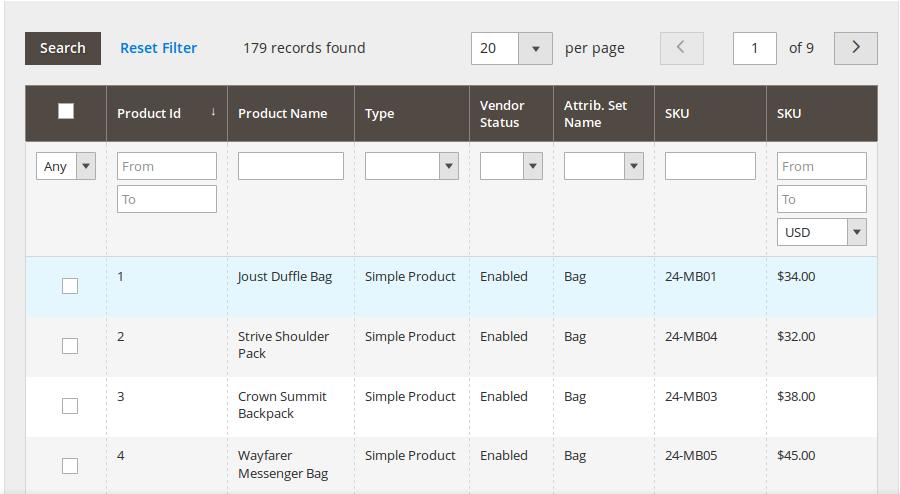
- Since no products are assigned to the profile, there are no products listed in the table.
- Click the Reset Filter link.
All the products are listed in the table as shown in the following figure:
- In the right panel, do the following step:
- Select the check boxes associated with the required products those the admin wants to assign to the new profile.
Note: Admin can assign one product to one profile only. It means, admin can assign multiple products to the same profile but can associate a product only with one profile at one time. To assign a product to another profile, the admin has to remove that product from the currently assigned profile.
- Select the check boxes associated with the required products those the admin wants to assign to the new profile.
- Click the Save Profile button.
The created profile is saved and listed on the Manage Profile page.
Or
Click the Save and Continue Edit button to save the created profile and continue editing, if required.
Or
Click the Save and Manage Product button to save the profile and make ready to upload the product to Fruugo.
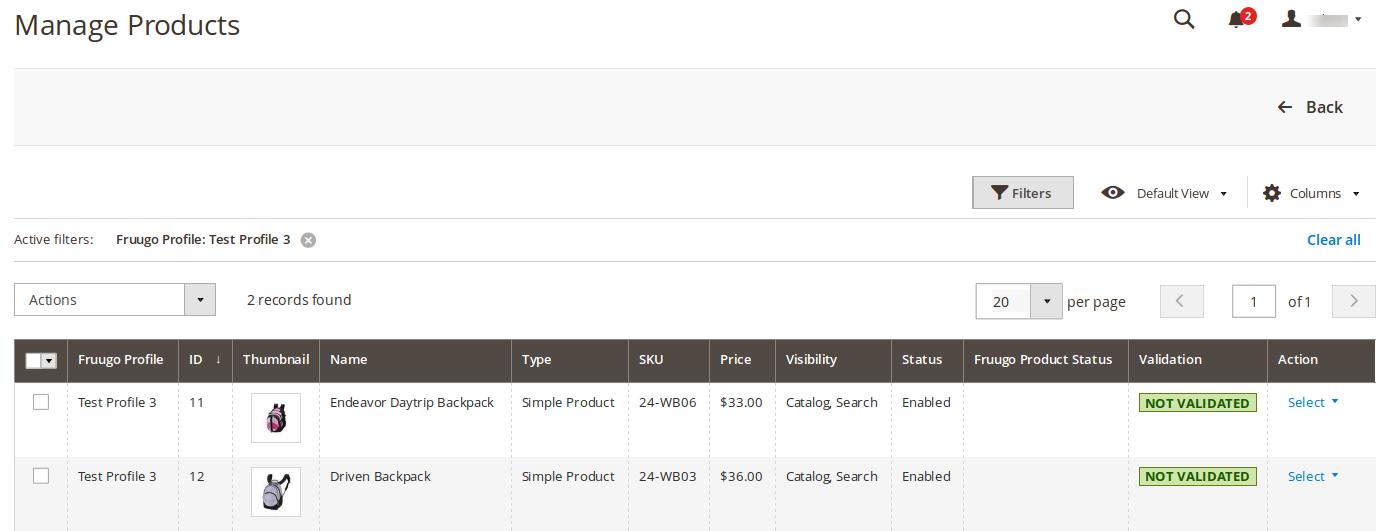
The assigned products are listed on the Manage Products page as shown in the following figure:
×


