
Configuration Settings
To set up the configuration settings in the Prestashop Admin panel
-
- Go to the Prestashop Admin panel.
- In the left navigation panel, place the cursor on the Wish Integration menu.
The menu appears as shown in the following figure:
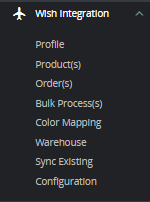
- Click on Configuration.
- Go to API Settings.
The tab appears as shown below:
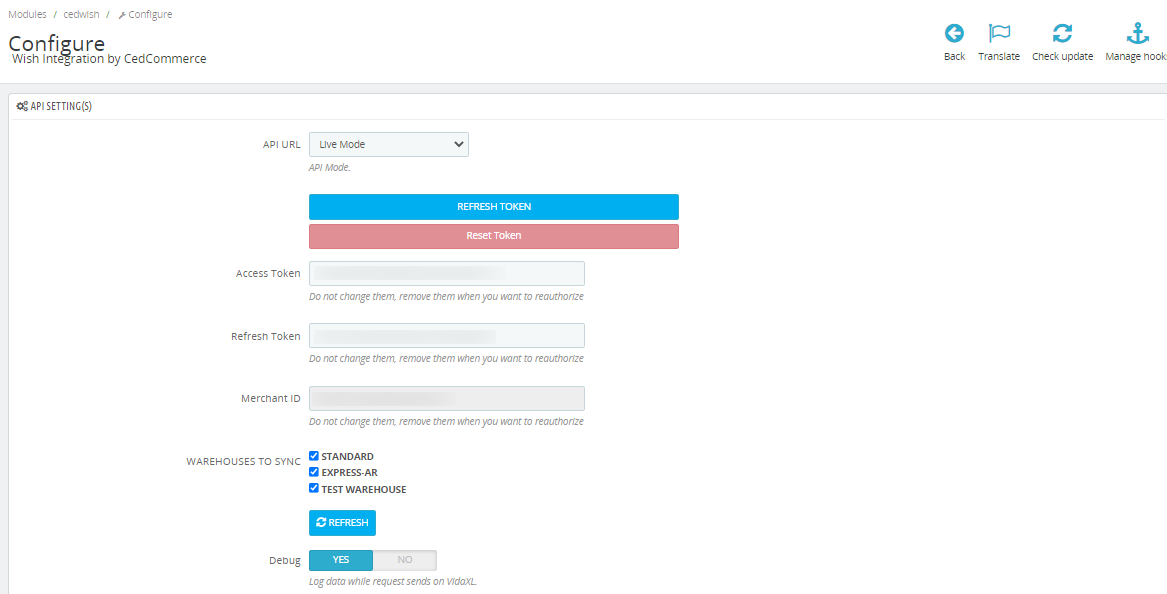
- In the API Settings, do the following information
- In the mode bar. You may select Live or Sandbox according to the need of your system. Once you choose your Account Mode, Click on the ‘Refresh Token’ button it will redirect to the Wish Merchant Account.
- Your API Access Token, API Refresh Token, and Merchant ID get filled automatically.
- In Debug mode, click on ‘Yes’ to enable the debug mode.
- Now Go to the Product Settings section.
The tab appears as shown in the figure:
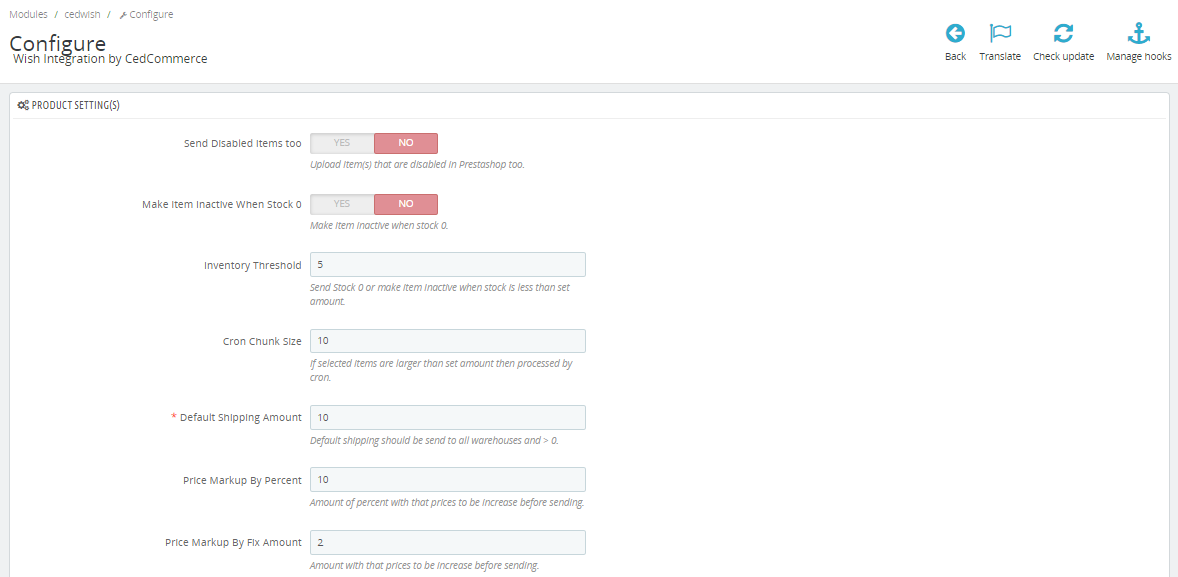
- In the Product Settings, do the following steps:
- In the Send Disabled items too, Click on ‘Yes’ to enable sending disabled items in Prestashop.
- In the Make Item Inactive When Stock 0, Click on ‘Yes’ to enable the make item inactive when stock 0.
- In the Inventory Threshold, enter the numeric value to send Stock 0 or make the item Inactive when the stock is less than the set amount.
- In the Cron Chunk Size, enter the chunk size if selected items are larger than the set amount then processed by corn.
- In the Default Shipping Amount, enter the default shipment amount.
- In the Price Markup By Percent, enter the number which you want to increase in percentage.
- In the Price Markup By Fix Amount, enter the number which you want to increase in amount.
- In the Store Language, select the language in which you want the data to be processed.
- In the Image Type, choose the image type which needs to send to the marketplace.
- In the Customer Group ID, choose the customer group and send prices.
- In the Currency on Wish, choose your Wish set currency.
- In the Currency of Price, Select the same currency as wish. If that currency is not available in-store, then you can add that with the conversion rate with “International > Localization > Currencies”
- In the Size Attributes, select Attributes you want to send as size if in items.
- In the Color Attributes, select Attributes you want to send as color if in items.
- 15. In the SKU on Wish, Map with a field you want to send it as SKU on wish.com
- 16. In the GTIN on Wish, Map with the field you want to send it as GTIN on wish.com.
- 17. In the Image URL for localhost uploads, When using from localhost then you need to add URL from any server because localhost URLs are not accepted by wish.com.
- Now Go to Order Settings.
- The tab appears as shown in the following figure:
- In the Order Settings, do the following steps:
- In the Email for Customer, enter the email to create orders, not from marketplace data.
- In the Create order with Carrier, choose your carrier to create orders.
- In the Create order with Payment, create orders with a payment method.
- In the Force create order, select Yes to create order even stock not available or product not active on the store.
- In the Cancel order when canceled on the store, select ‘Yes’ to Cancel order on wish.com when order was canceled on Prestashop store by admin.
- In the Use Marketplace order id as Reference, you can use marketplace ID as a reference.
- In the CUSTOMER ID, enter the ID for customers to be created, for orders which are imported from Wish.
- In the Origin Country, choose your origin country.
- In the Order status when Import, select the order status while importing the order.
- In the Create Shipment, choose when to create shipment select the order status to appear when the order has been shipped.
- In the Status For Order Create Shipment, select the order status to appear when the order has been Shipped.
- In the Carrier Mapping, you can choose your country, store carrier and map with marketplace carrier for shipment.
- In the Order Status Mapping, you can map store order status with marketplace order status.
- Lastly, Go to Cron Settings.
- The tab appears as shown in the figure:
- In the Cron Settings, do the following steps:
- In Cron Secure Key, you can make a combination of secure keys consisting of the alphabet, number, and special characters.
- You may see cron URL, name, and recommended time.
- You can also see ‘How to setup Cron Urls’ on the server.
Click the Save button and the configuration will be saved.
×


