
Bonanza Configuration Settings
Once the module gets installed, you get navigated to the Configuration page.
To set up the configuration settings
- Go to Prestashop Admin Panel
- In the left navigation panel, place cursor on the Bonanza Integration menu.
The menu appears as shown in the following figure:
- Click on eBay Configuration.
The Configuration page appears as shown in the following figure:
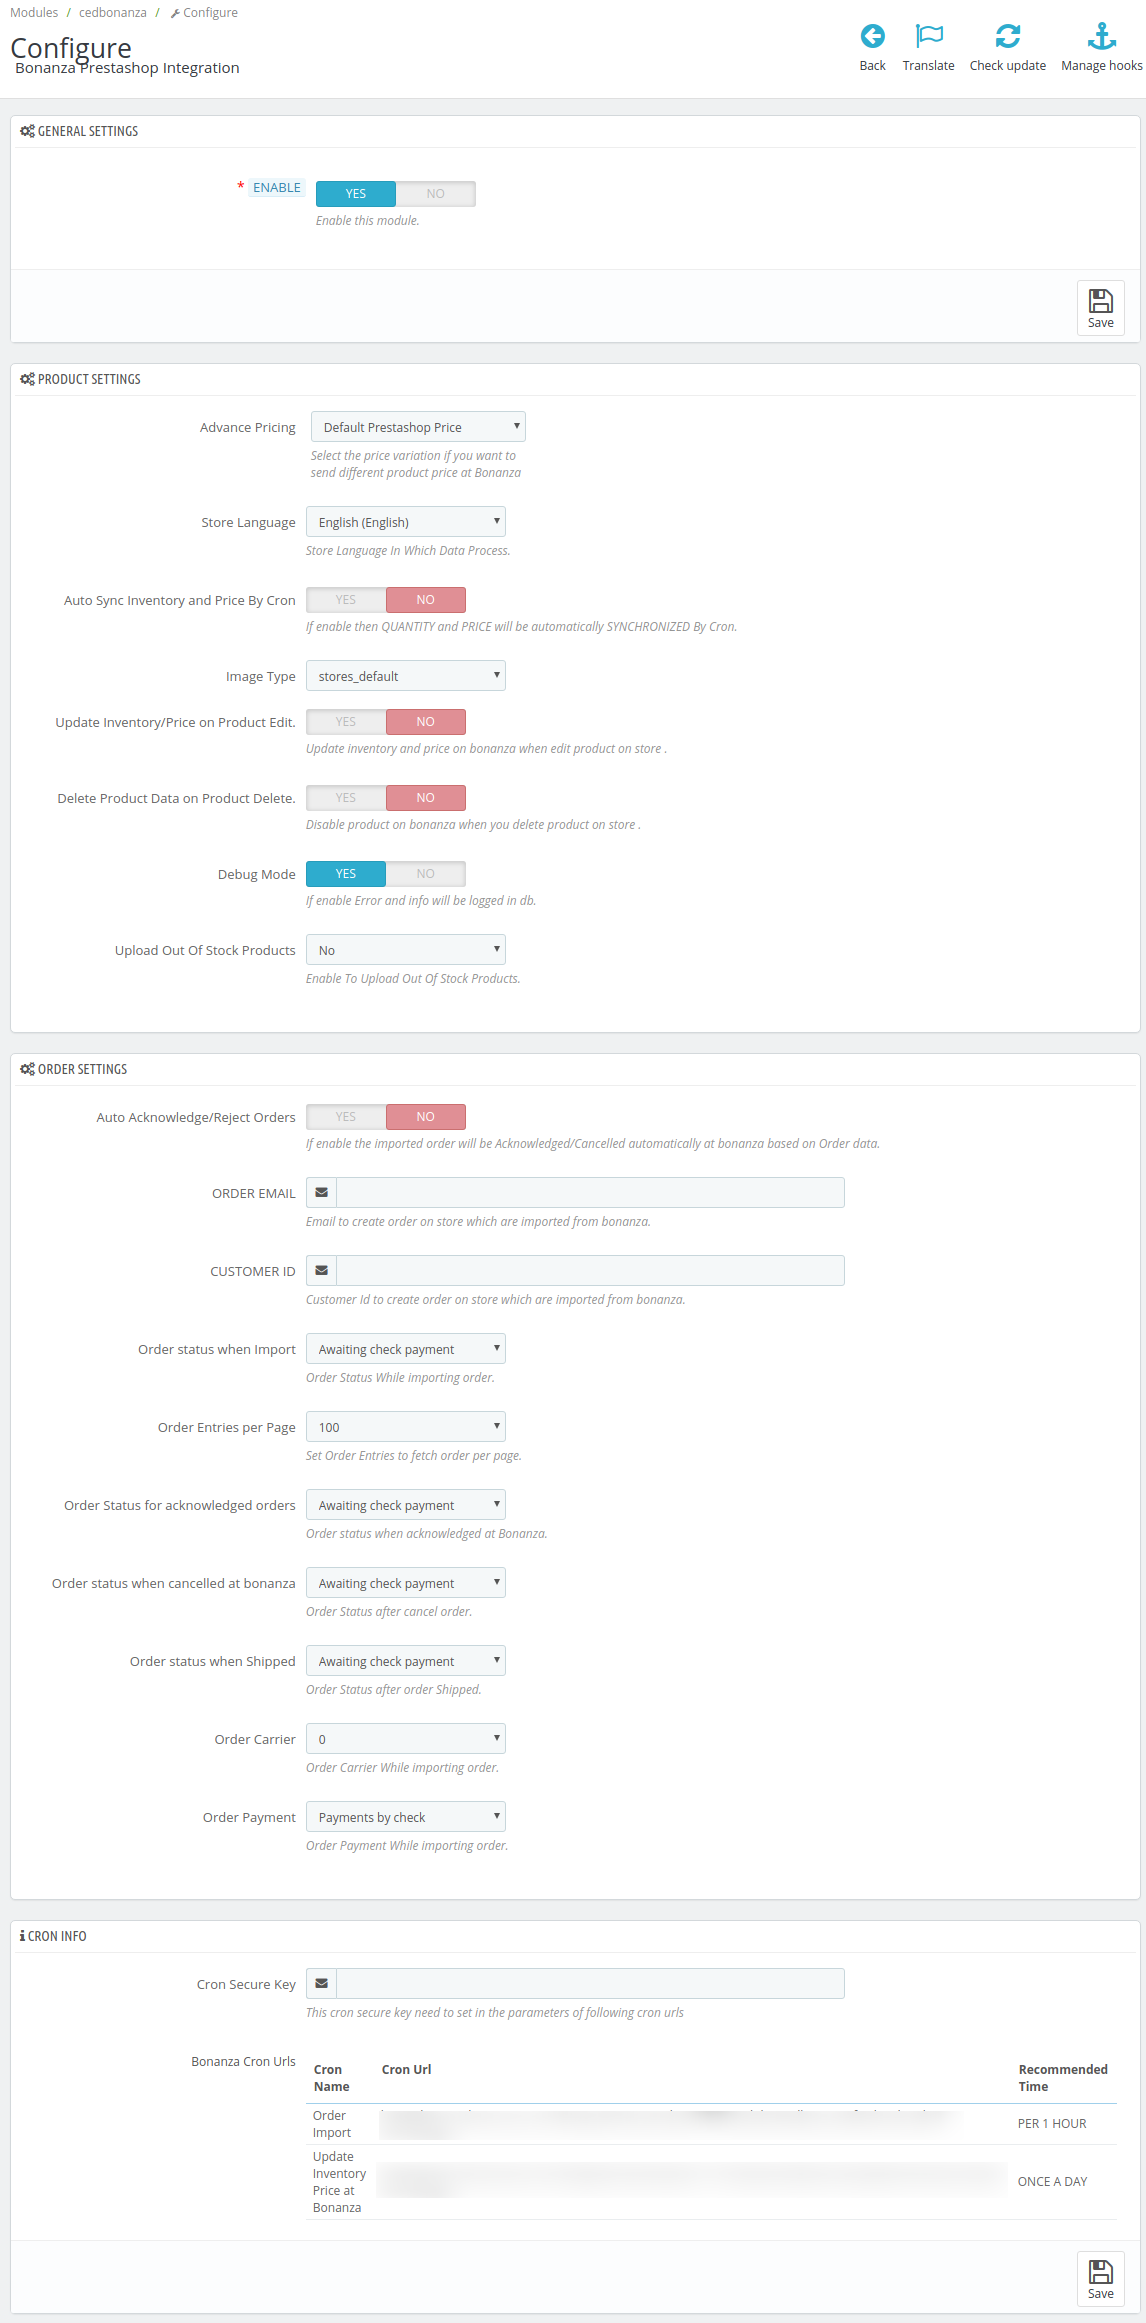
- In the General Settings, do the following steps:
- In the Enable option, choose Yes to enable the module.
- Click on Save Button, to save the enable settings.
- In the Product Settings, do the following steps:
- In the Advance Pricing option, do the following steps:
- Increase by Fixed Price: If selected, then the Modify by Fix Price field appears.
- Increase by Fixed Percentage: If selected, then the Modify by Percentage Price field appears.
Enter the numeric value to increase the price of the Bonanza, product price by the entered value % of Prestashop price.For Example,
Prestashop price + 5% of Prestashop price.
Prestashop Price = 100
Select Increase By Fixed Percentage option
Modify by Percentage Price = 5
100 + 5% of 100 = 100 + 5 = 105
Thus, Bonanza Product Price = 105 - Decrease by Fixed Price: If selected, then the Modify by Fix Price field appears.
- Decrease by Fixed Percentage: If selected, then the Modify by Percentage Price field appears.
Enter the numeric value to decrease the price of the Bonanza product price by the entered value % of Prestashop price.For Example,
Prestashop price – 5% of Prestashop price.
Prestashop Price = 100
Select Decrease By Fixed Percentage option
Modify by Fix Price = 5
100 – 5% of 100 = 100 – 5 = 95
Thus, Bonanza Product Price = 95
- In the Store Language, select the language in for your module.
- In the Auto Sync Inventory and Price By Cron box, select Yes option to enable the auto-sync inventory and price by cron between Bonanza and Prestashop.
- In the Image Type box, select the option type in which you need to display on Bonanza.
- In the
- In the Delete Product Data on Product Delete box, select the Yes option enables to delete product on bonanza.
- In the Debug mode, select the Yes option to enable the debug mode,
- In the when you select the Yes option then the tab expands as shown in the following figure:

- Here you can enter the minimum quantity to be upload at bonanza in case Product is Out Of Stock. Leave it blank if you don’t want to upload out of stock product.
- In the Advance Pricing option, do the following steps:
- In the Order Settings, do the following steps:
- In the Auto Acknowledge/Reject Orders, select Yes option, to enable the imported order will be Acknowledged/Cancelled automatically at bonanza based on Order data.
- In the Order Email box, enter the email to create order on the store which is imported from bonanza.
- In the Customer ID box, enter the Customer Id to create order on the store which is imported from bonanza.
- In the Order status when Import box, select the order status while importing orders.
- In the Order Entries per Page box, enter the numeric value to set order entries to fetch order per page.
- In the Order Status for acknowledged orders box, select the order status when acknowledged at Bonanza.
- In the Order status when canceled at bonanza box, select the order status after cancel order.
- In the Order status when Shipped box, select the order status after the order shipped.
-
In the Order Carrier, select the order carrier set for particular orders while importing the Bonanza order.
-
In the Order Payment Method, select the order payment method set for each order while importing the Bonanza order.
- In the Cron Settings, do the following steps:
- In Cron Secure Key, you can make a combination of secure key consisting of the alphabet, number, and special characters.
- You may see cron URL, name and recommended time.
- Click the Save button and the configuration will be saved.
×


