
3.Jet Configuration Settings ↑ Back to Top
Once the extension is successfully installed on the Merchant’s store, the Jet menu appears on the top navigation bar dispalyed in the Magento Admin Panel. The merchant has to fill-in the API credentials in the Jet Configuration page of the admin panel.
The user has to log in the https://partner.jet.com/ to obtain the following API credentials:
- Jet API key
- API Secret
- Fulfillment Node Id
After obtaining the API credentials, the merchant has to copy all of them one by one from the Jet Partner account and paste it one by one to the Configuration page of the admin panel of the merchant.
To follow the process of copying and pasting of the API credentials,
- Open the Jet Partner account and the Magento Admin Panel in two different tabs or windows of the browser. Thus, copy the keys from the Jet Partner account and paste them one by one to the Magento Admin Panel.
OR
- Use the Get Jet Credentials button available on the Jet Configuration page of the admin panel of the merchant.
To Copy the API Key details from the Jet Partner account
- Go to the https://partner.jet.com/ login.
The page appears as shown in the following figure:

- In the right-upper corner of the page, click the Get API Keys button.
The Sandbox API Keys dialog box appears as shown in the following figure:
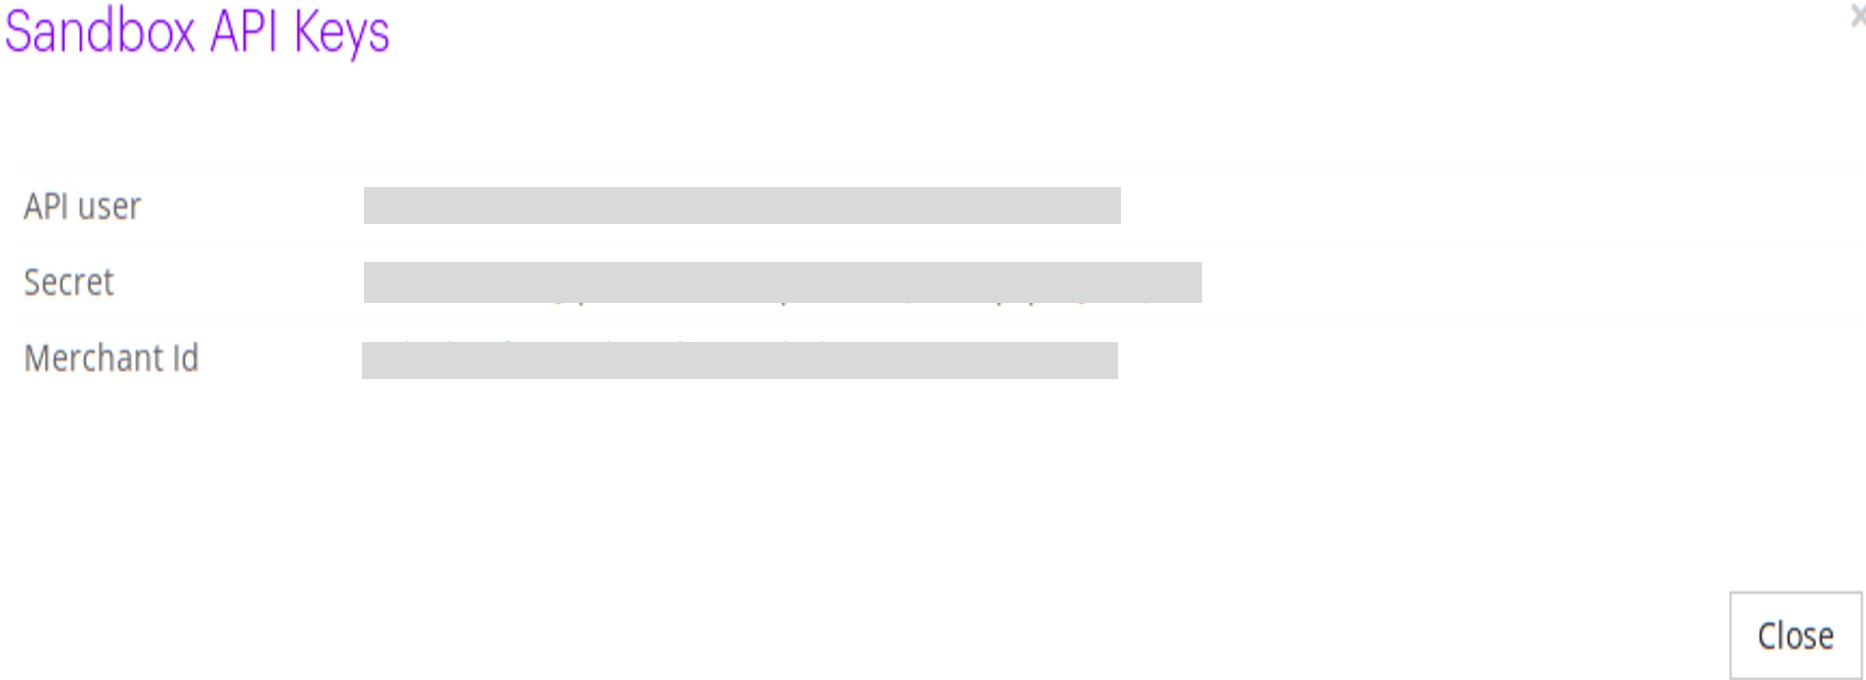
- Copy all the API keys for further use.
- Click the Close button.
- On the left navigation bar, click the Fulfillment menu.
The Fulfillment Node ID is generated and the page appears as shown in the following figure:

- Copy the Fulfillment Node ID from the Fulfillment Node ID column.
To update the Jet Configuration Setting of the extension
- Go to the Magento Admin panel.
- On the top navigation bar, click the Jet menu, .
The menu appears as shown in the following figure:
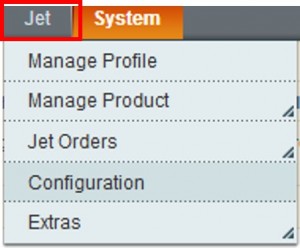
- Click Configuration.
The Jet Configuration page appears as shown in the following figure:
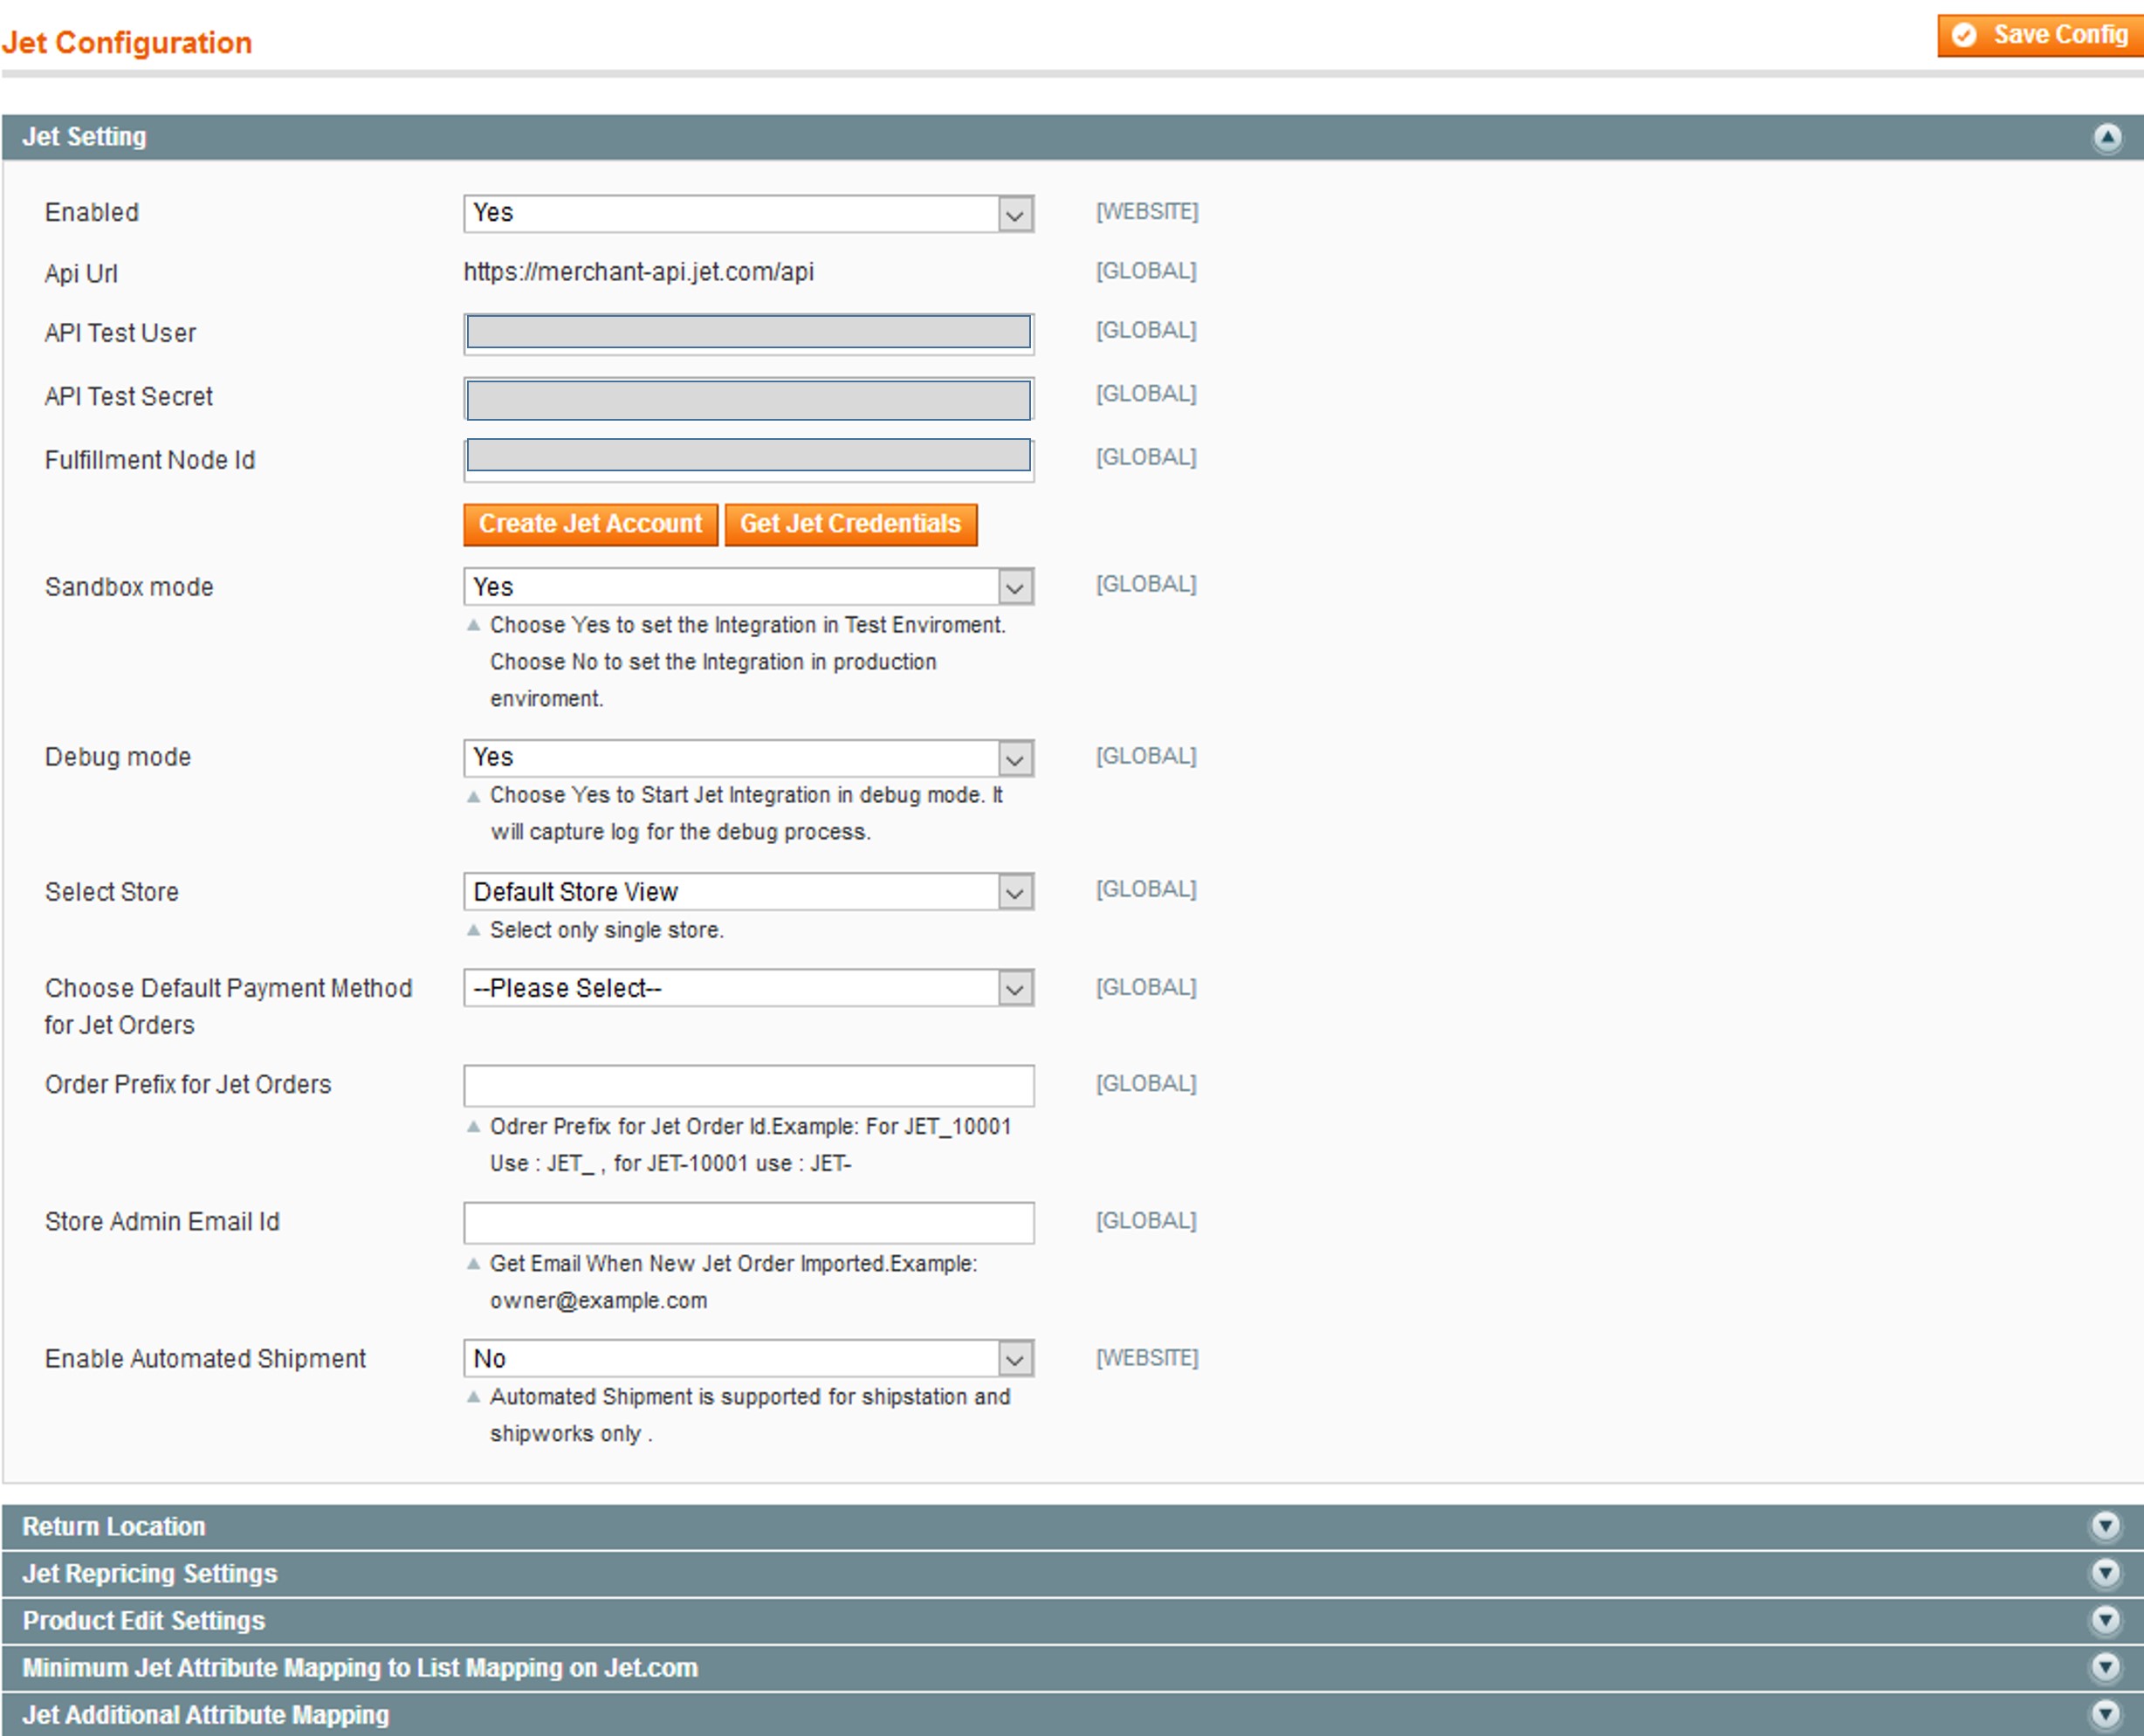
- Under Jet Settings, do the following steps:
- In the Enabled list, select Yes.
Note : Selecting the No option hides all other fields of Jet Settings. The Jet menu does not appear on the top navigation bar. - In the Sandbox mode list, select Yes to configure the Integration in the Test Enviroment.
Note : Select the No option to configure the Integration in production enviroment. - Click the Get Jet Credentials button to to obtain the API credentials from the existing Jet partner account.
OR
Click the Create Jet Account button to create the account to obtain the API credentials. - In the API Test User box, paste the corresponding API User value copied from the Sandbox API Keys dialog box of the Jet Partner Account.
- In the API Test Secret box, paste the corresponding Secret value copied from the Sandbox API Keys dialog box of the Jet Partner Account.
- In the Fulfillment Node Id box, paste the corresponding Fulfillment Node ID value copied from the Fulfillment & Returns Settings page of the Jet Partner Account.
- In the Debug mode list, select Yes to start Jet Integration in the debug mode.
It captures the log for the debug process. - In the Select Store list, select the single store.
- In the Choose Default Payment Method for Jet Orders list, select the required option.
- In the Order Prefix for Jet Orders box, enter the prefix value.
- In the Store Admin Email Id box, emter the email-id.
- In the Enable Automated Shipment list, select the required option.
- In the Enabled list, select Yes.
- Click the Return location tab.
The Return location tab is expanded as shown in the following figure:

- Under Return location, enter the values in the following fields:
- First Address
- Second Address
- City
- State
- Zip Code
- Click the Jet Repricing Settings tab.
The Jet Repricing Settings tab is expanded as shown in the following figure:

- Under Jet Repricing Settings, do the following steps:
- In the Repricing Enabled list, select the required option.
- In the Global Repricing Enable list, select the required option.
Note: If all the products are having the same price or the admin wants to set a global minimum and maximum price for all the products, then the admin can enable it otherwise disable it.
Admin can also enable or disable the product wise repricing in the product edit section.
- Click the Product Edit Settings tab.
The Product Edit Settings tab is expanded as shown in the following figure:

- Under Product Edit Settings, do the following steps:
- In the Auto Sync With Jet list, select Yes or No.
Note: If the Yes option is selected, then if the product is deleted or disabled from the product edit page magento it will automatically archived on the jet.com. - In the Show Upload Button list, select Yes or No.
- Note: If the Yes option is selected, then on product edit page Validate and Upload Product button will appear on top.
- In the Archive Child Products list, select Yes or No.
Note: If the Yes option is selected, then the child product is archived on jet.com once its parent config product is disabled or deleted.
- In the Auto Sync With Jet list, select Yes or No.
- Click the Minimum Jet Attribute Mapping to List Mapping on Jet.com tab.
The tab is expanded as shown in the following figure:
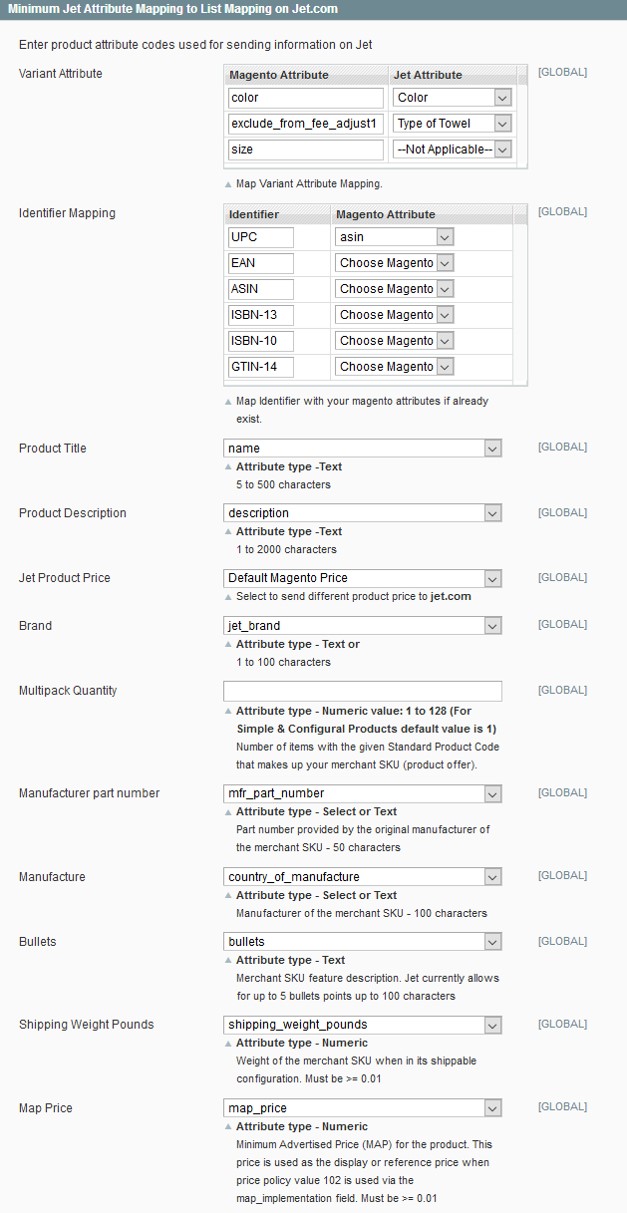
- Under Minimum Jet Attribute Mapping to List Mapping on Jet.com, do the following steps:
Note: Attributes are preselected. Admin can change as per the requirement.
- In the Variant Attribute field, select the corresponding Jet Attribute from the list to map it with Magento Attribute.
- Under Identifier Mapping, select the corresponding existing Magento Attribute from the list to map it with Identifier.
- In the Product Title list, select the required attribute.
Note: Select the Text-Type attribute. Limitation on the attribute value is 5 to 500 characters. - In the Product Description list, select the required attribute.
Note: Select the Text-Type attribute. Limitation on the attribute value is 1 to 2000 characters. - In the Jet Product Price list, select the required option.
- In the Brand list, select the required attribute.
Note: Limitation on the attribute value is 1 to 100 characters. - In the Multipack Quantity box, enter a required numeric value.
Note: Valid Numeric Value is from 1 to 128. Default value for the Simple and Configurable Products is 1. - In the Manufacturer part number list, select the required attribute.
Note: Select the Text-Type or the Select-Type attribute. Part number provided by the original manufacturer. - In the Manufacture list, select the required attribute.
Note: Select the Text-Type or the Select-Type attribute. - In the Bullets list, select the required attribute.
Note: Select the Text-Type attribute. Currently, Jet allows 5 bulleted points and the limitation of 100 characters. - In the Shipping Weight Pounds list, select the required attribute.
Note: Select the Numeric-Type attribute. The allowed attribute value is >= 0.01. - In the Map Price list, select the required attribute.
Note: Select the Numeric-Type attribute. The allowed attribute value is >= 0.01. Minimum Advertised Price (MAP) of the product.
- Click the Jet Additional Attribute Mapping tab.
The tab is expanded as shown in the following figure:
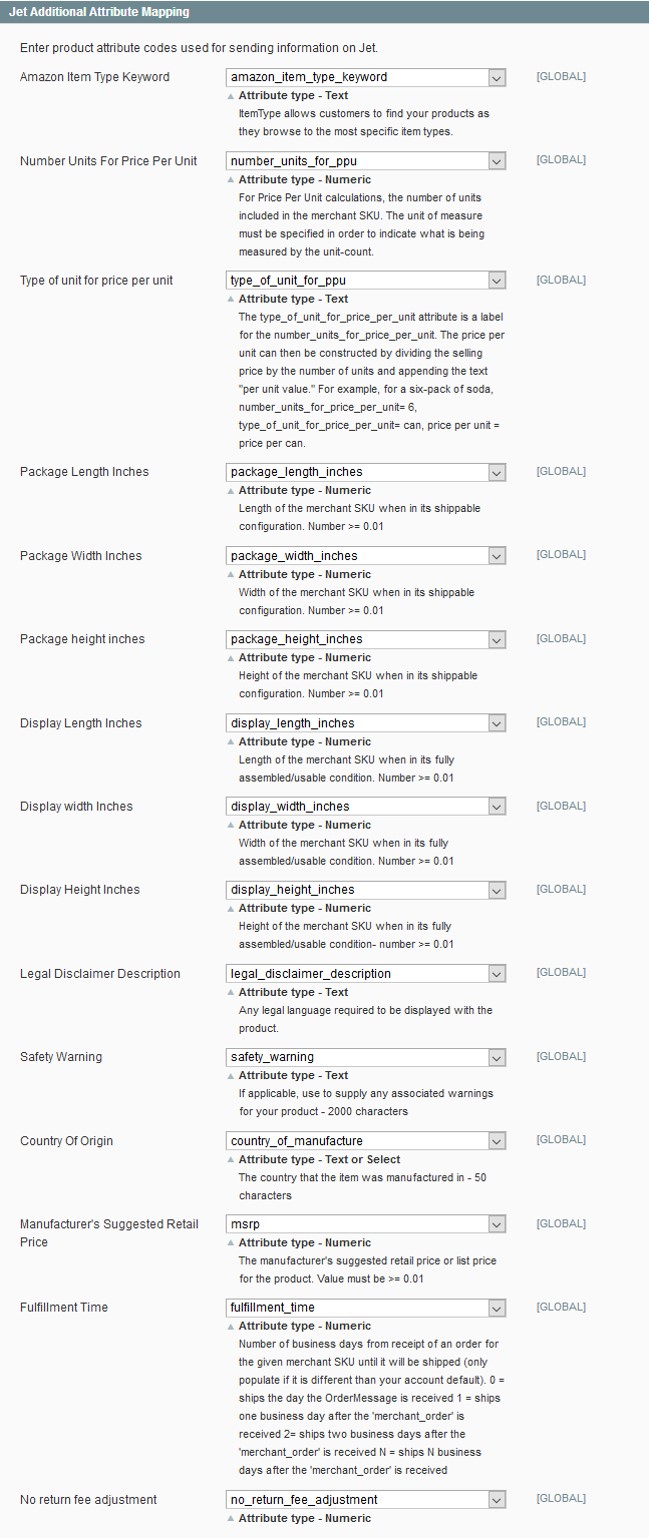
- Under Jet Additional Attribute Mapping, select the corresponding attributes for mapping:
- Amazon Item Type Keyword: Select the Text-Type attribute.
It allows customers to find the specific products. - Number Units For Price Per Unit: Select the Numeric-Type attribute.
The attribute value should specify unit of measure to indicate what is being measured by the unit-count. - Type of unit for price per unit: Select the Text-Type attribute.
The atribute value of the type_of_unit_for_price_per_unit attribute is defined as a label for the atribute value of the number_units_for_price_per_unit attribute .
price per unit = selling price divided by the number of units and appending the text per unit value.
For example: If the product is six-pack of soda, then number_units_for_price_per_unit= 6, type_of_unit_for_price_per_unit= can, thus, price per unit = price per can. - Package Length Inches: Select the Numeric-Type attribute. The allowed attribute value is >= 0.01.
- Package Width Inches: Select the Numeric-Type attribute. The allowed attribute value is >= 0.01.
- Package height inches: Select the Numeric-Type attribute. The allowed attribute value is >= 0.01.
- Display Length Inches: Select the Numeric-Type attribute. The allowed attribute value is >= 0.01.
- Display width Inches: Select the Numeric-Type attribute. The allowed attribute value is >= 0.01.
- Display Height Inches: Select the Numeric-Type attribute. The allowed attribute value is >= 0.01.
- Legal Disclaimer Description: Select the Text-Type attribute. Any legal content that the admin wants to display with the product.
- Safety Warning: Select the Text-Type attribute. Limitation on the attribute value is 2000 characters.
- Country Of Origin: Select the Text-Type or the Select-Type attribute. Specifies the country where the product is manufactured. Limitation on the attribute value is 50 characters.
- Manufacturer’s Suggested Retail Price: Select the Numeric-Type attribute. Retail price or list price suggested by the manufacturer. The allowed attribute value is >= 0.01.
- Fulfillment Time: Select the Numeric-Type attribute.
- No return fee adjustment: Select the Numeric-Type attribute.
- Amazon Item Type Keyword: Select the Text-Type attribute.
- Click the Save Config button.
×


