
3.eBay Multi-Account Configuration ↑ Back to Top
To complete the configuration,
- Go to your Magento 2 admin panel.
- Click on eBay present on the left navigation bar.
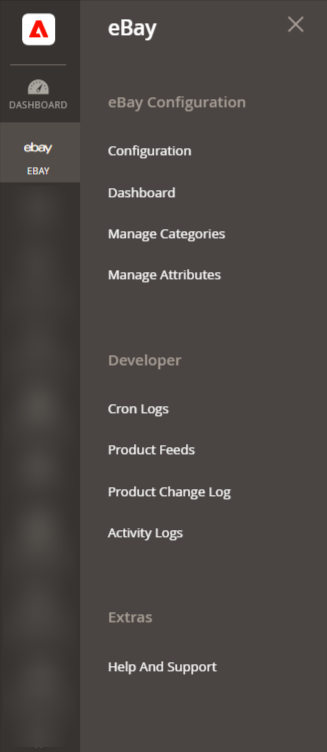 3. Click on Configuration from the eBay Magento admin panel.

You will be navigated to the configuration page as shown below:
 eBay Merchant/Developer Settings
1. Click on eBay Merchant/Developer Settings and the section will expand as:

2. Under eBay Merchant/Developer Settings proceed with the following steps:
• In Use Developer Account, if you select No then the Cedcommerce internal developer account will be used for API calling.
Note: Each developer account has separate API limits provided by eBay. Keep in mind that the developer account is distinct from the seller account.
• If you select Yes, then you must have a developer account but if in case you do not have a developer account then click here: https://developer.ebay.com/signin?tab=register to register yourself for creating a developer account. - After selecting Yes, the sections expand as shown below:
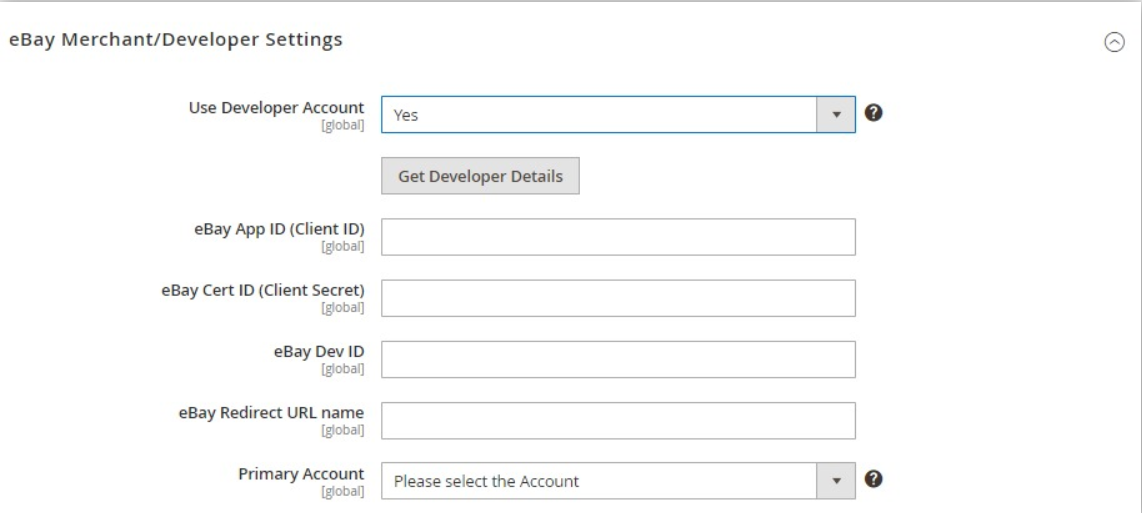
- Now for entering the Client ID, Client Secret Key, Developer ID you need to follow the steps below:
- Login to the eBay developers Program Page, by clicking here: https://developer.ebay.com/signin?tab=register
- Enter the login credentials and then click the sign in button. The page appears as shown below:

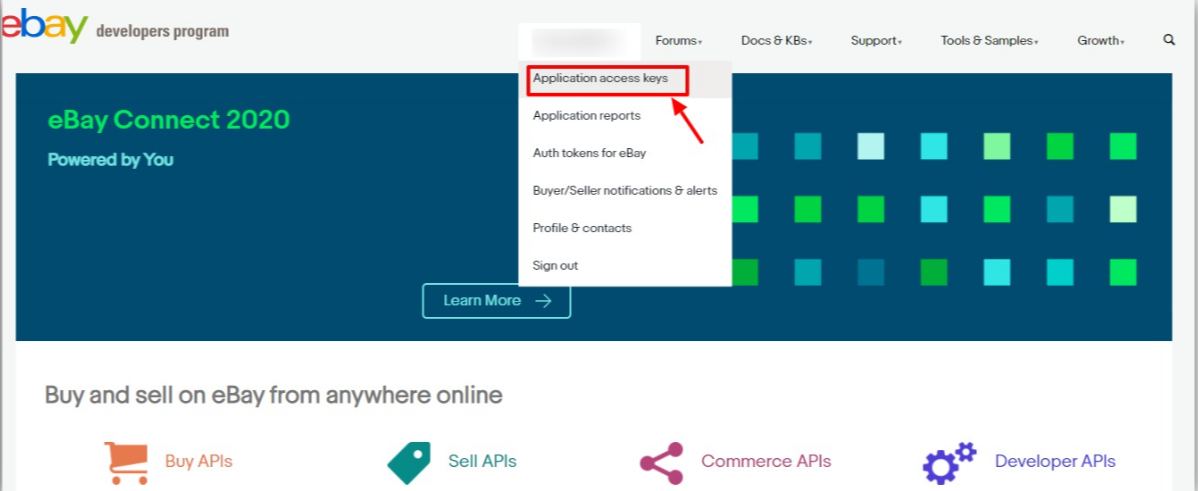
- Now, click on your profile name on the top of the page, and when the menu appears, click Application access keys, as highlighted in the image below:
- On clicking it, a tab will get opened and you may see your App Id, Dev Id, and Cert Id on the page for Sandbox/Production as highlighted in red boxes in the image below:
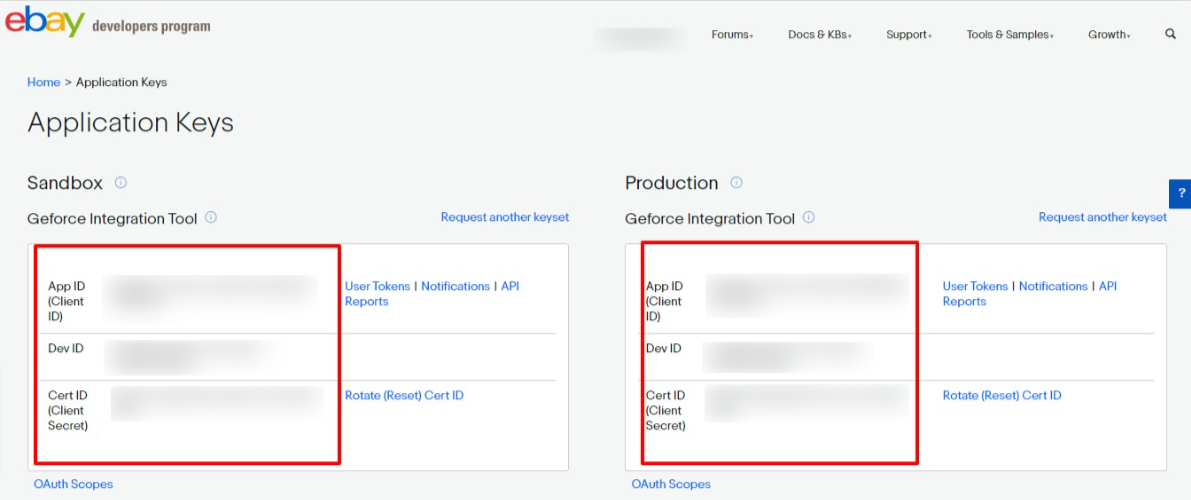
Copy the API Keys from here to enter in eBay Configuration Page in the Magento panel. - In eBay App ID(Client ID), paste the App ID you had copied from the developer account.
- In eBay Cert ID(Client Secret), paste the secret ID you had copied from the developer account.
- In eBay Dev ID, paste the ID copied from the developer account.
- For eBay Redirect URL name, do the following steps:
- Now, for Redirect URL Name for either Sandbox or Production, click on the corresponding User Token | Notifications | API Reports on the seller page’s section where you get the ID’s. It is highlighted in the image below:
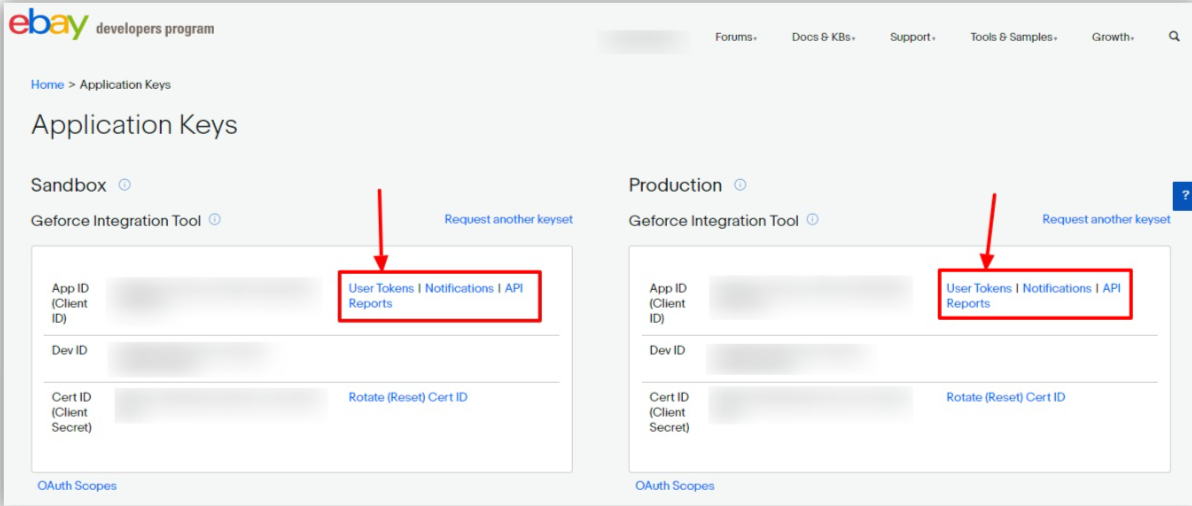
- Now, for Redirect URL Name for either Sandbox or Production, click on the corresponding User Token | Notifications | API Reports on the seller page’s section where you get the ID’s. It is highlighted in the image below:
- On clicking it, you will be navigated to the page as shown below:
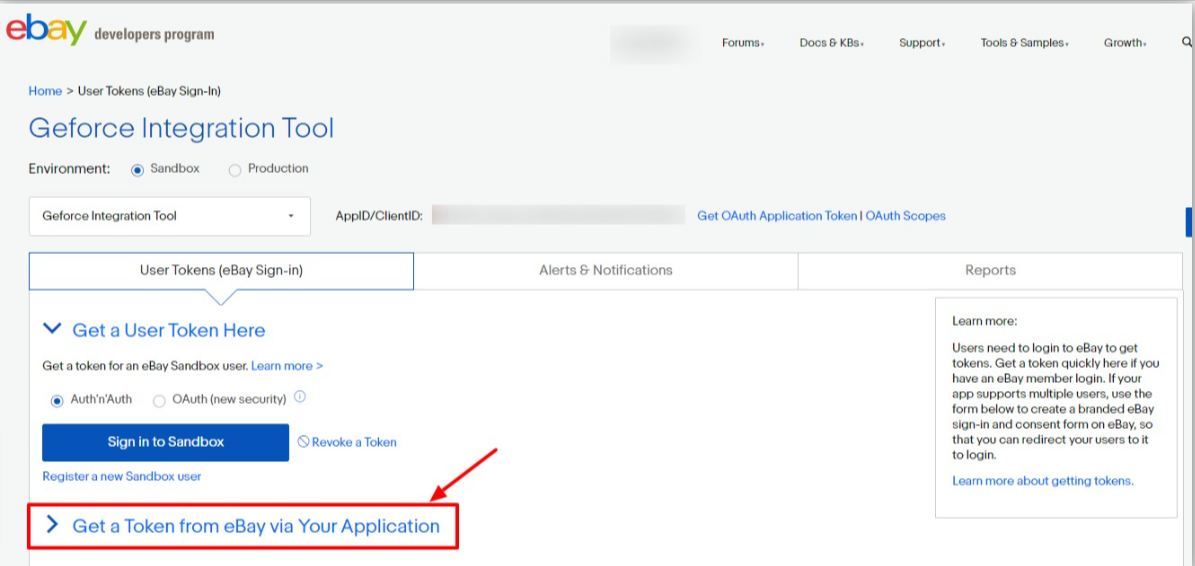
- Click the Get a Token from eBay via Your Application Button as highlighted in the above image. The section gets expanded and appears as shown below:
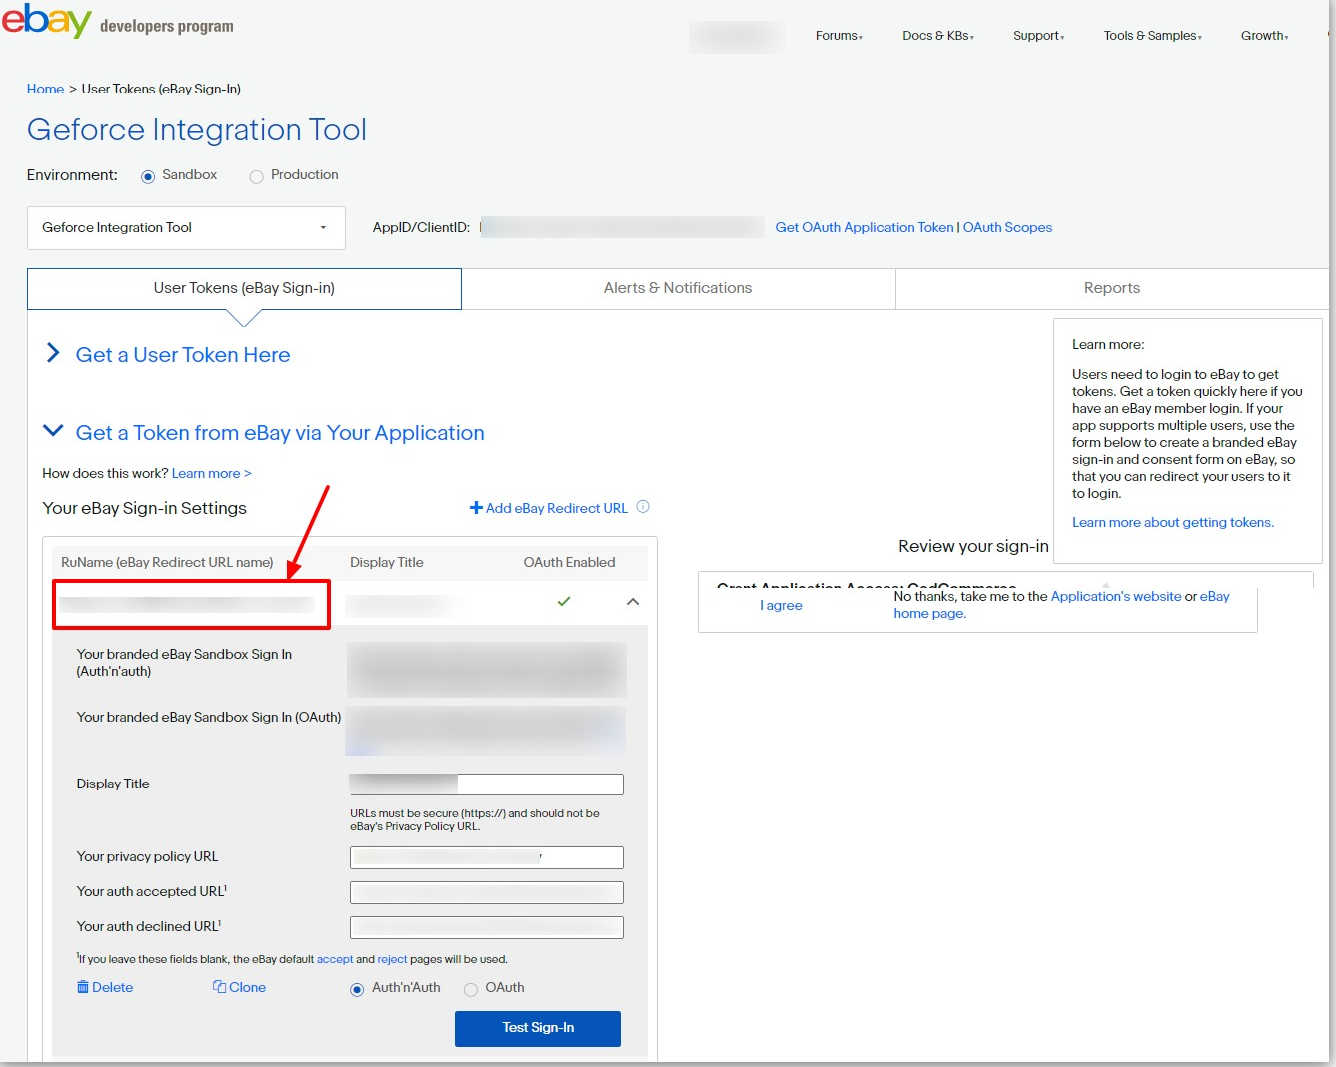
- Now copy the Redirect URL Name as highlighted inside the red box in the above image and paste it in the eBay Redirect URL Name field on the eBay Configuration page. (Additionally, input the URLs provided by CedCommerce in Your auth accepted URL and Your auth declined URL fields on the same page, as indicated in the image. Save the settings.)
- In the Primary Account, select the account you want to set as primary.
Note:
–If the primary account is selected here then wherever in further process account selection is required then it will be skipped and the selected primary account will be chosen by default.
-If you do not select any primary account here then you have to select an account at every step where the account selection is required.
eBay Product Upload Setting -
- Click on eBay Product Upload Setting and the section will expand as:
Note: MSI, also known as Multi-Source Inventory, is a functionality designed to manage inventory by the locations. Merchants find MSI beneficial for efficiently managing and controlling their inventories across multiple channels
- Under Inventory Settings, do the following steps:
- In Use MSI, if you select No then the actual Magento product quantity will be used. But if you select Yes then it is expanded as:

- In MSI Source Code, enter that source code for the particular inventory whose code is required for eBay listings.(Path: Stores -> Inventory -> Sources)
- In Use Scalable Quantity, if select No then product actual source quantity will go for the eBay listings, and if you select Yes then under MSI Stock Name, put the stock name that you want to use for the eBay listing.(Path: Stores -> Inventory -> Stocks)
- Now proceed to the further product upload settings:
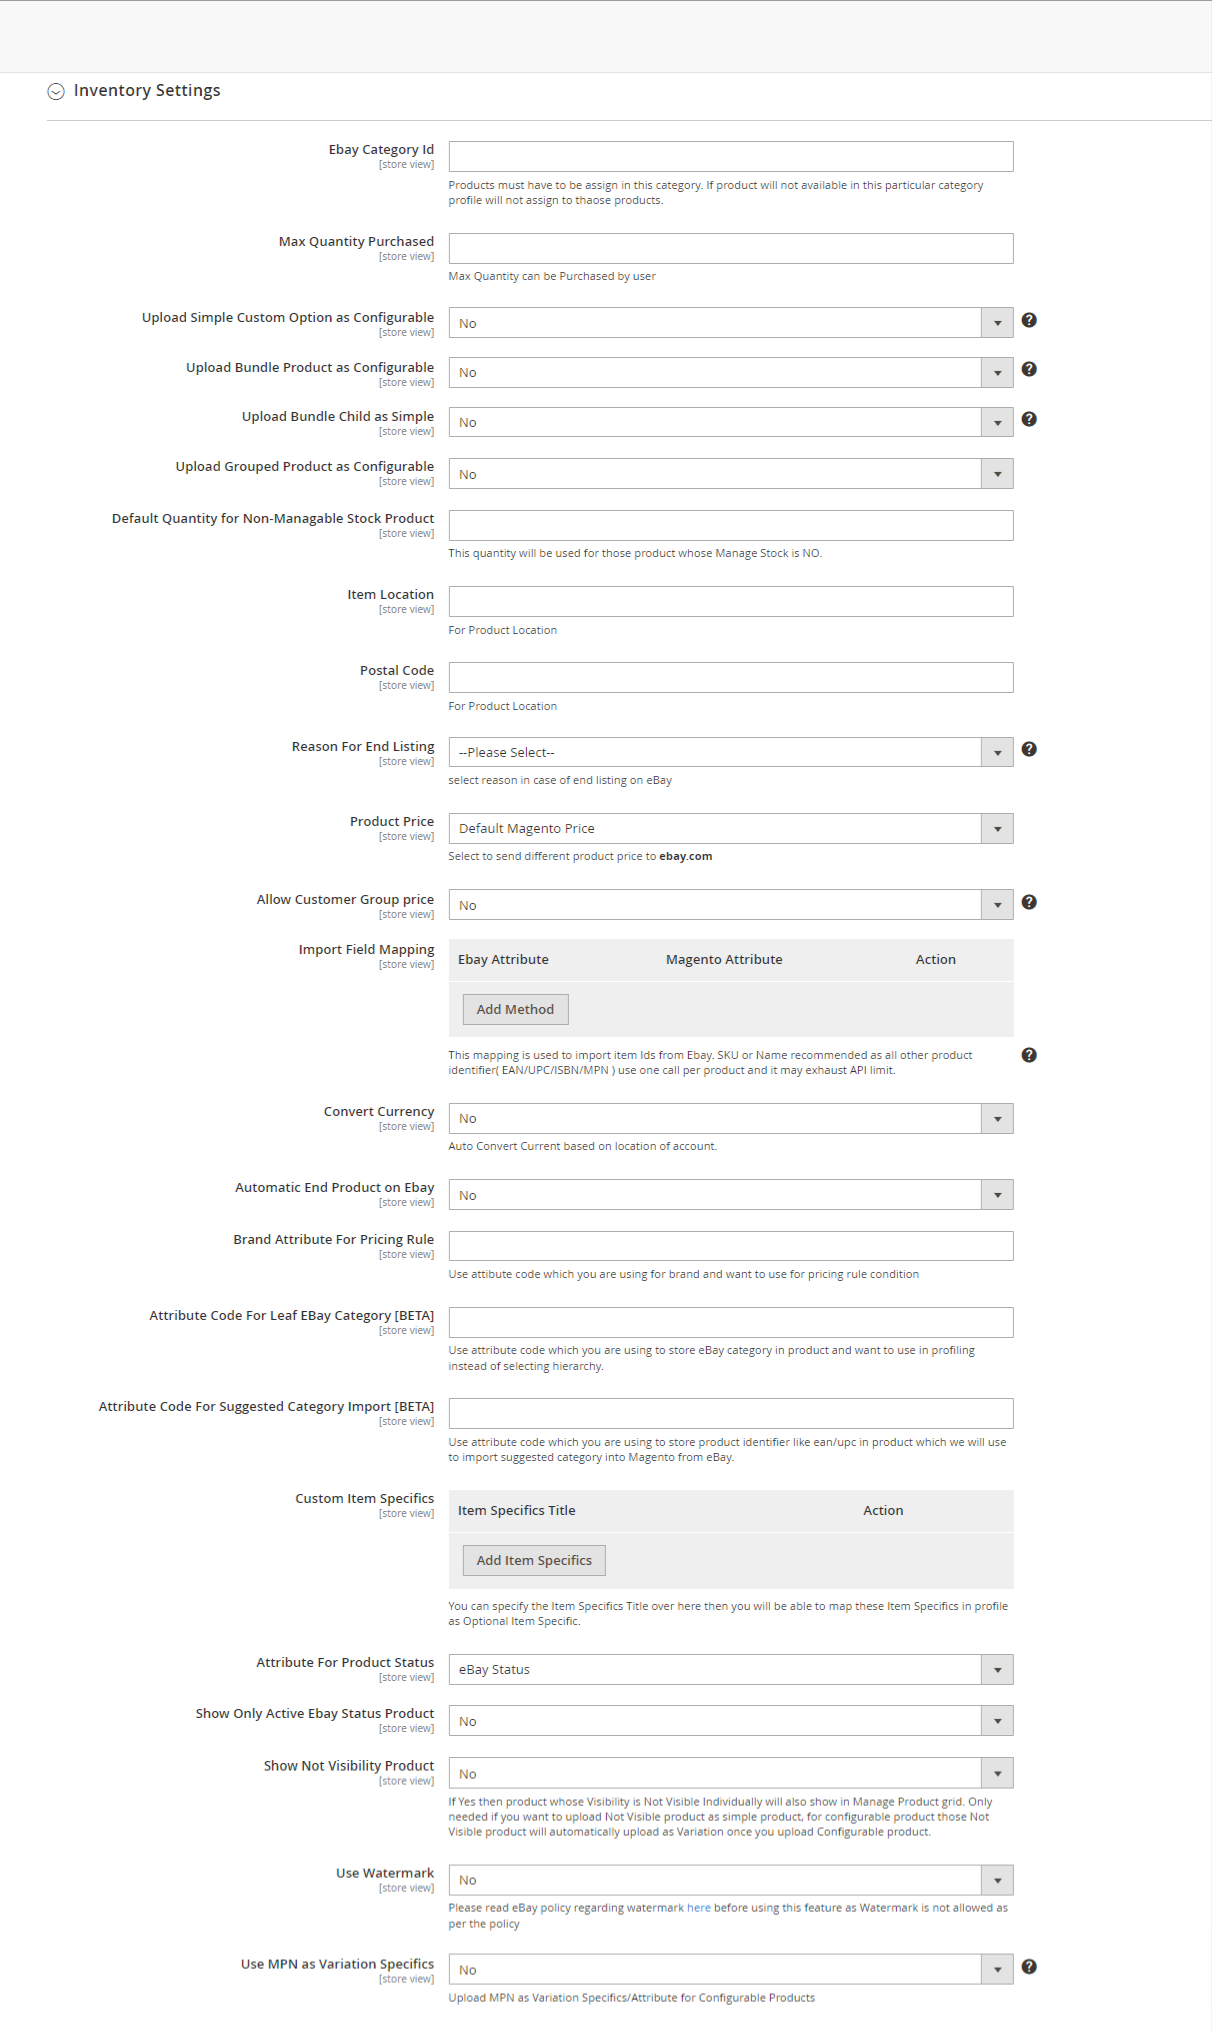
- In eBay Category Id, enter a single category ID of Magento that will be specific for eBay only. Obtain this ID from catalog -> Categories. The products within these designated categories will be considered for profile assignments; otherwise, they will not be included.
- In Max Quantity Purchased, enter the maximum quantity the user can purchase at the time of checkout of the particular listing.
- In Upload Simple Custom Option as Configurable, if you select Yes then combination will prepare based on custom options and then upload as variation otherwise upload as Simple.
- In Upload Bundle Product as Configurable, if the setting is Yes then the product will be uploaded as variation and if you select No then it will be uploaded as Simple.
- In Upload Bundle Child as Simple, if you select No then Parent Product will be uploaded as Simple and if you select Yes then the child will be also uploaded as simple.
- In Upload Qty as Maximum Number of Bundles that can be made, if you select Yes then quantity for your bundle parent product will be calculated based on quantities of each child SKU and divide by the bundle default quantity and use minimum value otherwise if NO is selected then the quantity of first child product will be used.
- In Upload Grouped Product as Configurable, select Yes then the grouped Products will be uploaded as configurable and if you select No then it will be uploaded as simple.
- In Default Quantity for Non-Mangable Stock Product, for some products the manage stock is selected as No, so the quantity you enter here will be used for those products.
- In Item Location, enter the geographical location of the item listings. This setting can be overridden under the Account Configuration also.
- In Postal Code, enter the postal code of the place where the item is located. This setting can be overridden under the Account Configuration also.
- In Reason For End Listing, select the reason for the end listing on eBay. This setting is required if you want to end any of the listings from the module.
- In Product Price, you can increase or decrease the price accordingly to display, for this do the following steps:-
- Increase by Fixed Price: If selected, then the Modify by Fix Price field appears.
- Increase by Fixed Percentage: If selected, then the Modify by Percentage Price field appears.
Enter the numeric value to increase the price of the ebay, product price by the entered value % of Magento 2 price.
For Example,
Magento 2 price + 5% of Magento 2 price.
Magento 2 Price = 100
Select Increase By Fixed Percentage option
Modify by Percentage Price = 5
100 + 5% of 100 = 100 + 5 = 105
Thus, eBay Product Price = 105 - Decrease by Fixed Price: If selected, then the Modify by Fix Price field appears.
- Decrease by Fixed Percentage: If selected, then the Modify by Percentage Price field appears.
Enter the numeric value to decrease the price of the eBay product price by the entered value % of Magento 2 price.
For Example,
Magento 2 price – 5% of Magento 2 price.
Magento 2 Price = 100
Select Decrease By Fixed Percentage option
Modify by Fix Price = 5
100 – 5% of 100 = 100 – 5 = 95
Thus, eBay Product Price = 95
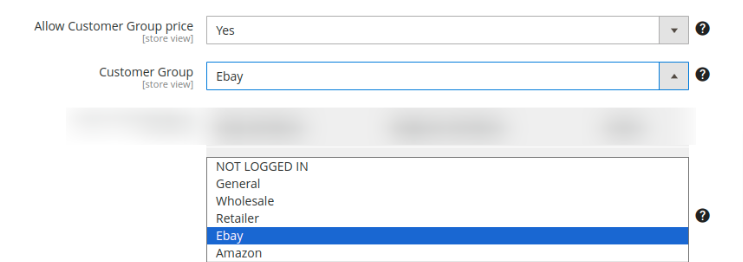
- Selecting Yes for Allow Customer Group Price enables you to send prices based on chosen customer groups. If you wish to avoid sending customer group prices, set it to No.
- In Import Field Mapping setting is for Import Item ID Actions. For this, you need to map the eBay and Magento attributes here. Once done the eBay id is imported to Magento.
- In Convert Currency, if you select No then Magento pricing selected will be chosen as default but if you select Yes then the currency rate set up in Magento will change the final price according to the currency of the store location.
- In Brand Attribute For Pricing Rule, select enter code for making the brand according to the pricing rules you have selected.
- In Custom Item Specifics, if you have any custom items specifics that are not provided by eBay then you can add here like Chinese Collar which can be sent with a particular category by adding in this setting.
- In Show Only Active eBay Status Product, selected products where eBay attributes are selected yes will be shown.
- In Use Watermark, select No if you don’t want the watermark to be shown and the gallery images will be selected as the ebay images. If you want to show Watermark on any image then select Yes.
Note: Watermark is a faint design made in some paper during manufacture that is visible when held against the light and typically identifies the maker.
On selecting Yes the menu expands as: (ebay 15)
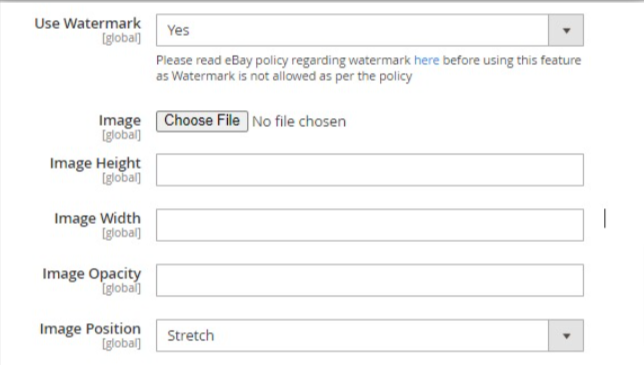
- In Image, upload the image you want.
- In Image Height, enter the height according to you for the image.
- In Image Width, enter the width according to you for the image.
- In Image Opacity, enter the transparency of the image according to you.
- In Image Position, select the position where you want to place the image.
- In Use MPN as Variation Specifics, select Yes if the brand and MPN are marked then the brand will go to the parent level and MPN will go to the child with the specifics.
eBay Order Setting:
- Click on eBay Order Setting and the section will expand as: (ebay 16)

Now click on Global Setting and the menu expands:
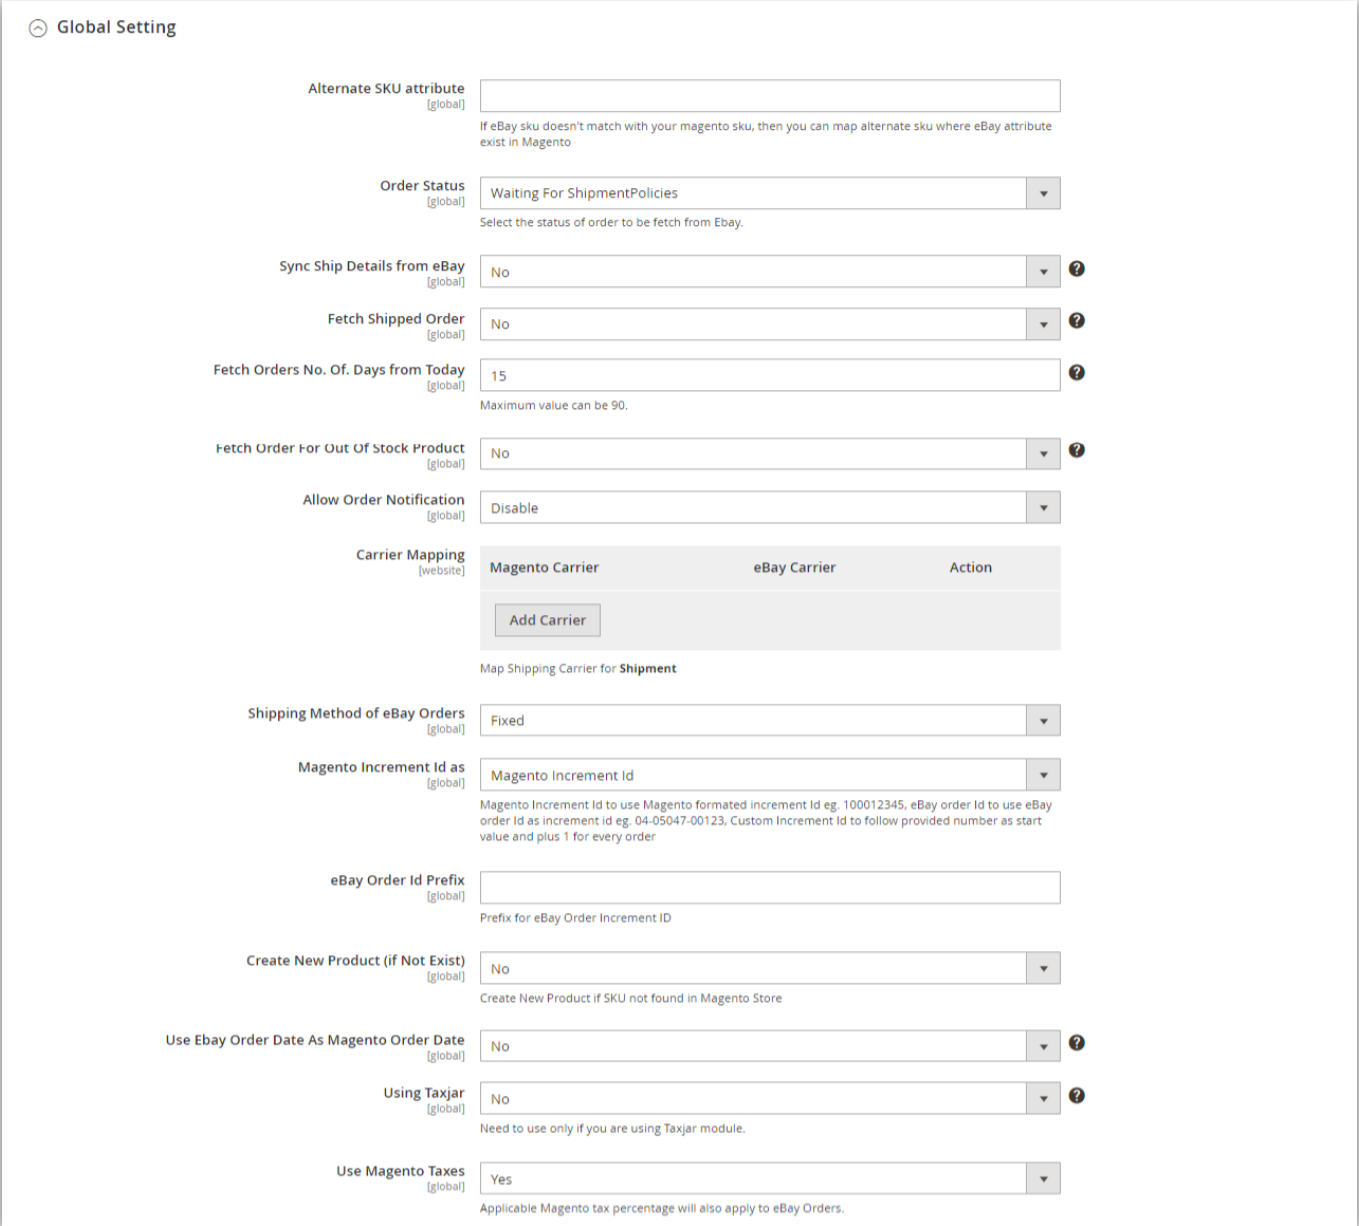
Under Global Settings, do the following steps:
- In Alternate SKU Attribute, enter a code that will be used to fetch the orders when Magento SKU does not match with the eBay/Custom SKUs.
- In Order Status, the particular state of the order will be fetched. If you select Waiting for Shipment Policies then those orders will be fetched whose tracking details have not been entered. And if you select Waiting for Payment Policies then orders whose payment is pending will be fetched.
By default, we use the Shipment Policies Option. - In Fetch Shipped Order, if you select Yes then the orders which are already shipped on eBay and have tracking on eBay are fetched. If you select No then it will fetch only the unshipped orders which do not have the tracking on eBay.
- In Fetch Orders No. Of. Days from Today, enter the number of days from the current day for which you want the orders to be fetched.
- In Fetch Order For Out Of Stock Product, select Yes if you want to fetch the orders for the products that are out of stock. If No is selected then the orders will move to the failed orders in the eBay order grid.
- In Allow Order Notification, Select Enable if you want to receive notifications via email about the order status either fetched or failed. On selecting Enable it is expanded as: (eBay int 18)

- In the Order Notification Email, enter the email address of the recipient to whom you intend to send the notification.
- In the Order Notification Sender Email, enter the email address from which the notification will be dispatched.
- The Carrier Mapping setting is related to the shipment of orders. The Magento carriers are different from the eBay carriers hence here you map the Magento carriers with the eBay carriers for the Shipment.
- In the Shipping Method of eBay Orders, the Magento shipping method is required for Magento every order. So here you need to select the Magento shipping method for eBay order which you will choose from our extension.
Note: Mostly eBay Shipping method is preferred in this list because the shipping prices is properly managed by us. - In Use eBay Order Id as Magento Increment Id, select Yes if you want to override the Magento Increment Id with the eBay Order Id/Extended Order Id.
- In eBay Order Id Prefix, enter the prefix for the Magento orders.
- In Create New Product (if Not Exist), select Yes if you want to create a new product if it is not existing in the Magento with the same or any alternate SKU. A product will be created with the name of default_ebay_SKU and this will be used for all other orders which are not existing in Magento with item id as a custom option.
- In Use eBay Order Date As Magento Order Date, select Yes you want the Magento order date to be as same as the eBay order date.
- In Using Taxjar, select Yes if you are using only Taxjar Module.
- In Use Magento Taxes, select Yes if you want to use the Magento tax. (ebay int 19)

- Under Create Customer Setting, do the following steps:
- In Create Real Customer, select Yes if you want to create a customer by default and if you select No then enter the customer’s details manually in the fields shown above in the image.

- In Customer First Name, enter the first name of the customer.
- In Customer Last Name, enter the last name of the Customer.
- In Customer Group, select what type of customer he is from the menu.
- In Customer Email, enter the email of the customer.
- In Customer Password, enter the password.
- In Create Real Customer, select Yes if you want to create a customer by default and if you select No then enter the customer’s details manually in the fields shown above in the image.
- Click on the Save Config button to save the settings
The configuration settings will be saved.
eBay Cron Settings
Now move to the section eBay Cron Settings, the section is expanded as:
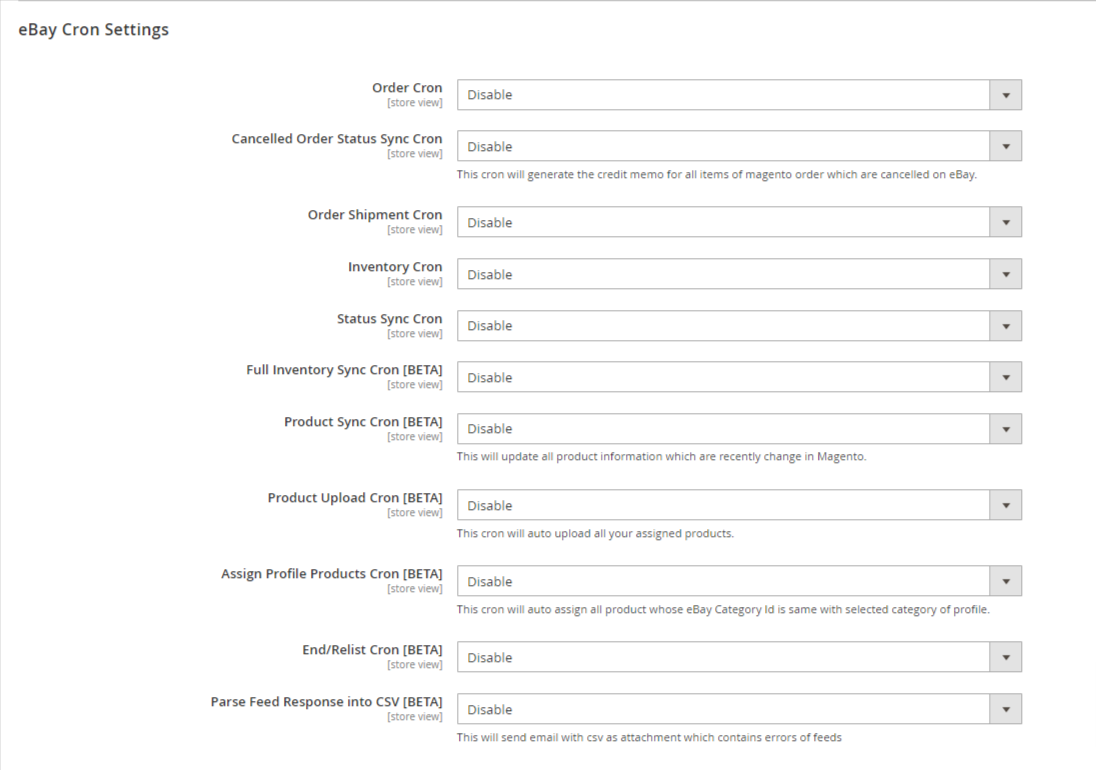
- Under eBay Cron Setting, do the following steps:
- In the Order Cron, select Enable if you want to fetch the orders. Order Crons are used to fetch waiting for shipment orders at approximately 10 minutes. based on the combination of three order settings- Order Status, Fetch Shipped Order, and Fetch Orders No. Of. Days the orders are automatically fetched if this cron is enabled.
- In Cancelled Status Order Sync Cron, the orders canceled on eBay whose refund has been sent, those orders can be synced again and the credit memo/refund can be generated if you Enable this cron.
- In Order Shipment Cron, the tracking details of orders existing in Magento will be updated as it is on the eBay orders also if you select Enable option.
- In Inventory Cron, the recent changes in the inventory/price attributes are updated every 10 minutes on eBay if you Enable this cron.
- In Full Inventory Sync Cron, all the products that are live on eBay are scheduled chunk wise and the inventory and price are synced if this cron is Enabled.
- In Status Sync Cron, the feed is processed completely on eBay or not ,i.e., the status of the feed is synced if this cron is Enabled.
- In Report File Processing Cron, the feed errors in the bulk scheduler uploaded or its error report files will be synced to Magento if this cron is Enabled.
- In Product Sync Cron, if you select Enable then the additional details of the products are updated if there is any change in it.
- In Product Upload Cron, the products that are not uploaded on the eBay product manager grid are uploaded automatically if you select Enable in this cron.
- In Assign Profile Products Cron, the products are assigned automatically in the profiles whose eBay category ids are the same for the selected category id. This Cron is equivalent to the Mass action Assign Products.
- In End/Relist Cron, if the eBay status attribute is Yes and the product there is ended on Magento then this cron will relist it if you Enable it and perform vice versa.
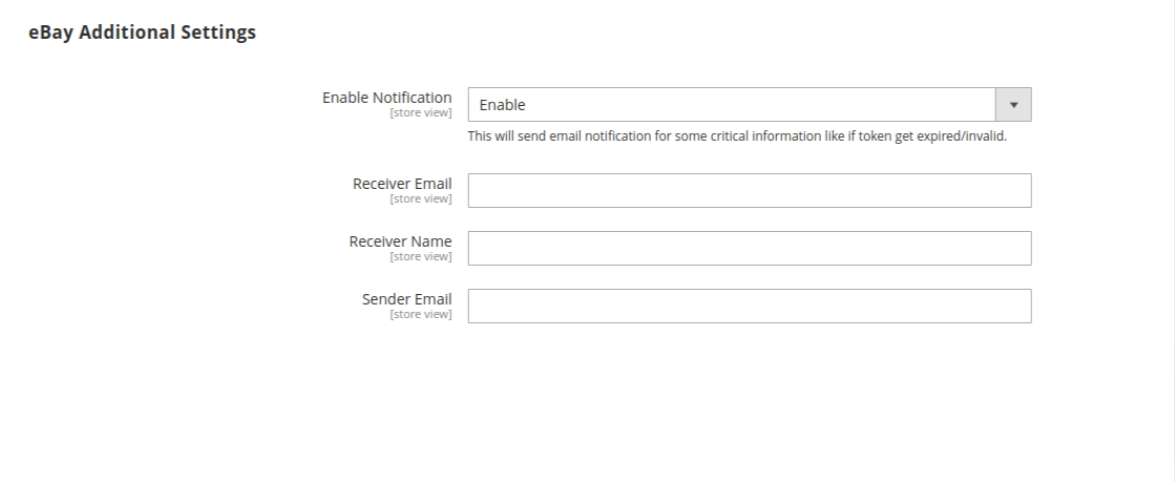
eBay Additional Settings
In order to avail additional settings enable the notification. This will send the email notification regarding critical information.
×


