4.Configuration Settings ↑ Back to Top
Once the extension is successfully installed on the Merchant’s store, the Overstock tab appears in the Magento Admin Panel.
The admin has to set up the configuration settings for establishing the connection between the Magento store and the overstock marketplace.
To set up the configuration settings in the Magento Admin panel
- Go to the Admin panel.
- On the top navigation bar, click the Overstock menu.
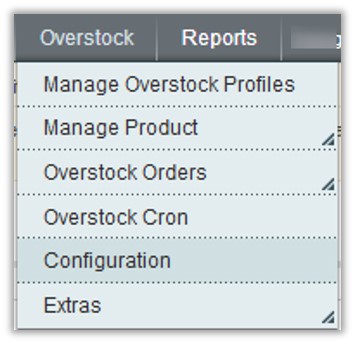
The menu appears as shown in the following figure:

- Click Configuration.
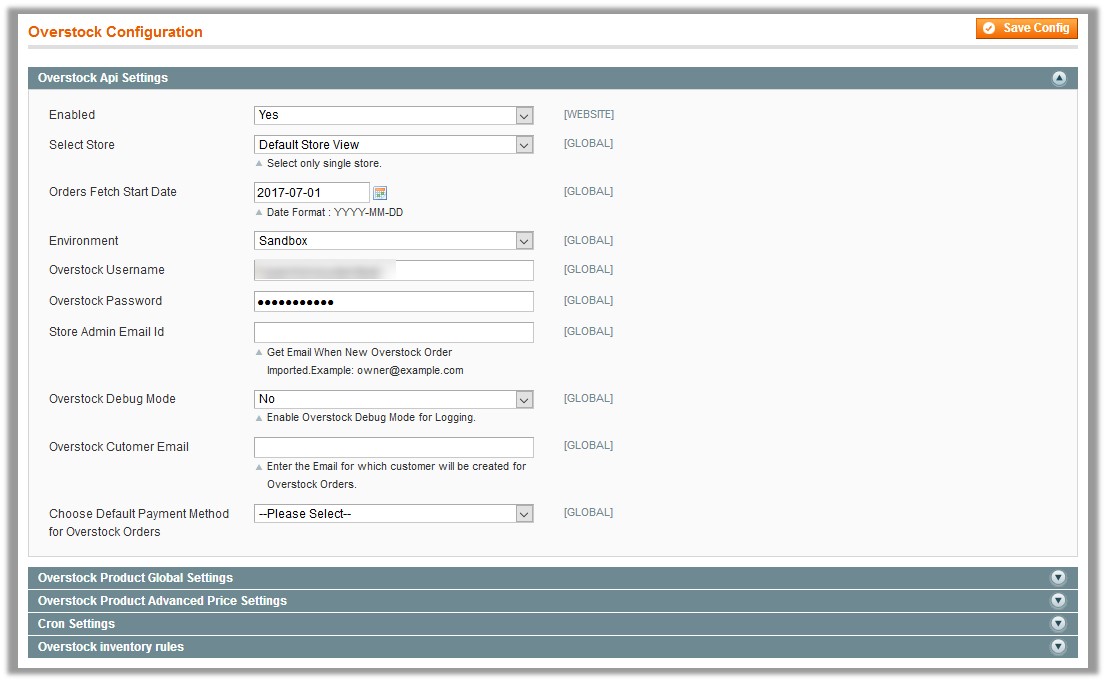
The Overstock Configuration page appears as shown in the following figure:

- Under Api Overstock Settings, do the following steps:
- In the Enabled list, select Yes.
Note : The No option disables the Overstock Integration extension. - In the Select Store list, select the required store.
- In the Orders Fetch Start Date box, click the Calendar icon to select the required date.
- In the Environment list, select Sandbox or Production as per the requirement.
Note: Sandbox environment is used for the testing purpose; Production is to make it live. - In the Overstock Username box, enter the Overstock Seller Account username.
- In the Overstock Password box, enter the Overstock Seller Account password.
- In the Store Admin Email Id box, enter the email id.
- In the Overstock Debug Mode list, select Yes to enable Overstock Debug Mode for logging.
- In the Overstock Customet Email box, enter the email id for which the customer is created for Overstock orders.
- In the Choose Default Payment Method for Overstock Orders list, select the required payment method.
- In the Enabled list, select Yes.
- Click the Overstock Product Global Settings tab.
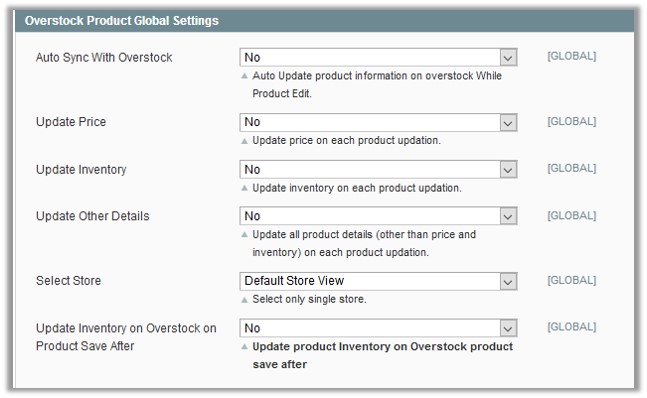
The Overstock Product Global Settings tab is expanded as shown in the following figure:

- Under Overstock Product Global Settings, select the appropriate option in the corresponding fields:
- Auto Sync With Overstock: Enables or disables the automatic Cron syncing of all products.
- Update Price: Enables or disables the price update of the product whenever the product is edited or synched from admin panel.
- Update Inventory: Enables or disables the inventory update of the product whenever the product is edited or synched from admin panel.
- Update Other Details: Enables or disables the other details of the product including images, description, and so on whenever the product is edited or synhced from admin panel.
- Select Store: Select only single store.
- Update Inventory on Overstock on Product Save After: Enables or disables the inventory update of the product on saving the product.
- Click Overstock Product Advanced Price Settings tab.
The Overstock Product Advanced Price Settings tab is expanded as shown in the following figure:

- Under Overstock Product Advanced Price Settings, enter the values in the corresponding fields.
- Overstock Product Price: This is to set a different price for all the products as shown in the following figure:
User can set the price on the following basis: –- Increase by Fixed Price: If selected, then the Enter Amount field appears.
- Increase by Fixed Percentage: If selected, then the Enter Percentage field appears.
Enter the numeric value to increase the price of the the Overstock product price by the entered value % of Magento price
For Example: Magento price + 5% of Magento price.
Magento Price = 100
Select Increase By Fixed Percentage option
Enter Percentage = 5
100 + 5% of 100 = 100 + 5 = 105
Thus, Overstock Product Price = 105 - Decrease by Fixed Price: If selected, then the Enter Amount field appears.
- Decrease by Fixed Percentage: If selected, then the Enter Percentage field appears.
Enter the numeric value to decrease the price of the the Overstock product price by the entered value % of Magento price
For Example: Magento price – 5% of Magento price.
Magento Price = 100
Select Decrease By Fixed Percentage option
Enter Percentage = 5
100 – 5% of 100 = 100 – 5 = 95
Thus, Overstock Product Price = 95
- Overstock Product Price: This is to set a different price for all the products as shown in the following figure:
- Click the Cron Settings tab.
The Cron Settings tab is expanded as shown in the following figure:

- Under Cron Settings, do the following steps as per the requirement:
- In the Enable Product Price Update list, select Yes to enable the product price update cron.
- In the Enable Product Inventory Update Cron list, select Yes to enable product inventory update cron.
- In the Enable Order Cron list, select Yes to enable order cron.
- Click the Overstock Inventory Rules tab.
The Overstock Inventory Rules tab is expanded as shown in the following figure:

- Under Overstock Inventory Rules tab, do the following steps:
- In the Send Inventory on the Basis of Threshold list, select Yes to send the inventory based on threshold.
Note: Only when the admin selects Yes, the other fields appear.
The section appears as shown in the following figure:

Note: Inventory Threshold Value is the minimum quantity of the inventory that the admin wants to have in hand. - In the Inventory Threshold Value box, enter the required value.
- In the Send Inventory for Lesser Than Threshold Case box, enter the required value.
- In the Send Inventory for Greater Than Threshold Case box, enter the required value.
- In the Send Inventory on the Basis of Threshold list, select Yes to send the inventory based on threshold.
- Click the Save Config button.
×


