
Configuration
You need to first configure the extension on your Magento 1 store to achieve the true marketing automation. There are 3 aspects to achieve full configuration.
- Establishing a communication channel between Mautic and Magento 1 Store
- Defining the parameters used to segment different customers
- Mapping the relevant fields between Magento 1 and Mautic to capture customer data
- Establishing a communication channel between Mautic and Magento 1 StoreTo do this, first, click Mautic>Configuration on the top Menubar. As you follow this instruction, you’re redirected to the configuration page.There are two types of authentication type provided. You can choose any of them. Depending on the two types of Authentication, there are 2 different sets of configuration sets which are as follows:a) Configuration with Oauth2 Authentication
b) Configuration with Basic Authentication
- Configuration with Oauth2 AuthenticationTo begin the configuration:Select Enable in Enable Mautic Integration field
b) Choose Oauth2 Authentication Type Oauth2
c) Now enter Client ID
d) Enter Client Secret
e) Enter Mautic URL
f) Enter Redirect URL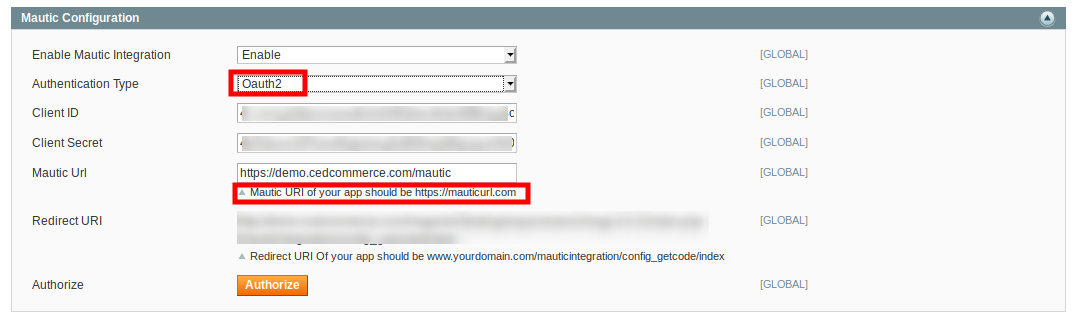
Once you’re done, entering the above fields, click Authorize to establish a seamless channel
- Configuration with Basic AuthenticationTo begin the configuration:a) Select Enable in Enable Mautic Integration field
b) Choose Basic Authentication Type
c) Now Enter User Name
d) Enter Password
e) Enter Mautic URL
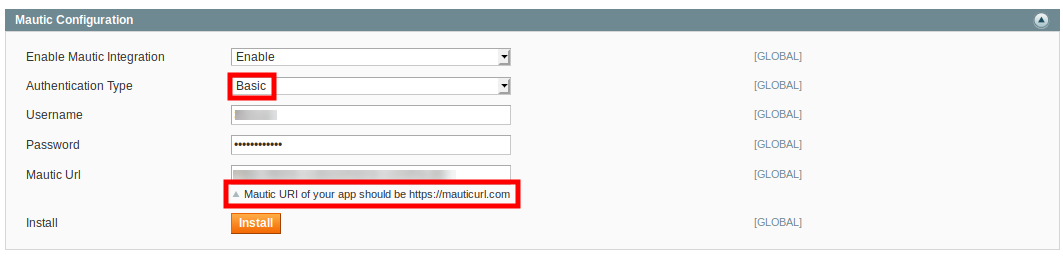
Once you’re done, entering the above fields, click Install to establish a seamless channel.
Note:
After filling all the correct details , if there are showing 404 not found message during connection. then just Flush the Mautic Cache and retry the connection.
7. Setting Up And Managing Property Groups Of Mautic
a) Customer Groups: If you enable customer group, the customer id, email address, first name, last name and the group of a customer (defined as a customer is a retailer or a user) will be directed to mautic.
b) Order Item Feedback: By enabling order item feedback, mautic will be able to track last shipped order id and also the HTML of the completed order.
c)Shipping and Billing Address: By enabling this, mautic will get the shipping address where the order is being shipped and also the billing address, if different.
d)Abandoned Cart: If you enable the abandoned cart, you will get another setting regarding abandoned cart explained below.

- Setting Up Abandoned Cart a) Abandoned Cart Cron Time: It let you set abandoned cart cron time whether mautic get the information-once in a day, twice a day, four times or every hour.
b) Abandoned Cart: This lets you manage after how much time the cart will get considered or treated as abandoned.

- Customer Export Settings a) Export type: It consists of two options first i.e., immediately where mautic gets the data when the transaction takes place and the second cron. If you set cron you will get another dropdown explained below.
 b) Cron Time: Through this, you can decide the cron time whether mautic get the customer details-once in a day, twice a day, four times a day or every hour.
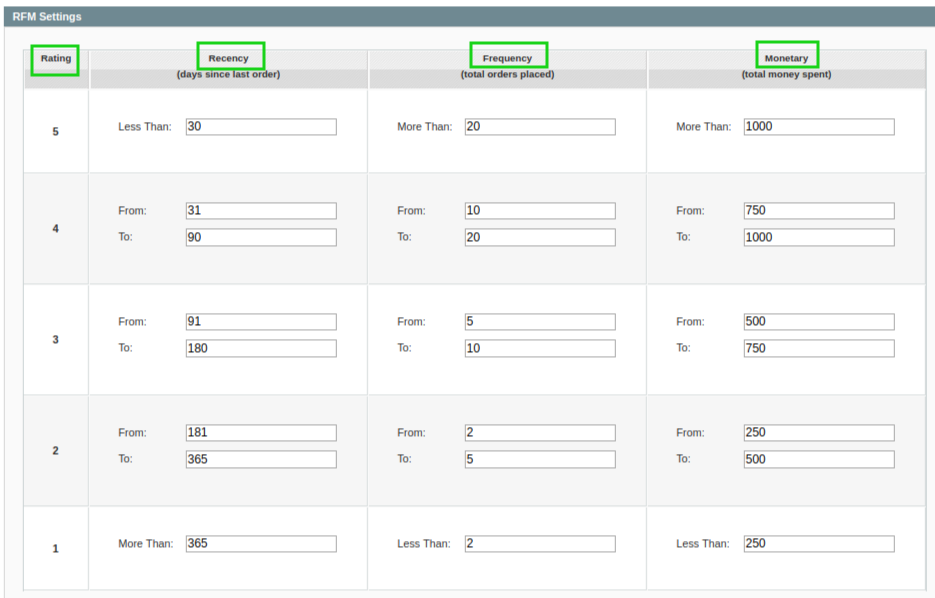
- Defining the parameters used to segment different customersThis is one of the most crucial operations of this entire exercise. This section requires you to enter data sets to provide a real scale for different ratings. For example →In the recency column, all the customers who purchased within a month will be considered as best one (rating 5) and those having made the purchase with the quarter will be considered as your second best customers.
In the Frequency column, the customers who have purchased more than 20 times are defined as rating 5 customers whereas those with lower than 2 purchases are the worst performers.
In the monetary column, those who spent more than $1000 are considered as top customers and those with spending less than $250 are considered as low-priced customers.
Note:
Since businesses are unique and their products distinct in some way or another from others, the sellers can enter the value as per their business needs.
- Mapping the relevant fields between Magento 1 and Mautic to capture customer dataThis is the last, but definitely not the least, the step towards completion of your Mautic Integration for Magento 1 your configuration.Here you can map relevant Mautic Contact Fields with Magento 1 Customer Fields so the relevant datasets from your Magento 1 store can be fetched to your Mautic account. You can Add and Delete the different fields.

Once you complete this step the configuration of Mautic Integration stands completed.


