
3.Colizey Configuration Settings ↑ Back to Top
Once the extension is successfully installed in the Magento store, the Colizey menu appears on the top navigation bar of the Admin Panel. The merchant has to first create a seller account in the Colizey seller panel. Once the seller account is created and is approved by Colizey, then the Magento store owner can use the Colizey Username and Password while setting up the Colizey Configuration settings in the Magento Admin panel.
Procedure to set up the configuration settings in the Magento Admin panel
- Go to the Magento Admin panel.
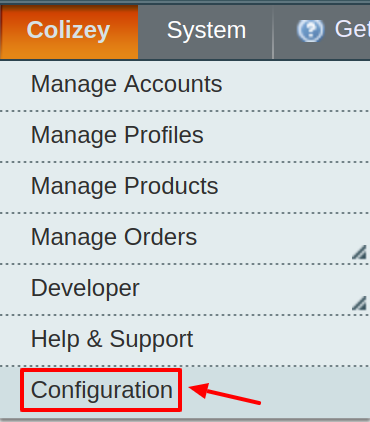
- On the top navigation bar, point to the Colizey menu.
The menu appears as shown in the following figure:
- Click Configuration.
The Colizey Configuration page appears as shown:
- In the right panel, click Colizey API Settings section and it will expand as shown:
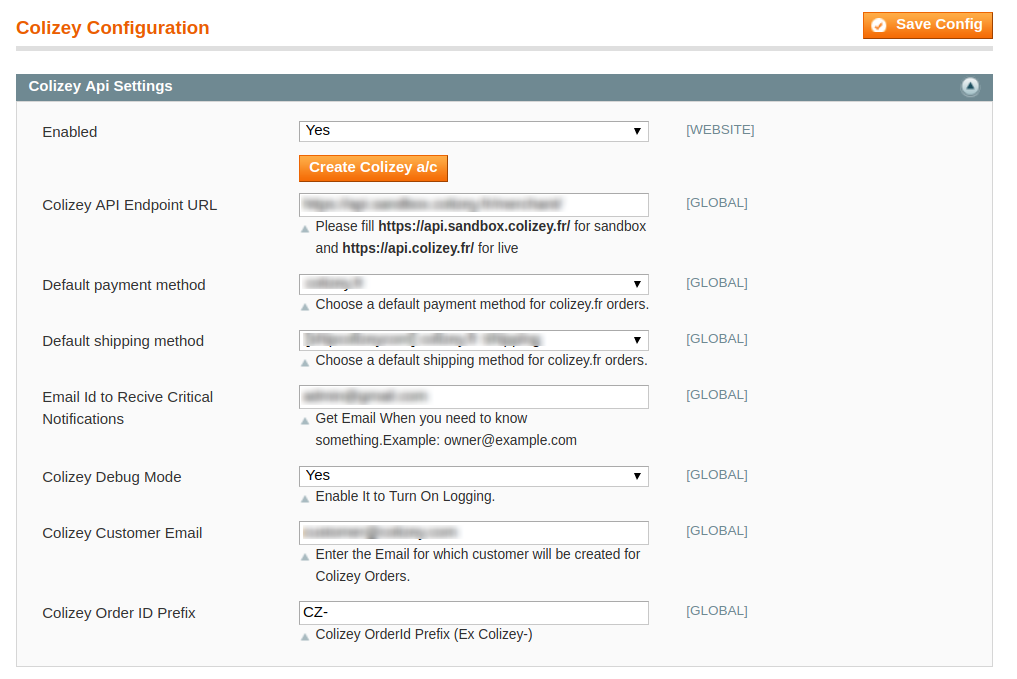
- Under Colizey API Settings, do the following steps:
- In the Enabled list, select Yes.
Note: Selecting the No option hides all other fields of Colizey API Settings. The Colizey menu does not appear on the top navigation bar. - In the Colizey API Endpoint URI box, paste the corresponding fill either of these two URLs
- For Sandbox enter https://api.sandbox.colizey.fr/
- For Live enter https://api.colizey.fr/
- In the Next section choose Default Payment Method for Colizey Orders list from the drop-down menu.
- In the Default Shipping Method, select the default Shipping Method.
- The next section is the Email Id to receive critical notification, where you need to enter the desired email id on which you wish to receive the notifications.
- In the Colizey Debug mode list, select Yes.
Note: By Enabling the debug mode for Colizey Integration, it starts capturing the log for the debug process. - In the Colizey Customer Email box, enter the customer email-id. This is the default customer id for the orders recieved.
- In the Colizey Order ID Prefix box, enter the prefix that the admin wants to add before the Colizey order Id. This is for your recognization of the orders recieved from the Colizey marketplace.
- In the Enabled list, select Yes.
- Now move to the Colizey Product Global Settings, Click on it and it expands and additional options appear.
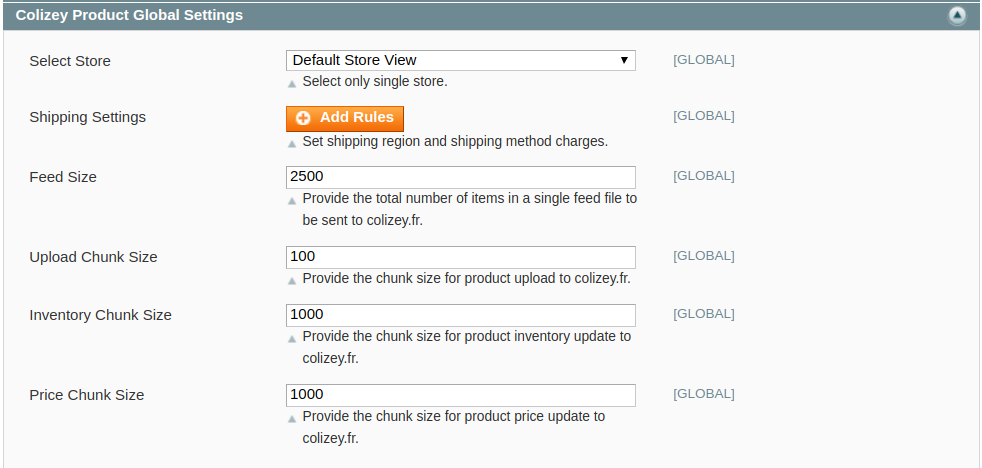
- Do the following steps:
- In the Select Store list, select the single store.
- In Shipping Settings, Click on Add Rule & the section expands
 Under Enabled, select Yes.
Choose the Region from the drop-down menu.
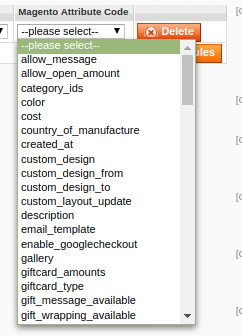
Select the Method of Selling from the drop-down menu.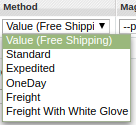 You can also choose the Magento Attribute Code for selecting from the list.
- In Feed Size, Enter the total number of items to be sent in a single feed file to Colizey.
- In Upload Chunk Size, Enter the size of the chunk which will be used during the auto synchronization of Products.
- In Inventory Chunk Size, Enter the chunk size for product inventory to be updated on Colizey.
- In Price Chunk Size, Enter the size of chunks of Prices synchronization.
- Move to the Colizey Product Advanced Price Settings and the section expands as:
 In the Colizey Product Price list, select one of the following options:
- Increase by Fixed Price
- Increase by Fixed Percentage
- Decrease by Fixed Price
- Decrease by Fixed Percentage
a) Increase by Fixed Price: If selected, then the Enter Amount field appears. Now suppose if you enter 50 in the field and your product is available on Magento for 100, the product will be available on Colizey for 150 as you have chosen increased by fixed price and have entered the amount of 50; so it will be added to the price for which the product is available on Magento and the resultant amount will be reflected on Colizey, which is 150 in this case.
b) Increase by Fixed Percentage: If selected, then the Enter Percentage field appears. Enter the numeric value to increase the price of the Colizey, product price by the entered value % of Magento price
For Example,
Magento price + 5% of Magento price.
Magento Price = 100
Select Increase By Fixed Percentage option
Enter Percentage = 5
100 + 5% of 100 = 100 + 5 = 105
Thus, Colizey Product Price = 105c) Decrease by Fixed Price: If selected, then the Enter Amount field appears. Now suppose if you enter 50 in the field and your product is available on Magento for 100, the product will be available on Colizey for 50 as you have chosen decreased by fixed price and have entered the amount of 50; so it will be subtracted from the price for which the product is available on Magento and the resultant amount will be reflected on Colizey, which is 50 in this case.
d) Decrease by Fixed Percentage: If selected, then the Enter Percentage field appears.
Enter the numeric value to decrease the price of the Colizey product
price by the entered value % of Magento price
For Example,
Magento price – 5% of Magento price.
Magento Price = 100
Select Decrease By Fixed Percentage option
Enter Percentage = 5
100 – 5% of 100 = 100 – 5 = 95
Thus, Colizey Product Price = 95 - Next is the Colizey Inventory rules. Click to open up additional options:

- In the Send Inventory on the Basis of Threshold list, select Yes to send the inventory based on a threshold.
Note: Only when the admin selects Yes, the other fields appear. Threshold Inventory is the minimum count of an item that the store owner wants to keep in stock. - The additional fields appear and the inventory rules look like:
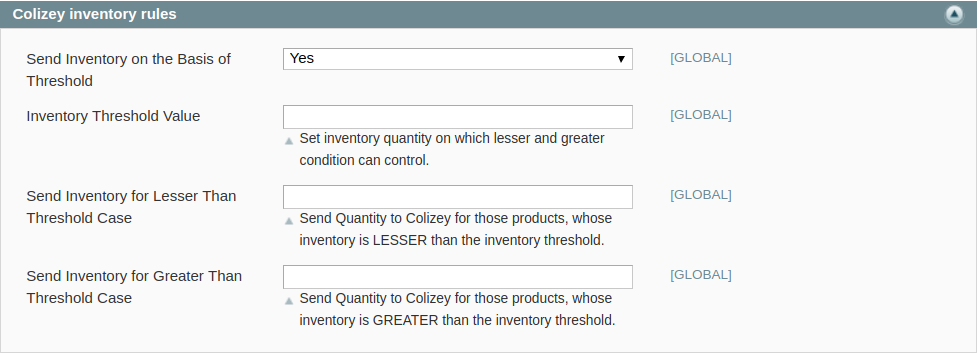
- Enter the Inventory Threshold Value in the next section, Enter the threshold value of the products on your Colizey store. By doing so sellers can adjust the deprecated products and hence can control the condition.
- In Send Inventory Lesser Than Threshold Case Enter the number of products that will be reflected on Colizey when the inventory quantity reaches below than the threshold value.
- In Send Inventory Greater Than Threshold Case Enter the number of products to be displayed on the Colizey Marketplace if your inventory value is greater than or equal to the threshold value entered above.
- In the Send Inventory on the Basis of Threshold list, select Yes to send the inventory based on a threshold.
- Move to the last configuration settings ie Cron Settings and do the following steps:

- In the Cron Settings Override list, select Yes to enable the cron settings.
- To enable or disable the order cron, Select Yes or No from the Enable Order Cron.
- Similarly, in the Enable Order Status Sync Cron, Select Yes to enable Order Cron Status Synchronisation.
- In the Enable Inventory Cron list, select Yes to enable the Inventory cron.
- To Enable the product price update cron select yes from the Enable Price Cron Settings.
- Once all the actions have been taken, click on Save Config button on the top right side of the page. The configuration will be saved.


