
Configurations
Navigate to Delivery App > Configuration under the settings section on the Admin panel to open the configuration page for Delivery boy apps.
Driver Commission Settings
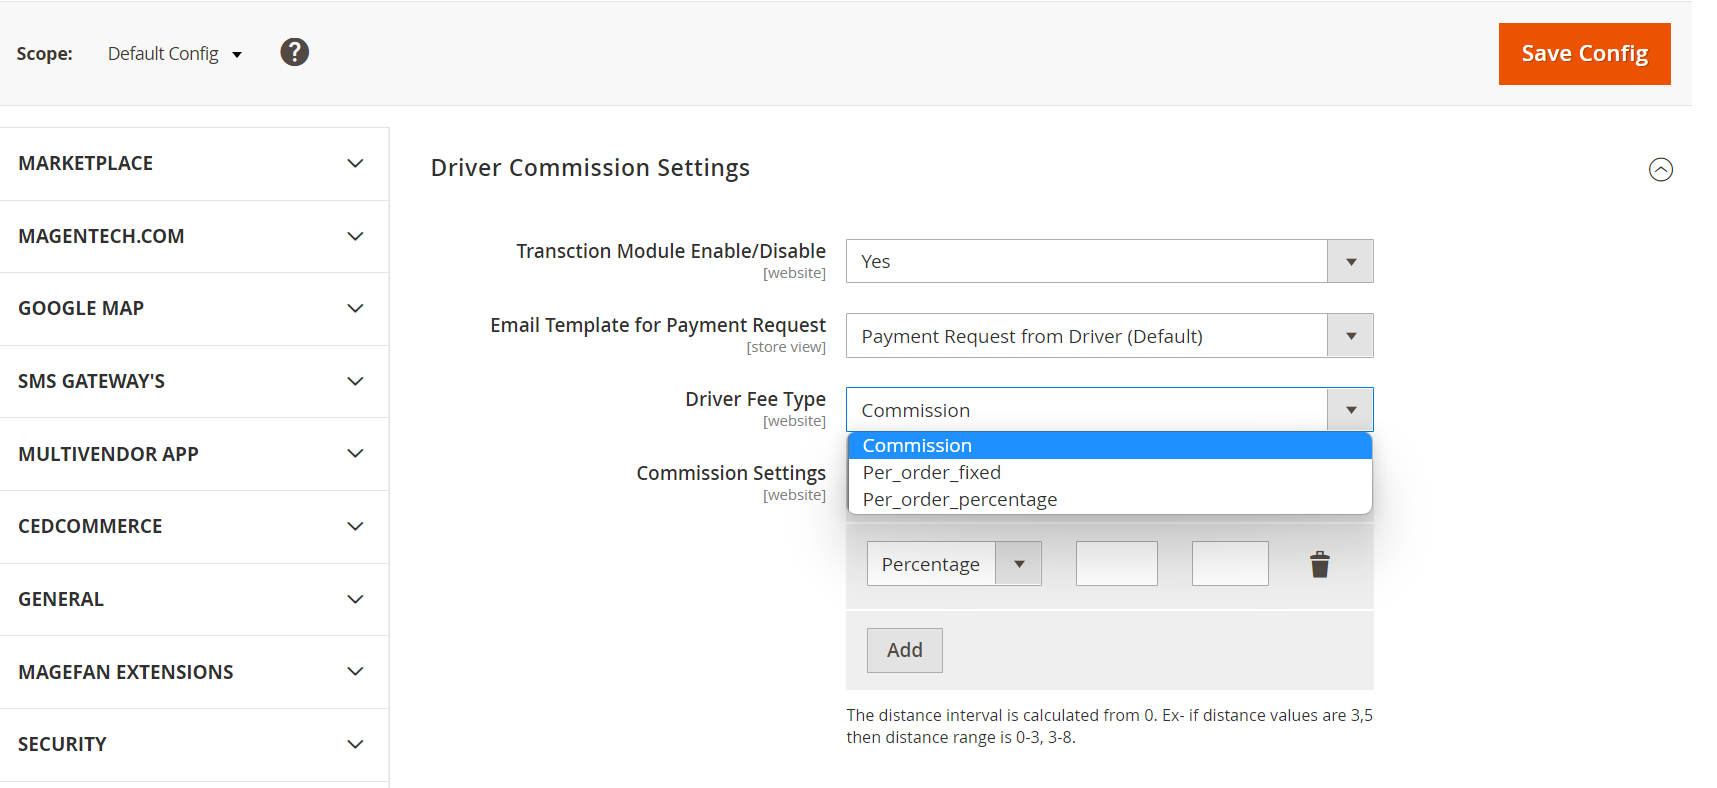
Transaction Module Enable/Disable – Select Yes/No to enable or disable the transaction module respectively
Email Template for Payment Request – From the dropdown, choose the email template for payment request
Driver Fee Type – Choose driver fee type as Commission, Per_order_fixed, or Per_order_commission as per the business requirement:
- In the Commission type, the driver will be paid a configured fixed/percentage commission amount according to the distance. The distance interval is calculated from 0. Ex- if distance values are 3,5 then the distance range is 0-3, 3-8.
- Per_order_fixed type means that the driver will get a fixed fee for every order that he is completing.
- Per_order_commission type means that the driver will get a commission fee for every order that he is completing.
General
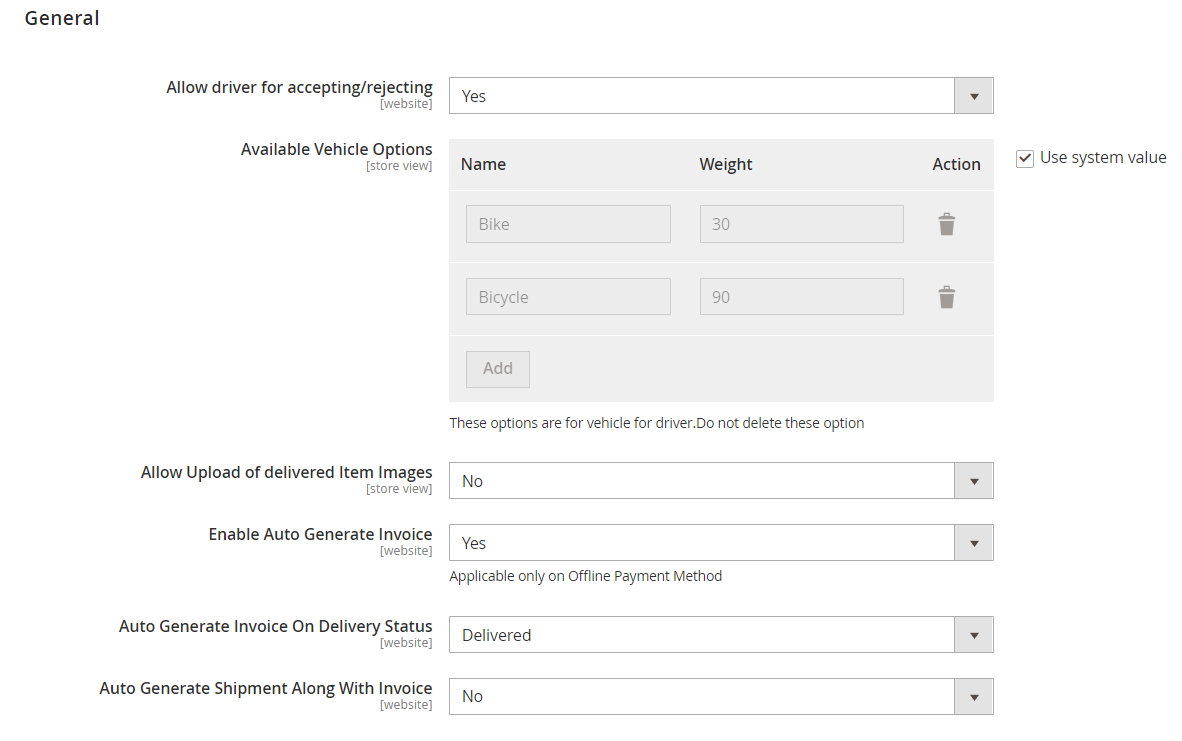
Allow driver for accepting/rejecting – Select yes/no from the dropdown if you want the driver to accept and reject orders respectively.
Available Vehicle Options – Add various vehicle options as per your business processes.
Allow Upload of delivered Item Images – To allow or disallow uploading of images of delivered items, select yes or no from the dropdown.
Enable Auto Generate Invoice – To enable or disable auto generate invoice, select yes or no
Note: Auto-generate invoice is applicable only on Offline Payment Method
Auto Generate Invoice On Delivery Status – Select Ready to Assign/Assigned/Arriving for Pickup/Out for Delivery/Delivered from the dropdown list of Auto Generate invoices on Delivery Status.
Auto Generate Shipment Along With Invoice –To enable or disable auto-generate Shipment along with an invoice, select yes or no.
Push Notification Settings
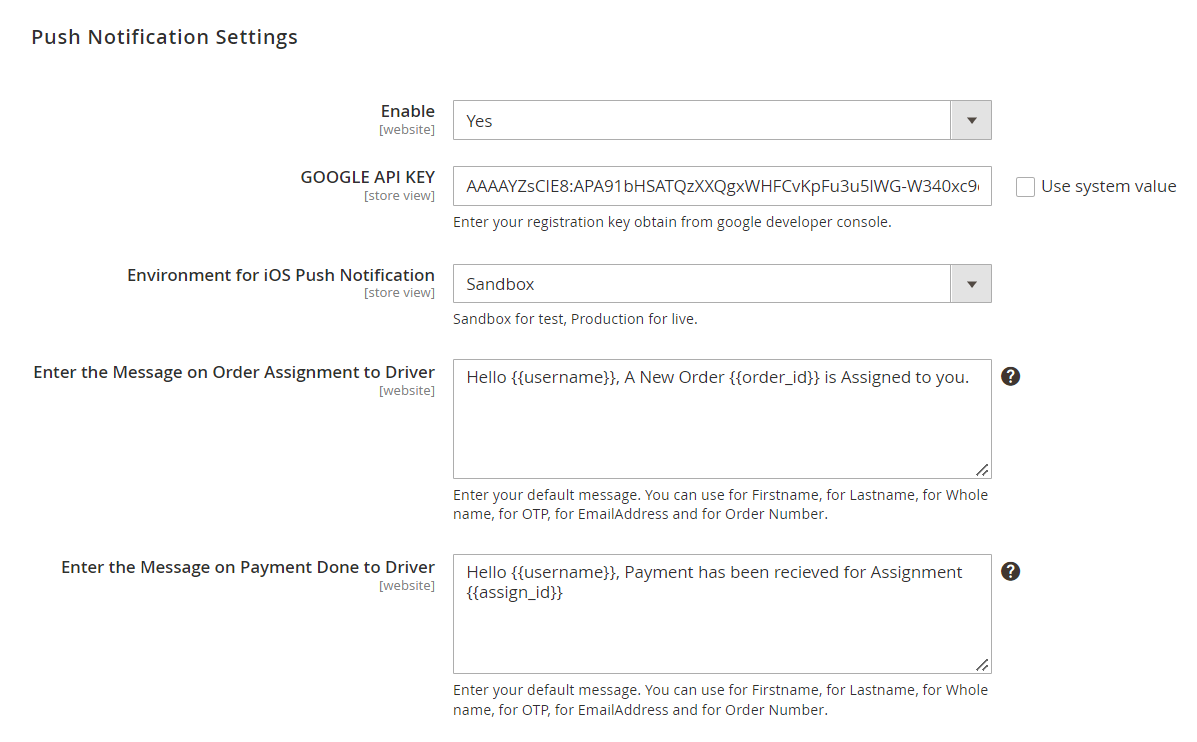
Enable – Enable Push Notification Setting by selecting Yes/No.
GOOGLE API KEY – In the next tab, enter your Google Map key obtained from the Google developer console. For Google API Key, please visit https://developers.google.com/maps/documentation/javascript/get-api-key
Environment for iOS Push Notification – From the dropdown, select Sandbox for the test, and Production for live.
Enter the Message on Order Assignment to Driver – Fill in the message required.
Enter the Message on Payment Done to Driver – Fill in the message required.
WhatsApp Notification Configuration

Enable – Select Yes/No from the dropdown List to enable WhatsApp notification
WhatsApp API URL – Fill URL in this field
WhatsApp Auth Token – The token can be generated using the mentioned link https://developers.facebook.com/docs/whatsapp/cloud-api/get-started
Enable OTP Verification on Delivery Order – Select yes to enable OTP verification
Enter the Message – Enter the message you want to send to the customer.
Enable Message sent to driver – To enable select yes and no to disable.
Enter the message for driver – Enter the message you want to send to the driver.
Admin Notification Configuration
Enable – Select Yes/No from the dropdown List to enable Admin Notification
Enable Notification On Payment Request – Select Yes/No from the given Choice in this field
Delivery Return Setting
Allow Return – To allow the return of any item or order Select Yes/No
Allow Auto Credit Memo -To allow Auto Credit Memo of any item or order Select Yes/No
Delivery Store Pickup
Use Google Map – IF you want to add google Map Select Yes/No from The dropdown List
Store location Feature
Store Location Feature Enable/Disable – Select Yes to enable or no to disable
Hyperlocal Settings
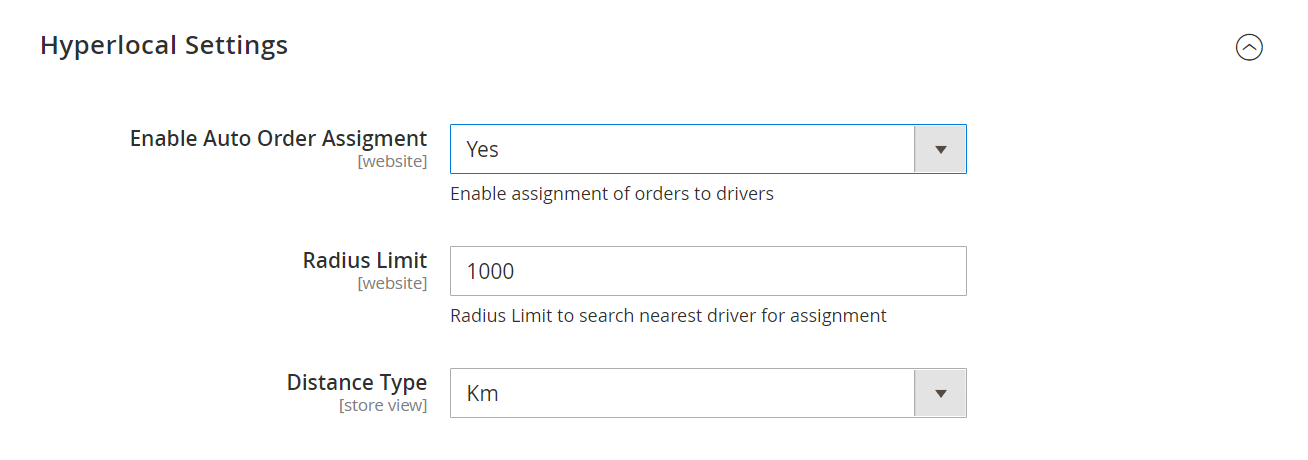
Enable Auto Order Assignment – Select yes/no to Enable the auto-assignment of orders to drivers.
Radius Limit – Fill in Radius Limit to search for the nearest driver for the assignment
Distance Type – Fill the distance in Km or Miles
MobiDelivery Shipping Method

Under Mobidelivery Shipping Method, do the following steps.
- In the Enabled for Checkout list, select Yes.
- In the Title box, enter a name that mentions the shipping method, which is applicable during checkout.
- Method Name – Enter the method name as per the requirements.
- In the Enable Free Shipping Threshold list, select one of the following:
- Enable: On selecting the Enable option, the free Shipping with minimum Order, the Free Shipping Amount Threshold field appears.
Note: It means, on enabling the free shipping with a minimum order, in the Free Shipping Amount Threshold box, the admin has to enter the minimum amount for an order to qualify for the free shipping. - Disable: Mobidelivery shipping is not applicable to any orders.
- Enable: On selecting the Enable option, the free Shipping with minimum Order, the Free Shipping Amount Threshold field appears.
- Free Shipping Amount Threshold – Enter the amount till which you will be providing free shipping
- In the Condition for Handling Fee list, select a method to use to calculate the handling fees. From the list, select the required option.
- Per Order: allows a single handling fee for the entire order.
- Per Package: allows an individual handling fee for each package.
Tips:
-
-
- If the charge is based on the Fixed fee, then enter the amount in decimal value. For example, 4.90.
- If the handling fee is based on the Percent of the order, then enter the percentage value in decimal format. For example, if the charges are six percent of the order, enter .06.
-
- Rates on distance Intervals (in km) Basis – Add specific rates based on the distance here. The distance interval is calculated from 0. Ex- if distance values are 3,5 then the distance range is 0-3, 3-8.
- Distance Threshold – Enter the maximum distance allowed for the shipping method to be applicable.
- Sort Order – Here the admin can specify the sort order. Shipping cost will be displayed at the position specified in the sort order field by the admin at the front end.
- In the Show Method if not Applicable list, select one of the following:
- Yes: Shows this as a shipping method during checkout, even if it is not applicable to the order.
- No: Shows this as a shipping method during checkout, only if it is applicable.
- In the Displayed Error Message box, enter the required message.
Note: A default message appears in the field. Admin can alter the message as per the requirement. This message appears on an unavailability of the selected method.
- Click the Save Config button.


