
Houzz Configuration Settings
After obtaining the API credentials from the Houzz Seller account, the Magento store owner has to paste them in the respective fields displayed on the Houzz Configuration page of the admin panel.
To set up the configuration settings in the Magento Admin panel
- Go to the Magento Admin panel.
- On the top navigation bar, point to the Houzz menu.
The menu appears as shown in the following figure:
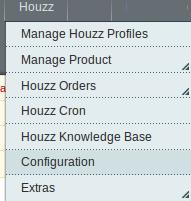
- Click Configuration.
The Houzz Configuration page appears as shown in the following figure:

- Click the Houzz Api Settings tab.
The tab is expanded and the relevant field appears under the Houzz Api Settings section.

- Under Houzz Api Settings, do the following steps:
- In the Enabled list, select Yes to enable the extension features.
The other relevant fields appear as shown in the following figure:
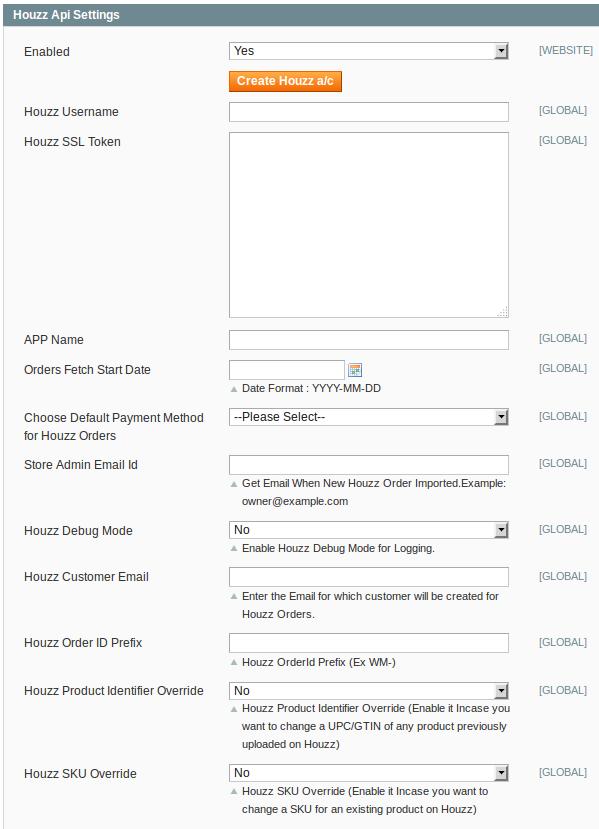
- Click the Create Houzz a/c button.
The admin is redirected to the Sell on Houzz.com link to create a seller account and retrieve API Key Details from the Houzz seller account. Once the API keys are retrieved, the admin has to enter those key values in the respective fields under the Houzz Api Settings section. - In the Houzz Username box, paste the username provided by Houzz.
- In the Houzz SSL Token box, paste the SSL Token provided by Houzz.
- In the App Name box, paste the App name provided by Houzz.
- In the Orders Fetch Start Date box, enter the required date in the YYYY-MM-DD format.
Or
Click the corresponding Calendar icon to select the required date. - In the Choose Default Payment Method for Houzz Orders list, select houzz.com.
- In the Store Admin Email Id box, enter the required email Id.
- In the Houzz Debug mode list, select Yes to start Houzz Integration in the debug mode.
It captures the log for the debug process. - In the Houzz Order ID Prefix box, enter the required prefix value.
For instance, enter HZ- for HZ-10001. - In the Houzz Product Identifier Override list, select Yes to change the UPC/GTIN of any product previously uploaded on Houzz if required.
- In the Houzz SKU Override list, select Yes to change an SKU for an existing product on Houzz if required.
- In the Enabled list, select Yes to enable the extension features.
- Click the Save Config button to save the entered values.
- Click the Houzz Product Global Settings tab.
The tab is expanded and the relevant fields appear under the Houzz Product Global Settings section as shown in the following figure:
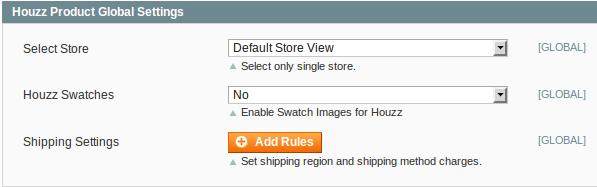
- Under Houzz Product Global Settings, do the following steps:
- In the Select Store list, select the single store.
- In the Houzz Swatches list, select Yes to enable Swatch Images for Houzz.com.
- Click the Add Rules button next to the Shipping Settings field to set the shipping region and shipping method charges.
The Grid appears as shown in the following figure:

- In the Enabled list, select Yes to enable the rule.
- In the Region list, select the required region.
- In the Method list, select the required method.
- In the Magento Attribute Code list, select the required code.
- Click the Add Rules to add more rules if required.
- To delete the rule, click the corresponding Delete button.
- Click the Save Config button to save the entered values.
- Click the Houzz Product Advanced Price Settings tab.
The tab is expanded and the relevant fields appear under the Houzz Product Advanced Price Settings section as shown in the following figure:
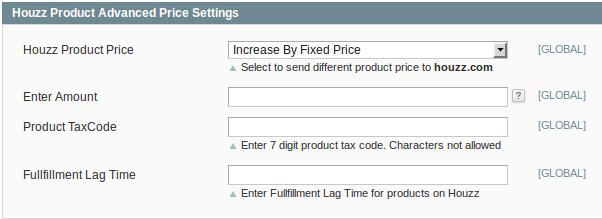
- Under Houzz Product Advanced Price Settings, do the following steps:
- In the Houzz Product Price list, select one of the following options:
- Increase by Fixed Price: If selected, then the Enter Amount field appears.
- Increase by Fixed Percentage: If selected, then the Enter Percentage field appears.
Enter the numeric value to increase the price of the Houzz, product price by the entered value % of Magento price
For Example,
Magento price + 5% of Magento price.
Magento Price = 100
Select Increase By Fixed Percentage option
Enter Percentage = 5
100 + 5% of 100 = 100 + 5 = 105
Thus, Houzz Product Price = 105 - Decrease by Fixed Price: If selected, then the Enter Amount field appears.
- Decrease by Fixed Percentage: If selected, then the Enter Percentage field appears.
Enter the numeric value to decrease the price of the Houzz product price by the entered value % of Magento price
For Example,
Magento price – 5% of Magento price.
Magento Price = 100
Select Decrease By Fixed Percentage option
Enter Percentage = 5
100 – 5% of 100 = 100 – 5 = 95
Thus, Houzz Product Price = 95
- In the Product TaxCode box, enter the 7 digit product tax code.
- In the Fulfillment Lag Time box, enter the required value.
Enter the numeric value for the fulfillment lag time in number of days or in minutes as required.
- In the Houzz Product Price list, select one of the following options:
- Click the Save Config button to save the entered values.
- Click the Houzz inventory rules tab.
The tab is expanded and the relevant field appears under the Houzz inventory rules section as shown in the following figure:

- Under Houzz inventory rules, do the following steps:
- In the Send Inventory on the Basis of Threshold list, select Yes to send the inventory based on the threshold.
Note: Only when the admin selects Yes, the other fields appear. Threshold Inventory is the minimum count of an item that the store owner wants to keep in stock.
The section appears as shown in the following figure:
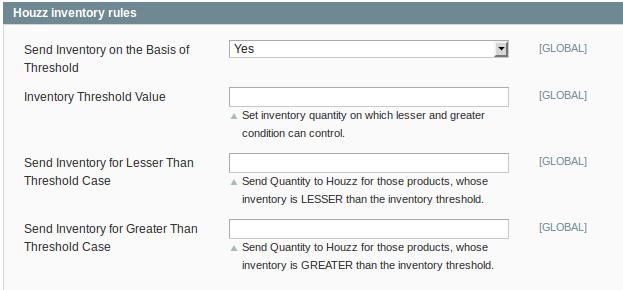
- In the Inventory Threshold Value box, enter the required value.
- In the Send Inventory for Lesser Than Threshold Case box, enter the required value.
- In the Send Inventory for Greater Than Threshold Case box, enter the required value.
- In the Send Inventory on the Basis of Threshold list, select Yes to send the inventory based on the threshold.
- Click the Save Config button to save the entered values.
- Click the Cron Settings tab.
The tab is expanded and the relevant field appears under the Cron Settings section as shown in the following figure:
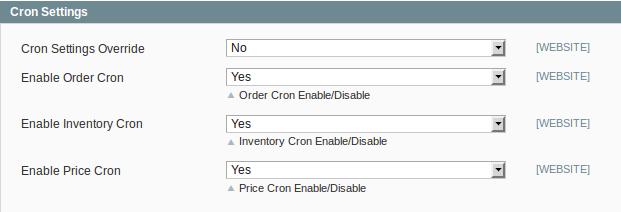
- Under Cron Settings, do the following steps:
- In the Cron Settings Override list, select Yes to enable the cron settings.
Note: Only when the admin selects Yes, the Order Cron, Product Inventory Update Cron, and Product Price Update Cron fields appear as shown in the following figure:
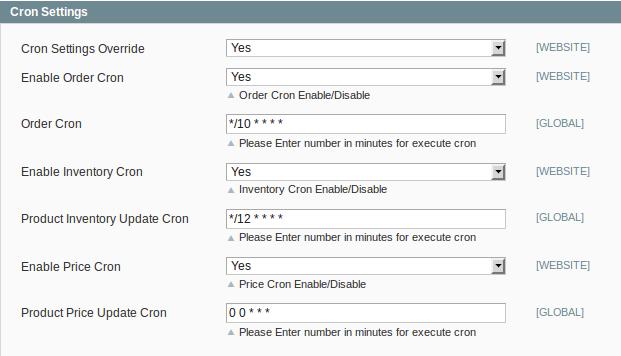
- In the Enable Order Cron list, select Yes to enable the order cron.
- In the Order Cron box, enter the required value in minutes to execute the Order cron.
- In the Enable Inventory Cron list, select Yes to enable the order cron.
- In the Product Inventory Update Cron box, enter the required value in minutes to execute the Inventory cron.
- In the Enable Price Cron list, select Yes to enable the order cron.
- In the Product Price Update Cron box, enter the required value in minutes to execute the Price cron.
- In the Cron Settings Override list, select Yes to enable the cron settings.
- Click the Save Config button.
×


